mGBA Tutorial
- About mGBA
- Should you use mGBA?
- Installation
- Setting up the keyboard
- Setting up a gamepad
- Loading a game
- Fullscreen
- Screen filters
- Save states
- Fast forward
- Cheats
- Capturing screenshots
- Finding ROMs
- Patching ROM hacks
- Q: How can I link roms to trade Pokemon?
- Q: Cheat codes aren't working in Pokemon!
- Q: My gamepad doesn't work with mGBA!
- Q: mGBA isn't saving anything!
View this guide on Google Docs to:
- Save as PDF or any common doc format
Share
About mGBA
This tutorial is to help you with mGBA on Windows. This is a Game Boy Advance and Game Boy Classic/Color emulator. mGBA was born in 2014. It's focused on being fast enough to run on lower end hardware than other emulators support. It doesn't want to sacrifice accuracy or portability.
*If you would like to download mGBA, go to their homepage. I also have it on my emulators page. It's easier from my website because I have it in a zip file while the official site has it in a 7Z file.
Should you use mGBA?
With all the emulator offerings as of 2026, should you use mGBA? Yes, absolutely. Currently, mGBA is the #1 emulator for Game Boy Advance. VisualBoyAdvance-M (Visual Boy Advance) used to be the top emulator. It is no longer recommended. Most importantly, VisualBoyAdvance-M is not a cycle-accurate emulator, while mGBA is.
RetroArch, a popular multi-system emulator, is another great option for Game Boy Advance emulation. It bundles GBA emulation with 40+ other video game systems. In the GBA category, it has cores for mGBA, VBA (Visual Boy Advance), and others. ('Cores' are what an emulator inside a multi-system emulator are called.)
Installation
When you go to download mGBA from the official website, you're going to see the following download links:
- Windows (portable .7z archive)
- Windows (installer .exe)
- Windows (64-bit, portable .7z archive) < Recommended
- Windows (64-bit, installer .exe)
So which do you download?
64-bit vs. 32-bit
All modern computers are 64-bit, so just focus on the downloads marked with 64-bit. Older computers are 32-bit. mGBA's 32-bit downloads are “Windows (installer .exe)“ and “Windows (installer .exe)”, which do not state 64-bit. If you want to confirm if your computer is 64-bit or 32-bit, YouTube has videos showing you how to check.
.7z archive? What's that?
7z is a compression format like 'zip'. You can extract 7z files with 7-Zip (it's free). If you need help extracting 7z files with 7-Zip, here are some help videos.
Portable vs. installer
The “Windows (64-bit, .7z archive)” download is the 'portable' version. This is how most emulators are: to 'install' the emulator, you simply extract it. The installer version (“Windows (64-bit, installer .exe)”) has an install wizard. The install wizard walks you through installing mGBA onto the C: drive. If you're not too computer savvy, I suppose the installer would be easier for you. But yet, I recommend the portable version. It lets you keep mGBA and the ROMs all in one location.
There's an important detail you need to remember with either version:
- With the portable version, mGBA must be placed in a common folder on your computer. I recommend Documents, Downloads, or create a folder on your desktop. You could place your GBA ROMs in mGBA's folder as well. To open mGBA, double-click on

- With the installer version, your GBA ROMs for mGBA must be placed in a common folder on your computer. I recommend Documents, Downloads, or create a folder on your desktop. Don't place them in mGBA's folder! To open mGBA, you can find it in your Windows start menu.
Installing a portable emulator
I made this quick video showing you how to 'install' a portable emulator. It shows Snes9x, but mGBA is the same process. It's pretty straight-forward - all that you're doing is extracting a zip file while doing a little bit of folder management. If you want to 'uninstall' a portable emulator, simply delete it!
In the video, I'm recommending “Documents” to house your emulators. But, you could also place emulators in “Downloads”, a folder on your desktop, an external HDD, or a thumb drive. These are common locations with full read/write access.
Setting up the keyboard
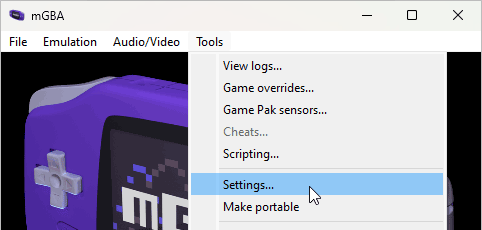
- Click on Tools > Settings, as shown below:
- You'll arrive at the Settings window. Click on Keyboard to arrive at the screen below:
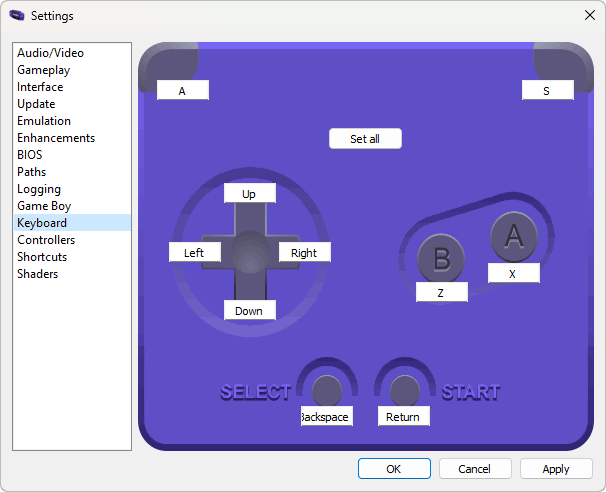
- To reconfigure a keyboard key, click on the white field and press the new keyboard key you want it set to. Repeat the process for all buttons you want to be changed. Click OK when you're done.
- Optionally, you can click on Shortcuts to explore the emulator shortcut keys available for mGBA. You can reconfigure them as well to different keyboard keys (or gamepad buttons).
Setting up a gamepad
- Click on Tools > Settings, as shown below:
- You'll arrive at the Settings window. Click on Controllers to arrive at the screen below:
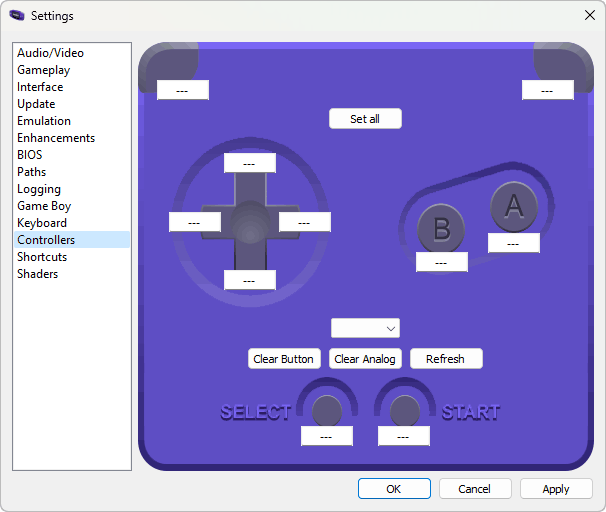
- To reconfigure a gamepad button, click on the white field and press the new gamepad button you want it set to. Repeat the process for all buttons you want to be changed. Click OK when you're done.
- Optionally, you can click on Shortcuts to explore the emulator shortcut keys available for mGBA. You can reconfigure them as well to different gamepad buttons (or keyboard keys).
Loading a game
In the installation section, I explained the difference between the portable version and installer version of mGBA. If you are using the portable version, it doesn't matter where you put your games (I recommend somewhere in Documents). If you are using the installer version, place your games in a common folder such as Documents - don't place them in mGBA's folder!
To load a game:
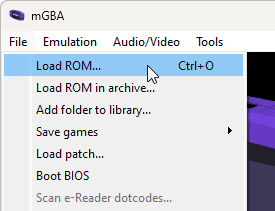
- Click on File > Load ROM.
- The “Select ROM” window will pop up. Initially, it'll show the folder where mGBA resides. If you placed your games elsewhere, navigate to that folder. Click on the game you want to play, then click Open - as shown here .
- The game will begin playing immediately.
Fullscreen
Once a game is loaded, you can enter/exit fullscreen by pressing Alt+Enter.
Screen filters
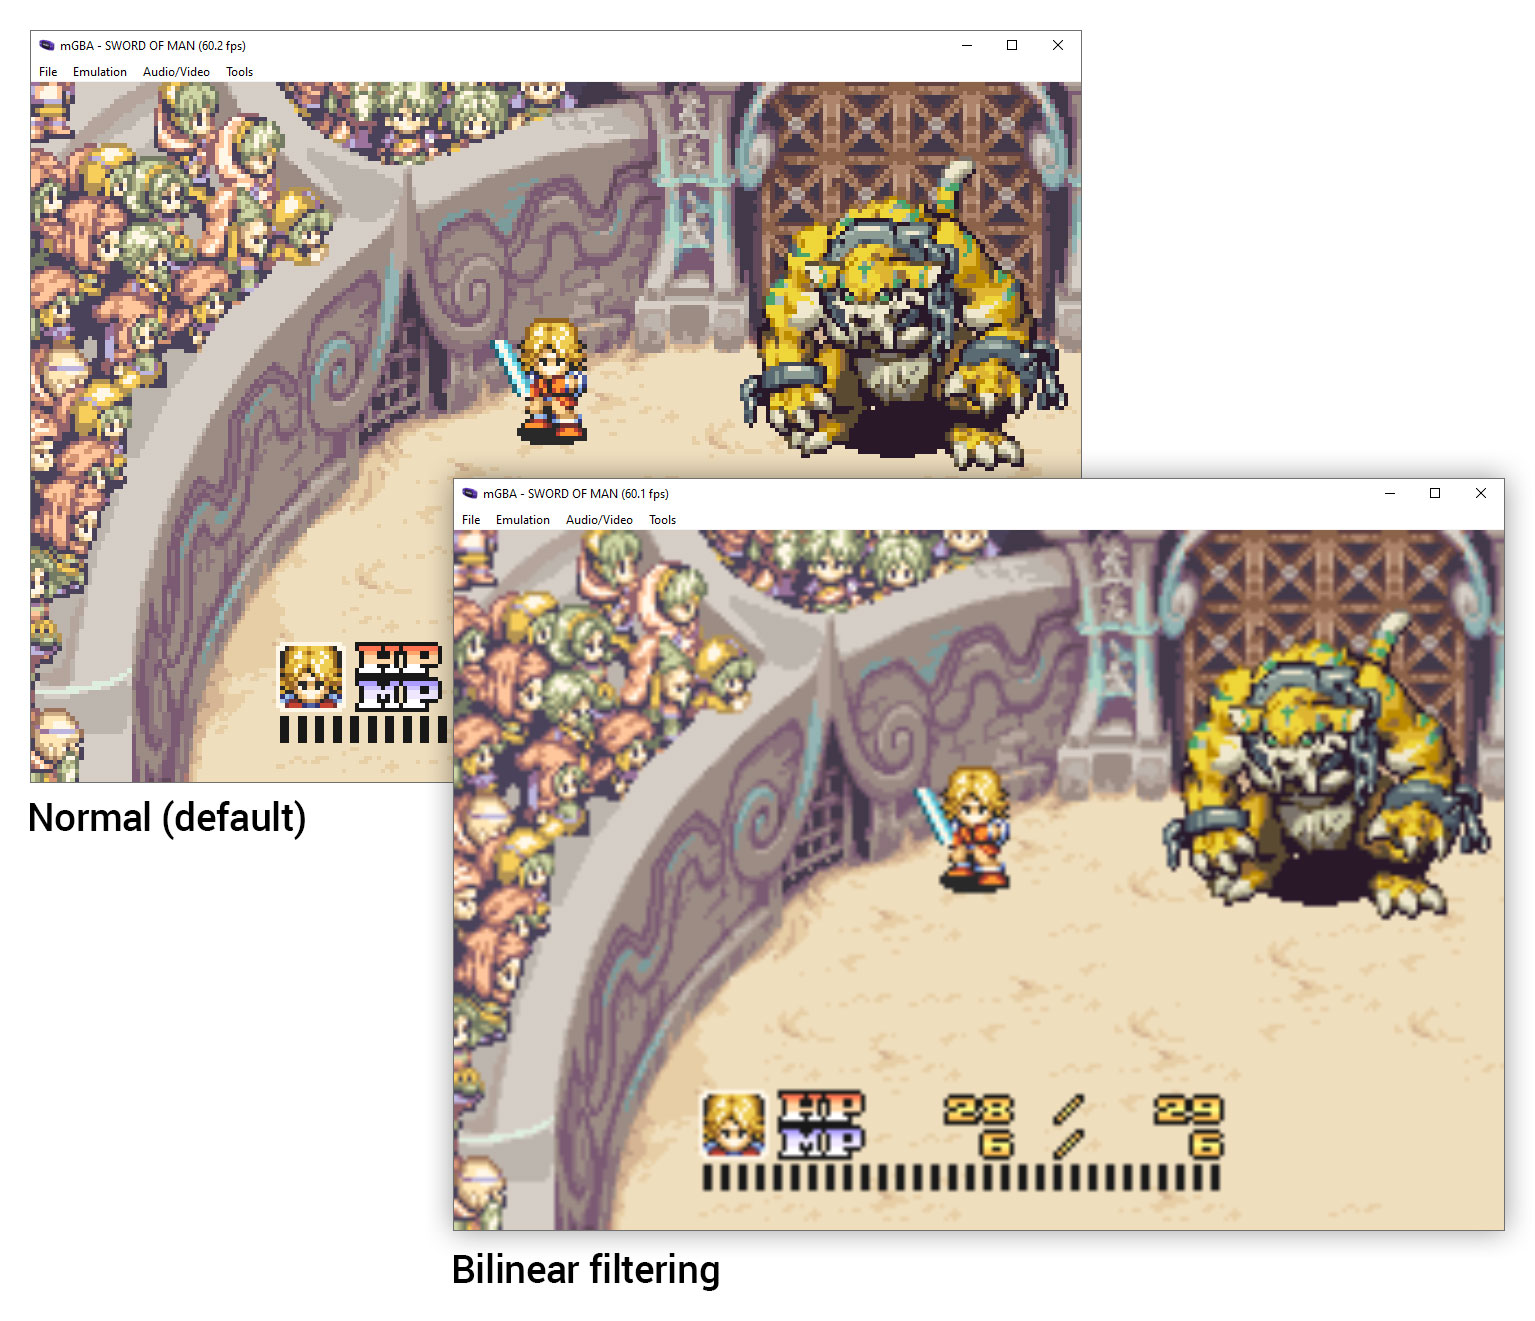
mGBA doesn't offer fancy screen filters like most emulators do. You only have one filter option: bilinear filtering. It's just a simple blur. You can enable it by going to Audio/Video > Bilinear filtering. See below for a before & after with this filter enabled.
Save states
Save states is a feature that saves the exact spot you are in any game. You can use this feature manually by going into the File menu or by quick keyboard shortcuts.
There's one detail about save states with mGBA that can be confusing. There are two types of them. You have quick saves and regular save states.
Quick saves
If you want instant gratification, quick saves are the instant saving you want.
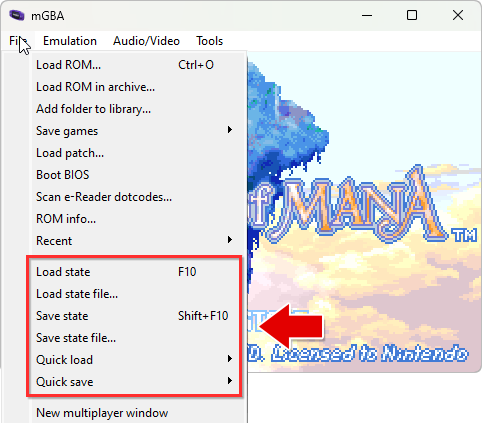
- Capturing a quick save: To capture a quick save go to File > Quick save and choose a slot, as shown here . mGBA lets you save up to 9 different quick saves (9 different slots). The keyboard shortcut for saving a quick save in slot 1 is Shift+F1.
- Loading a quick save: To load a quick save that you previously saved, go to File > Quick Load and choose the slot of the save you want to load (if you remember which one it is). The keyboard shortcut for loading a quick save from slot 1 is F1.
Regular save states
These saves require an extra step but provide you with a visual thumbnail gallery of your saves.
- Capturing a save state: To capture a save state go to File > Save state. You'll arrive at the save state thumbnail gallery . Click on the thumbnail square where you want your save to be. That's it; you'll be taken back to your game. The keyboard shortcut for saving a state is Shift+F10.
- Loading a save state: To load a save state that you previously saved, go to File > Load state. The save state thumbnail gallery appears. Click on the thumbnail you want to load. That's it; your game will immediately play from your saved state. The keyboard shortcut for loading a save state is F10.
Note: Save states are different from internal saves

If you're new to emulation, I might be leading you to think that save states are what you're supposed to be using with mGBA to save your progress. All video game emulators (not just mGBA) offer two ways to save your progress: internal saving and save states. Internal saving is when you arrive at a save point within the game, to save your progress as if you're using a real Game Boy Advance. You can use either internal saving or save states to save your progress. I recommend using both methods so that you always have a backup.
If you opted to use internal saving, remember that you load that save from within the game when you arrive at the title screen (like on a real Game Boy Advance). You don't load an internal save from the File menu. Only save states can be saved & loaded from the File menu.
Also note: All the RPG shrines in my FantasyAnime.com offer complete collections of periodical game saves. With them, you can continue at any significant point in the game. I offer a Game Saves Tutorial where you can learn more about how to use somebody else's saves. You can also learn about how to transfer saves between other emulators.
Fast forward
Fast forward is the feature that speeds up the game. To access it:
- Temporary fast forward: Press and hold the Tab key. When you want the fast forward to end, release the Tab key.
- Persistent fast forward: Press the Shift+Tab keys to enable a persistent fast forward. When you want it to end, press the Shift+Tab keys again. This feature can also be accessed via the Emulation menu
Also, you can customize the speed of fast forward by going to Emulation > Fast forward speed - as shown here .
Cheats
mGBA lets you cheat using your favorite GameShark, Pro Action Replay, or CodeBreaker codes. The process of entering codes can be confusing. Although confusing, a valuable bonus is that mGBA lets you enter multiple codes at once. Most other emulators only let you enter one line at a time.
For these directions I'm going to walk you through entering the 9-line GameShark code that enables the complete Pokedex in Pokemon Emerald:
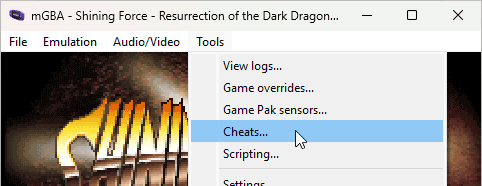
- Load the game you want to cheat with. Then go to Tools > Cheats:
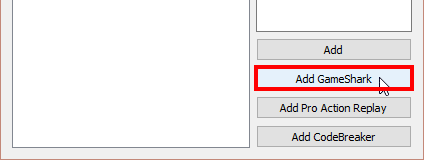
- Click on Add GameShark:
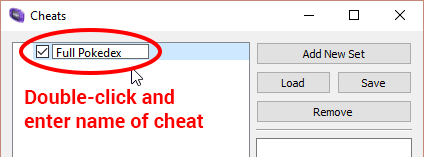
- You'll see an “Untitled” checked item appear in the white area. Double-click on it to enter the name of the code:
- Paste the GameShark code into the box shown below, then click Add.
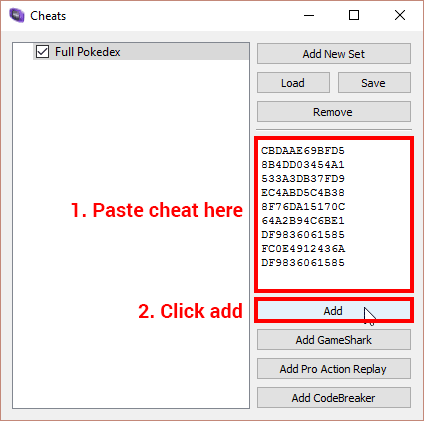
- The GameShark cheat is added. You can click the drop-down arrow to view the code to ensure it's there. Lastly, close this window and restart your game for the code to take effect.
If you followed these directions and your cheats still aren't working, it could be either you overlooked a step or the codes themselves are ineffective. Make sure you're grabbing the correct codes for the correct version of the game. You could also try reading this.
Finding cheats: Use Google. The best search keywords to use is to type the name of the game then “pro action replay” or “gameshark”. For example: “pokemon ruby pro action replay”. For Pokemon cheats specifically, Pokemon Coders is the best site.
Capturing screenshots
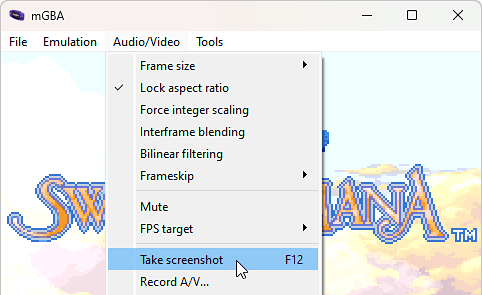
Go to Audio/Video > Take screenshot (as shown above), or press the F12 key. By default, mGBA will drop the screenshot into the same directory where your video game ROM resides. It will save the screenshot as a PNG image.
Finding ROMs
In my links page, I have some good links to sites where you can download ROMs. If you want to try to find more sites than what's in my collection of links, just Google around. For example, if you want to download Advance Wars just Google “download advance wars gba”.
Patching ROM hacks
Learn all about patching ROMs with ROM hacks in my Patching Tutorial. Note that the best place to find ROM hacks is Romhacking.net.
Q: How can I link roms to trade Pokemon?
mGBA has the ability to link the data of two Pokemon ROMs to trade Pokemon. You can find videos on YouTube that walk you through this process.
I haven't done this myself, but from reading comments online, this process sounds quite frustrating and error-prone. Most people can't seem to get it to work. If you want my opinion, I think it's far easier to just use GameShark cheats to achieve bringing certain Pokemon into your collection. I recommend Pokemon Coders for finding the best Pokemon cheat codes & hacks.
Q: Cheat codes aren't working in Pokemon!
People have reported having a great deal of trouble getting cheats to work specifically with the Pokemon games. If you read the section on using cheats and you're still unable to get cheats to work, check out this article at Pokemon Coders: How to Fix Not Working and Glitchy Cheats for Pokemon GBA Games.
Q: My gamepad doesn't work with mGBA!
There isn't any way to troubleshoot a gamepad (or controller) with mGBA. The gamepad either works or it doesn't. Any issues you encounter are the fault of your gamepad. Therefore, your gamepad needs to be troubleshooted. I offered some general troubleshooting guidance in the gamepads guide.
Q: mGBA isn't saving anything!
Firstly, are you using the portable version of mGBA or the installer version? In the installation section, I explained the difference between the two.
If you're using the portable version
Are you finding that you have all of the following problems?
- Save states aren't working. You save a state, then when you try to reload it nothing happens.
- In an RPG when you save your game at a save point and close/re-open mGBA, you find that the save is lost.
- Emulator configurations that you changed aren't saved. When you close/re-open mGBA, you have to make those configuration changes again.
Then your problem is that you currently have mGBA in a read-only location on your computer. You must move mGBA to a more common location such as Documents, Downloads, or a folder on your desktop.
If you're using the installer version
mGBA is on your C: drive. Did you place your GBA games there? If you did, that's why you're having saving issues. Your GBA games must be in a common location such as Documents, Downloads, or a folder on your desktop.