ePSXe Tutorial
- About ePSXe
- Should you use ePSXe?
- Installation
- Intro to plug-in system
- BIOS & plug-ins
- Setting up BIOS, video, & audio
- Setting up the keyboard or gamepad
- Loading a PSX ISO
- Loading a PSX game CD
- Q: I always get a black screen!
- Q: I get 'Recompile block too large' error!
- Full screen
- CD swapping for multiple-CD games
- Dumping your PSX games to ISO
- Pausing/exiting games
- Save states
- Memory card: copying/moving/deleting saves
- Memory card: cdrom not found error
- Fast forward
- Using cheats
- Game Troubleshooting
- Finding PSX ISOs
- Q: I keep getting 'ePSXe.exe has stopped working'!
- Q: My game is running way too fast!
- Q: My game keeps freezing!
- Q: When I close ePSXe it doesn't close completely!
- Q: I'm getting a “zlib.dll is missing” error!
- Q: How can I use GME saves with ePSXe?
- Q: ePSXe doesn't enter fullscreen! It centers the window instead!
- Q: Can I transfer my memory card file to another PSX emulator?
- Q: ePSXe isn't saving anything!
View this guide on Google Docs to:
- Save as PDF or any common doc format
Share
About ePSXe
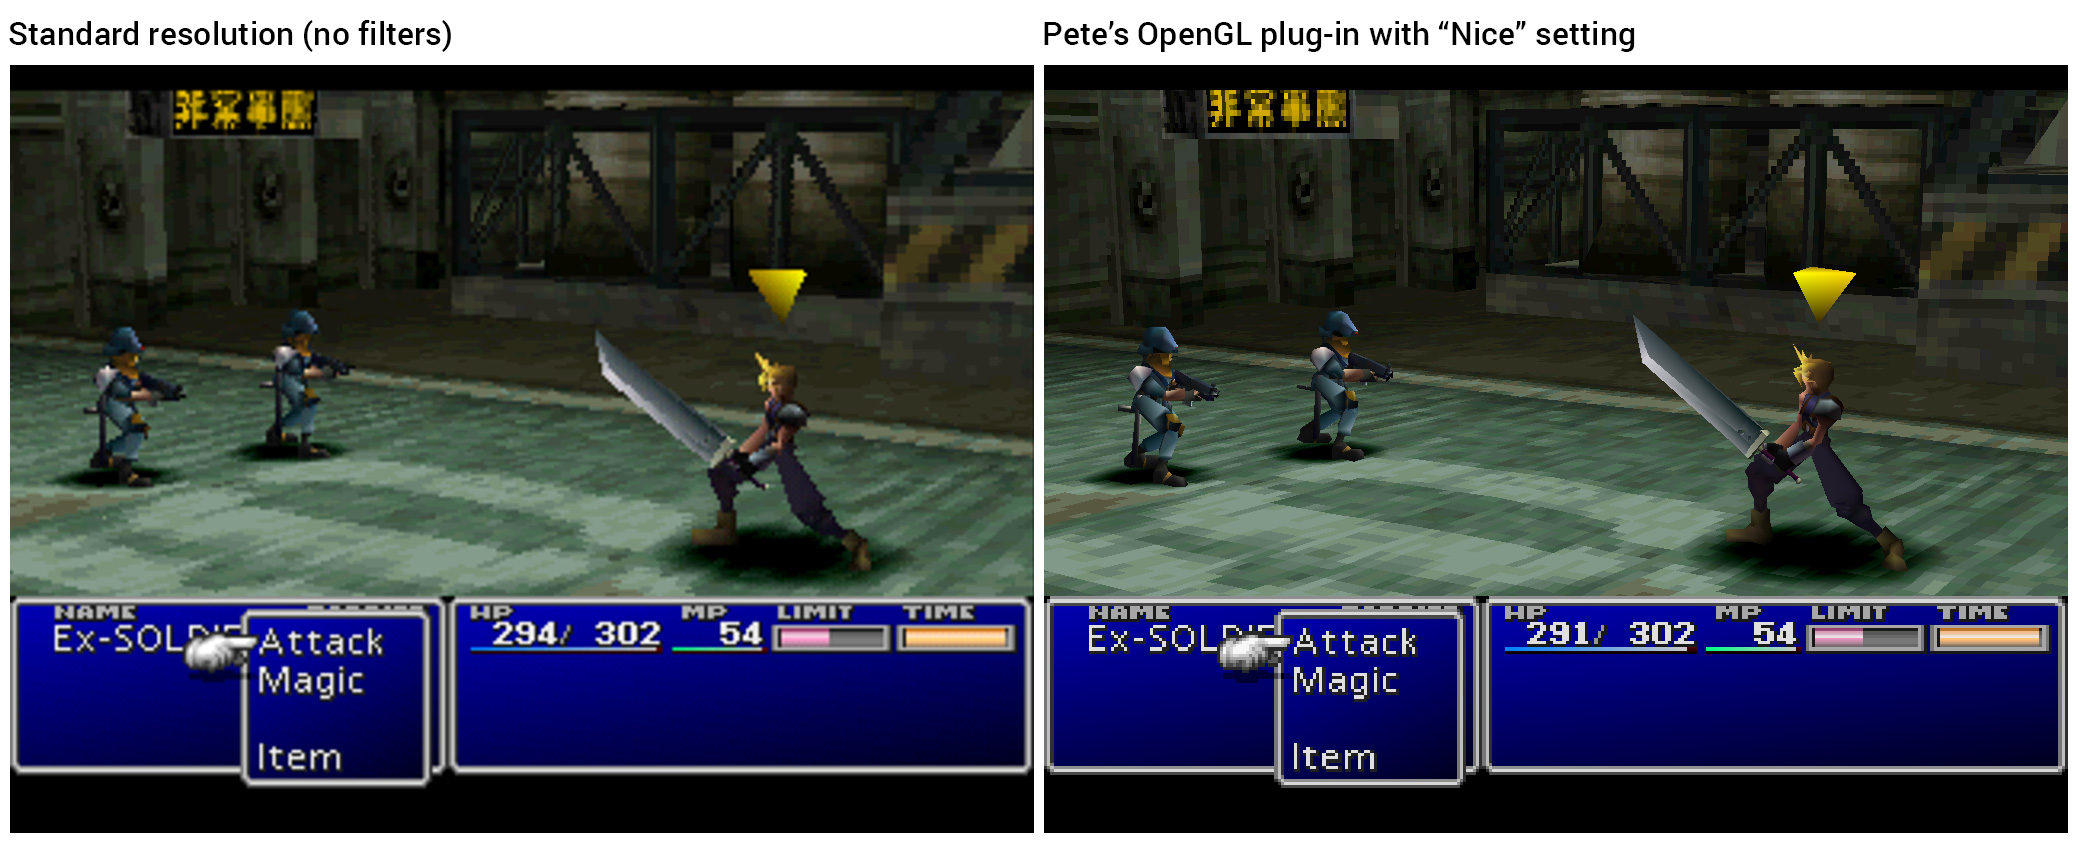
This tutorial is to help you with ePSXe for Windows. For nearly two decades since the 2000s, ePSXe was considered the #1 PlayStation 1 emulator. Most games emulate flawlessly. You can play games via the CD-ROM or via ISO. It's a plug-in based emulator, meaning ePSXe is nothing but a shell. It's your job to collect and configure the plug-ins that control video and audio. With Pete's OpenGL plug-in (and others), ePSXe can render 3D graphics sharper than the real thing! See for yourself:
*If you would like to download ePSXe, I have it on my emulators page.
Should you use ePSXe?
With all the emulator offerings as of 2026, should you use ePSXe? Well, I do not recommend ePSXe. DuckStation is currently the #1 emulator. Another great option is RetroArch, a multi-system emulator that supports over 40 systems. Both DuckStation and RetroArch offer superb PlayStation 1 emulation. They don't use a plug-in system, so you don't have to bother with plugins to set everything up. They can also correct 3D gittery and distorted textures . Just like ePSXe, DuckStation makes it easy to swap discs for multiple-CD games. RetroArch, however, is a hassle when it comes to swapping discs.
I no longer have any reason to recommend ePSXe. It's not a bad emulator, but it hasn't been updated since 2016. DuckStation and RetroArch, which are new and in active development, have clearly surpassed ePSXe. I'm keeping this tutorial around for those of you who still want to use ePSXe, but I urge you to move on to modern PS1 emulators.
Installation
ePSXe is a standalone program, so it does not have an install wizard. Installation is simple: just extract ePSXe from its zip file. To make things clearer, check out the video below that shows how to 'install' a portable emulator (it shows Snes9x, but ePSXe is the same process). It's pretty straight-forward - all that you're doing is extracting a zip file while doing a little bit of folder management. If you want to 'uninstall' a portable emulator, simply delete it!
In the video, I'm recommending “Documents” to house your emulators. But, you could also place emulators in “Downloads”, a folder on your desktop, an external HDD, or a thumb drive. These are common locations with full read/write access.
To open ePSXe, double-click on ![]()
Intro to plug-in system
PlayStation 1 emulation revolves around the plug-in system. The same system used by PlayStation 2 and N64 emulators. PlayStation emulators are merely the shell of the operation. It's your job to gather the plug-ins for each component of emulation. Those components are:
- a graphic plug-in (also called video)
- a sound plug-in
- a CDR plug-in (also called cdrom)
- the PlayStation BIOS
They need to be set up the first time you open ePSXe. Each plug-in comes with a whole bunch of useful customizable features. You can download the PlayStation plug-ins from any major emulation site. If you don't feel like looking around, you can just download them below.
BIOS & plug-ins
The PlayStation 1 BIOS is required in order to boot games. This is a separate download after you've downloaded ePSXe. Below you can download this BIOS as well as a collection of the best plug-ins.
- PlayStation 1 BIOS (236 KB). Download by right-clicking the download link and go to Save Link As. When saving, rename the “_ip” file extension to “zip”. If you don't see the file extension, try showing them. I also made this GIF animation to show you how to change the file extension.
- ePSXe plug-ins Collection (1.39 MB) - Contains all the best plug-ins! Here's a breakdown of what they are:
- cdrPeops.dll - This is the CD-ROM plug-in. CD-ROM drives aren't really used anymore so this plug-in is optional.
- DFSound.dll (Recommended!) - This is the best audio plug-in.
- Make sure you're using the latest version of Chrome. For some reason, previous versions of Chrome in early 2020(?) would auto-delete DFSound.dll from my zip file upon download. They fixed this issue.
- gpuPeopsSoft - This is a video plug-in. This plug-in is ideal for people with slower/older computers.
- gpuPeteD3D.dll, gpuPeteDX6D3D.dll, gpuPeteOpenGL.dll, gpuPeteOpenGL2.dll - These are the video plug-ins that render the 3D graphics according to a specified resolution (as explained in About ePSXe). Pete's OpenGL plug-in is the best of this trio.
- gpuPeopsOpenGL.dll (Recommended!) - Same as the above plug-ins, except this is the best and most advanced plug-in.
- spuEternal.dll - This is the second best audio plug-in. It's friendlier for slower/older computers.
- spuEternalL.dll - This is just a supporting file for spuEternal.dll.
Continue reading below for what to do next after you download the BIOS and these plug-ins.
Setting up BIOS, video, & audio
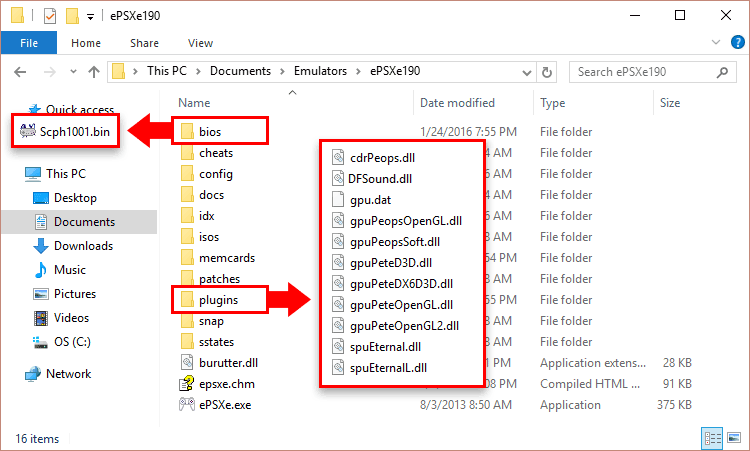
After you download the BIOS and plug-ins, extract them from their zip files. Organize them into ePSXe's folder as shown above. Move the PlayStation 1 BIOS (“Scph1001.bin”) into the “bios” folder. Then move the plug-ins into the “plug-ins” folder.
Configuring the BIOS
- Go to Config > Bios, as shown here .
- You'll arrive at the “Config Bios” window. Click on the Select button, as shown here .
- The “Select PSX BIOS” window pops up. You'll see “Scph1001.bin” (the PlayStation 1 BIOS file). Click on it, then click Open, as shown here .
- That's it! In the “Config Bios” window click OK.
Configuring video
- Go to Config > Plugins > Video, as shown here.
-
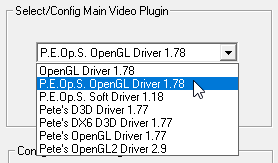
You'll arrive at the “Config Video” window. Click on the drop-down selection under “Select/Config Main Video plug-in”. Then select P.E.Op.S. OpenGL Driver, as shown here . Later you can play around with the other plug-ins, but for now, I recommend Pete's OpenGL Driver. It's the best and most compatible.
- Next, we need to configure the plug-in. Click on the Configure button below it - this one .
-
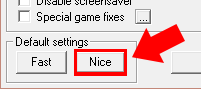
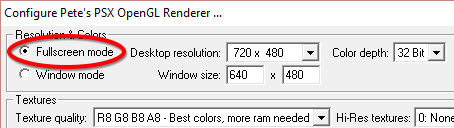
The “Configure Pete's PSX OpenGL Renderer” window pops up. As you can see there are many options here, and it can be intimidating to look at this for the first time. Fortunately, you don't need to bother with any of it. All you need to do is click on the Nice button, then click OK, as shown here.
- That's it! In the “Config Video” window click OK.
Configuring audio
-
Go to Config > Plugins > Sound, as shown here .
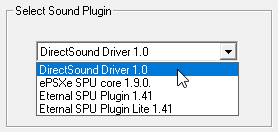
- You'll arrive at the “Config Sound” window. Click on the drop-down selection under “Select Sound plug-in”. Then select DirectSound Driver, as shown here . If you're using a slower/older computer, Eternal SPU might run better for you than DirectSound.
- Next, we need to configure the plug-in. Click on the Configure button below it - this one .
- In the configuration window, look in General settings > Mode. By default, the DirectSound plug-in is set to “Use SPUasync (must be supported by the emu)”. This SPUasync option is a CPU hog and will most likely result in poor quality scratchy audio. That's easily remedied by selecting High compatibility mode instead, as shown here.
- That's it! Click OK.
Setting up the keyboard or gamepad
- Click on Config > GamePads > Port 1 > Pad 1, as shown here .
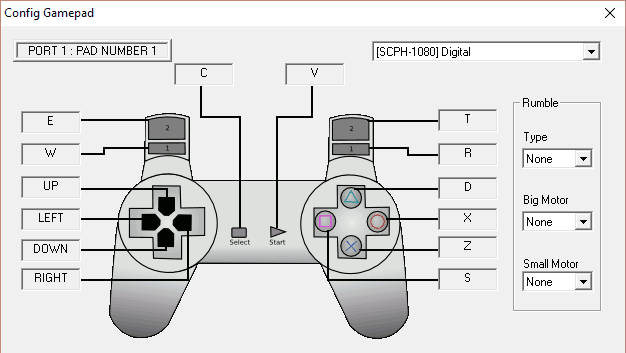
- You'll arrive at the “Config Gamepad” window for the primary controller. This window tells you which keyboard key is associated with which button on the PlayStation 1 controller. As indicated in this screen shot , click on the field for the button you want to reconfigure. Then press the keyboard key or gamepad button you want it changed to.
- Repeat the process until all desired buttons are customized. Click OK when you're done.
*If ePSXe isn't detecting your keyboard, restart your computer and try again.
Loading a PSX ISO
- Downloaded PlayStation 1 ISO's typically come in a ZIP, RAR, 7Z, or ECM file. The first step is to extract it. To extract a RAR or 7Z file you can use 7-Zip (it's free). To extract an ECM file watch this video.
- Using 7-Zip is easy. Just right-click the RAR or 7Z file and go to 7-Zip > Extract Here, as shown here .
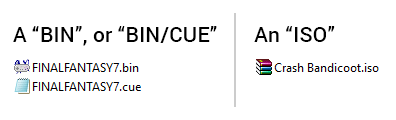
- Once the ISO is extracted, now take notice of the file format of the ISO. ePSXe ONLY supports ISO files that are in *.iso or *.bin format. Here's a visual example of how they look like (the icons will look differently):
- If the PSX game you downloaded is in CHD format, that is not supported by ePSXe. CHD became a popular format for PS1 games in the early 2020s. ePSXe hasn't been updated since 2016, so it never updated to support CHD.
- If the PSX game you downloaded came in a weird format such as NRG, IMG, UIF, DAA, CDI, XBX, B51, BWI, etc. - they are not supported. I recommend trying to find your game(s) in ISO or BIN format.
-
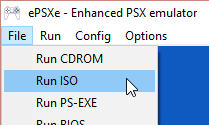
Go to File > Run ISO. Look through your computer for your ISO and load it as if you were loading a ROM. That's it! The game may not load immediately so give it a minute or two. Refer to troubleshooting if you're having problems.
Loading a PSX game CD
Firstly, I do not recommend using real PlayStation 1 game CDs with ePSXe (or any other PSX emulator). The process is prone to have problems and you will experience slow loading times. Rather, what I do recommend is ripping your PlayStation 1 game to a “BIN/CUE” ISO. There is plenty of space on your hard drive for it. Plus it's good to have a digital backup of your game, just in case your physical copy gets lost or broken.
Anyway, if you really want to play your PlayStation 1 game with ePSXe:
- The CDR plug-in needs to be set. If you downloaded my plug-ins collection it includes a CDR plug-on. The “Setting up BIOS, video, & audio” section of this guide explains how to setup a plug-in. You just go to Config > Cdrom and select the CDR plug-in.
- To load a game: insert the game CD into your CD-ROM drive. In ePSXe go to File & Run CDROM. That's it! Oh, and don't expect the game to load immediately; give it a minute or two.
Q: I always get a black screen!
Upon loading any game in ePSXe, you might get just a black screen. There are a few troubleshooting methods you can try to resolve this.
Attempt #1 - Wait a minute
Games don't always load instantly. Sometimes you have to wait a minute for it to come up. Still get a black screen? Try the next attempt.
Attempt #2 - CPU Overclocking
The latest version of ePSXe is known to have black screen issues. You can fix this by going to Options > CPU overclocking > x1. Still get a black screen? Try the next attempt.
Attempt #3 - Try a different video plug-in
It could be the video plug-in. Try a different video plug-in, or try different settings with your current video plug-in. Still get a black screen? Try the next attempt.
Attempt #4 - Edit the registry
Do this step if ePSXe once worked, but now all games are giving the black screen. So deleting ePSXe from the Registry Editor might fix the black screen problem. This won't mess anything up on your computer. All that this process does is revert ePSXe back to default.
- On Windows 10/11, in “Search the web and Windows” type “regedit” and click on regedit, as shown here . On older versions of Windows, click on Start > Run, type “regedit”, and press Enter.
- You'll be prompted with “Do you want this app to make changes to your PC?”. Click Yes.
- In regedit, click the notch next to SOFTWARE to expand it. Under it, look for “epsxe”. Right-click it and click Delete, as shown here .
- Close Registry Editor and restart ePSXe. You’ll need to set all the plug-ins up again.
Q: I get 'Recompile block too large' error!
Upon loading a game in ePSXe, you receive the following error:
Recompile block too large
Try the following:
- Make sure the file format of your game is BIN or ISO. If it's not in those file formats, then that's why it's not working. I talk more about this here.
- If the game is in a ZIP, RAR, or 7Z archive, you must extract it before playing. I talk more about this here.
- Still getting the error? It would seem your game (your ISO) is corrupt. There are a number of reasons that could have caused this. The most likely reason is maybe it didn't download completely. Try downloading the game again or download it from another website.
Full screen
ePSXe doesn't have a full screen keyboard shortcut. To bring games to full screen you need to set it in the video plug-in. Here are directions to enable it when using Pete's video plug-in:
- If you have a game running, you need to close ePSXe and re-open it.
- Go to Config > Video.
- In the upper left of the window, click on Fullscreen Mode to put a bullet there, as shown below:
- Click OK. Go ahead and run a game, and it will now open in full screen.
CD swapping for multiple-CD games
Many PlayStation 1 games consist of multiple CDs. ePSXe allows you to swap to the next CD whether you're playing an ISO or a physical game CD. Here's how:
- Wait until the game asks you to swap CDs.
- Press Esc to return to the ePSXe window.
- Go to File > Change Disc. From here select ISO (as shown here ) for an ISO (or BIN) or CDROM (as shown here ) for a physical CD. Then follow the prompts.
Dumping your PSX games to ISO
Perhaps you prefer using your own PlayStation 1 games instead of downloading them from the Internet? Or maybe you just want to keep backup copies of your PlayStation 1 games? Whatever the case, here's how you can dump your games:
- Download & install RetroArch for Windows. It's the #1 multi-system emulator. I have a tutorial for RetroArch for Windows as well.
- Put your game CD in your computer's CD-ROM drive. Open RetroArch and select Dump Disc - as shown here
- On the next screen, select your CD-ROM drive (the first option, most likely).
- You're going to see this progress bar appear on the lower-left of the screen:

Depending on the speed of your CD-ROM drive, this will probably take 5-20 minutes to finish. - When RetroArch finishes dumping your game CD, the progress bar will disappear. It doesn't prompt you with an alert sound or anything. If your CD-ROM was humming during the dumping, you'll know RetroArch finished when your CD-ROM's humming sound stops.
- RetroArch dumps the ISO of your game CD in its Downloads folder. So the next step is locating the Downloads folder. If you didn't set a custom location for RetroArch during its installation, then it's in its default location in Windows (C:) > RetroArch-Win64 - as shown here .
- In RetroArch's Downloads folder, you should see a BIN file and a CUE file with a weird filename like “cdrom-200000-1000000”, as shown here . Double-click on the CUE file and choose to open it in Notepad. You'll see the text that's shown in my picture.
- Next, rename the CUE file and BIN file to the name of your game. Open the CUE file in Notepad to rename the ISO as well. You can name these files to any name you want. The only requirement is that both files & the name in the CUE file must be the same exact name. Look here - these three instances need to be changed to the same name.
- That's it! You've successfully dumped your PlayStation 1 game. You can use it with any PlayStation 1 emulator or any multi-system emulator that supports PlayStation 1.
Pausing/exiting games
Press the Esc key to pause the game. Doing so will make the screen disappear and exit to your desktop (with the ePSXe window still there). But don't fret! The game is paused and still running in the background. To continue the game, click on the Run menu then Continue. If you accidentally close the ePSXe window, then your progress is lost.
Save states
Save states is a feature that saves the exact spot you are in any game. You can use this feature manually by going into the Run menu or by quick keyboard shortcuts.

- Capturing a state: To capture a save state go to Run > Save State and choose any of the 5 slots. These slots are reserved to allow you to save up to 5 different save states. Upon selecting a save slot, ePSXe will immediately return to the game. The keyboard shortcut for saving states is F1 to save in Slot 1.
- Loading a state: To load a state you previously saved, go to Run > Load State and choose the slot where your save resides. The keyboard shortcut for loading saves is F3 to load from Slot 1.
Note: ePSxe's save state feature is slightly glitchy. It has a history of not working well when you save during FMVs or instances of heavy activity. It's best to capture a save state at a point when the game is at a standstill with nothing going on.
Pro Tip: If you're playing a game that has in-game saving (such as an RPG) I recommend that you use both save states and in-game saving to save your progress. That way you'll always have a backup.
Memory card: copying/moving/deleting saves
To manage your memory card and copy/move/delete saves is the same exact way as you would on the real thing. The following directions will guide you to the memory card management screen.
- Go to File > Run BIOS, as shown here .
Note: If you get a “cdrom not found” error, read below. - You should arrive at the BIOS main screen . Choose Memory Card to proceed.
*If ePSXe took you to the CD Player instead, navigate the cursor to Exit to return to the main screen. - Now you're at the memory card management screen:

This is the screen where you can manage your memory card saves. You would do so exactly as you would on the real PlayStation 1 system.
Memory card: cdrom not found error
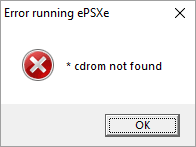
When attempting to run the BIOS, ePSXe may prompt you with a “cdrom not found” error. It's a bizarre error because it happens when you're on a computer or tablet with no CD-ROM drive.
This is an easy fix. All you need to do is configure a CD-R plug-in. Included in my plug-ins zip file are a few CD-R plug-ins. Here's how to configure it:
- Make sure “cdrPeops.dll” or any other CDR plugin is in ePSXe's plugins folder. In ePSXe, go to Config > Cdrom.
- Select a CD-R plug-in . Doesn't matter which one. Click OK then close & re-open ePSXe.
Fast forward
ePSXe doesn't natively come with a fast forward feature. You can access a fast forward feature only if you're using one of Pete's video plug-ins. Here are directions to enable fast forward with them:
- Press Delete to show the “FPS menu” of Pete's video plug-in (picture below). Notice the arrow is on the “FL” icon. It must be there to continue with these steps.

- Press the End key to enable fast forward. By doing so, you will see the icon change to this:
 .
. - To bring the game back to normal speed, press the End key. You will see the icon change to this:
 . Press the End key a second time to change the icon back to it's original state:
  .
. - When you're done you can hide the FPS menu by pressing the Delete key. To re-enable fast forward, repeat these directions.
- If fast forward isn't fast forwarding, switch to Pete's Soft plug-in.
Using cheats
Figuring out how to add your own Game Shark cheats from scratch could take 10 or so minutes. You can read this guide if you really want to know how. But I have something even better for you! Just download the zip file below that already has every cheat prepared for ePSXe.
- ePSXe Cheats Pack (1.67 MB) - the official cheats pack which contains Game Shark cheats for every PlayStation 1 game.
Here's how to use these cheats:
- Download the above cheats zip file and extract its contents into ePSXe's cheats folder .
- Open ePSXe and run the game you want to cheat with. Make sure the game loads successfully.
- Next, go to Options > Cheat codes - as shown here .
- You'll arrive at the Cheat Codes window . In “Cheat Codes Available” you should see a list of cheats. Click on the cheat(s) you want to add, then click the Enable button. Or just click Enable All.
- When you're done, click on the OK button. That's it! The cheats should be active and running.
Game Troubleshooting
Even though ePSXe is the #1 PlayStation 1 emulator, it's not perfect. Maybe the video plug-ins don't like your video card. Maybe the game you downloaded is partially corrupt. Maybe the game you're playing is obscure and not fully supported. Popular games do get more attention to run better. There could be many reasons why you're having problems. Keep reading for general tips on how to troubleshoot problems with ePSXe.
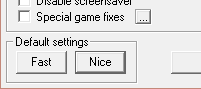
- If something is messing up VISUALLY: I suggest you play around with the settings in the video plug-in's configuration, or try another video plug-in. Also, make use of specific game fixes within the configuration. Particularly, when using Pete's plug-ins it helps to switch between the Fast and Nice presets. Playing with them can resolve speed issues or graphic glitches.
- If something is messing up with SOUND: I suggest you play around with the settings in the sound plug-in's configuration or try another sound plug-in.
That's basically the plan of action when something goes wrong. You try other configuration options or try another plug-in. For more help scroll down to the FAQ “Q:” questions.
So what do you do if nothing works? You tried everything but ePSXe is still buggy and laggy? Try ePSXe's competing emulator: pSX. It tends to run better than ePSXe on lower end computers. It's easier to use as well
Finding PSX ISOs
In my links page, I have some good links to sites where you can download PlayStation 1 ISOs. If you want to try to find more sites than what's in my collection of links, just Google around. For example, if you want to download Final Fantasy VII just Google “download final fantasy vii psx”.
Q: I keep getting 'ePSXe.exe has stopped working'!
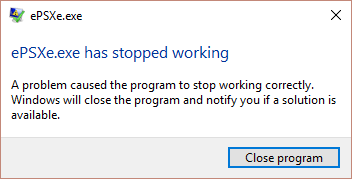
So every time you load a game, ePSXe crashes and Windows prompts you with a 'ePSXe.exe has stopped working' error? There are two possible reasons this could be happening:
- Your video card doesn't like the video plug-in you're using. If this is the case, switching to another video plug-in should resolve this problem.
- The last time this tutorial was updated, version 2.0.5 was the latest version of ePSXe. That version of ePSXe could be causing this issue. Go to my emulators page and download ePSXe version 1.9.0. If 2.0.5 was the problem then using 1.9.0 will resolve it.
- If the 'stopped working' errors continue even if you roll back to 1.9.0, try different video plug-ins (as suggested in reason #1).
Q: My game is running way too fast!
Ha, that's a good problem! This simply means your computer is too fast for the current settings of the video plug-in. To resolve this just beef up the settings. Doing so is easy. Go to Config > Video > Configure. If you're using one of Pete's plug-ins (which I hope you are) all you need to do is click on the Nice button.
Q: My game keeps freezing!
Read Troubleshooting.
Q: When I close ePSXe it doesn't close completely and I can still hear it!
So every time you close ePSXe, it closes the ePSXe window but you can still hear your game and its music in the background? This is slowly becoming a more common issue with new computers. ePSXe hasn't been updated since 2013. There's not a fix for this. Every time this happens you need to go into Windows Task Manager and force close the ePSXe process. Watch this video for directions on how to force close a process.
Q: I'm getting a “zlib.dll is missing” error!
That's a common error with ePSXe v1.70. You can download that zlib.dll file here (it's 31.9 KB). Extract it from its zip file and copy it over to the folder that you have ePSXe in.
Q: How can I use GME saves with ePSXe?
I bet you grabbed that save from GameFAQs. GameFAQs offers a wealth of PlayStation 1 saves, but they're all in GME format. Can you use them with ePSXe? Yes, you can! How? Just rename it. Take note how ePSXe organizes its memory cards.
First decide if you want the GME file to replace memory card 1 or memory card 2. To replace memory card 1, rename your GME to “epsxe000.mcr”. To replace memory card 2, rename your GME to “epsxe001.mcr”. Then move this file over to ePSXe's memcards folder.
Also, don't forget that saves are region specific. For example, a save from a European game won't work on a North American game.
Q: ePSXe doesn't enter fullscreen! It centers the window instead!
When using Windows 8 or Windows 10/11, ePSXe may behave funny when you attempt to enter fullscreen. Upon accessing fullscreen it doesn't enter fullscreen. Instead it centers the window. It's been awhile since ePSXe has been updated, so this is definitely a compatibility bug that has surfaced with newer operating systems. You may or may not be able to fix this (depends on your video card, I think). The troubleshooting measure you can try is to use the Windows Compatibility feature to have ePSXe emulated under an older version of Windows. Here's how to set it up:
- Right-click ePSXe.exe and left-click Properties.
- Click on the Compatibility tab. You will end up here .
- Here's the tricky part. I can't tell you what to do here because every video card is different.
- You can start by clicking Run compatibility troubleshooter and follow the wizard. Try “Try recommended settings” first. If that doesn't fix it, try “Troubleshoot program”.
- You could also try running ePSXe in compatibility mode under Windows 8 & older under “Run this program in compatibility mode for”. Probably Windows 7 or (even older) Windows XP is your best bet.
- Lastly, there's a small annoyance that might happen upon setting ePSXe to emulate under an older version of Windows. From now on, every time you open it you might be prompted by this message: “Do you want to allow the following program from an unknown publisher to make changes to this computer?”. Every time you will have to choose to accept that message.
Q: Can I transfer my memory card file to another PSX emulator?
Yes! For example, I've successfully transferred my memory card file to a PSX emulator on Android smartphones. It's easy. All that you do is copy over ePSXe's memory card file to the memory card folder of the other PSX emulator. Then rename your memory card file to the naming convention of the other PSX emulator. ePSXe's memory card file is located in the “memcards” folder - as shown here . So “epsxe000.mcr” is memory card 1 and “epsxe001.mcr” is memory card 2.
So let's say the other PSX emulator calls its memory card file “memcard1.mcr”. Just rename “epsxe000.mcr” to that same filename. You can learn more about transferring saves in my Game Saves Tutorial.
Note: You cannot transfer ePSXe save states to another PSX emulator. Only MCR memory card files can be transferred.
Q: ePSXe isn't saving anything!
If you're using ePSXe for the first time and you're finding that you have all these problems:
- Save states aren't working. You save a state, then when you try to reload it nothing happens.
- When you save your game at a save point and close/re-open ePSXe, you find that the save is lost.
- Plug-in configurations that you changed aren't saved. When you close/re-open ePSXe, you have to make those configuration changes again.
Then your problem is that you currently have ePSXe in a read-only location on your computer. You must move ePSXe to a more common location such as Documents, Downloads, or a folder on your desktop.