
 Back
Back


Game Saves Tutorial
About Game Saves
One of the features that FantasyAnime.com offers is that nearly all the RPGs that have been shrined have a collection of game saves from periodical points throughout the entire game. If for any reason you lose your saved position in an RPG, with my game saves you can continue pretty much where you left off! Naturally, that also means you're continuing the game from the person who collected the game save.
Video game emulator authors have been faithful with supporting a standard file format for saving saves. That means the game save files I offer can be used with any video game emulator, regardless of the OS or platform that it's on!
 Using game saves is easy. All you need to do is rename the save to the same filename as your video game ROM. However, there are a few details about this process that could get you stuck. And if you're still new to video game emulation, using game saves might be confusing. In either case, don't worry! I made this tutorial to help you out ☺️
Save States Vs. Saved RAM
There's an important detail about game saves that I need to point out to avoid confusion. Video game emulators save games in two ways:
 Save States - This is a feature that every video game emulator offers. It allows you to save the exact position of your gameplay, regardless of whether it's an RPG or not. In most cases, the save state file is exclusive to the specific emulator that it came from, so it can't be transferred to other emulators. Sometimes the emulator author decides to rewrite the save state functionality, rendering your save state incompatible with future versions of the given emulator.
 Saved RAM - In the 16-bit era and older, only RPGs let you save your progress. It did so with saved RAM. Video game emulators output saved RAM in “SRM” or “SAV” file formats. When we entered the 32-bit era with PlayStation 1 and N64, every game had the ability to save your progress with saved RAM or memory cards. With PlayStation 1 emulators, memory card files are saved in “MCD” or “MCR” file formats. SRM/SAV and MCD/MCR are standard formats that all video game emulators of said systems adhere to.
Pro Tip: When playing RPGs, I recommend that you save your game both with save states and saved RAM. That way, you'll always have a backup if something unfortunate happens.
Step 1: Show File Extensions
By default, Windows hides file extensions. To use game saves, you need to be able to see file extensions. This is so that you can distinguish which file is the save amongst all the other files in an emulator's folder. It especially doesn't help that most of the emulator's files (including the save) have the generic file icon (![]() ).
).
There are tons of YouTube videos showing you how to display hidden file extensions. You can follow them, or keep reading here for directions with Windows 11:
- In the upper section of a folder, you'll see a row with “New”, file actions, “Sort”, and “View”.
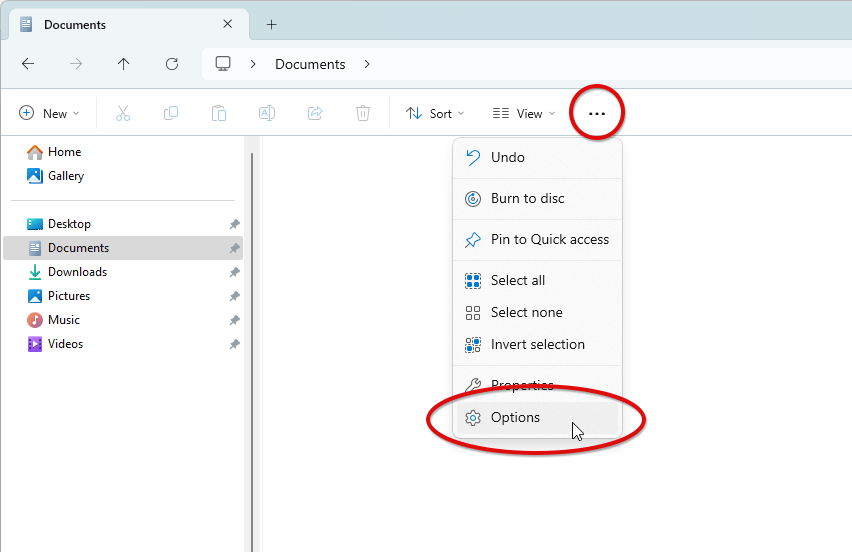
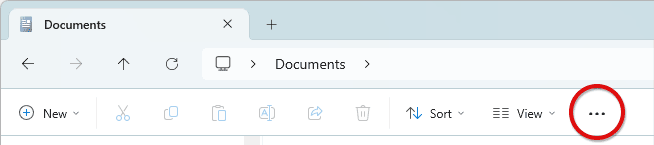 At the end of this row, there's a “...” dot button. Click that, then click Options - as shown here .
 - Click on the View tab
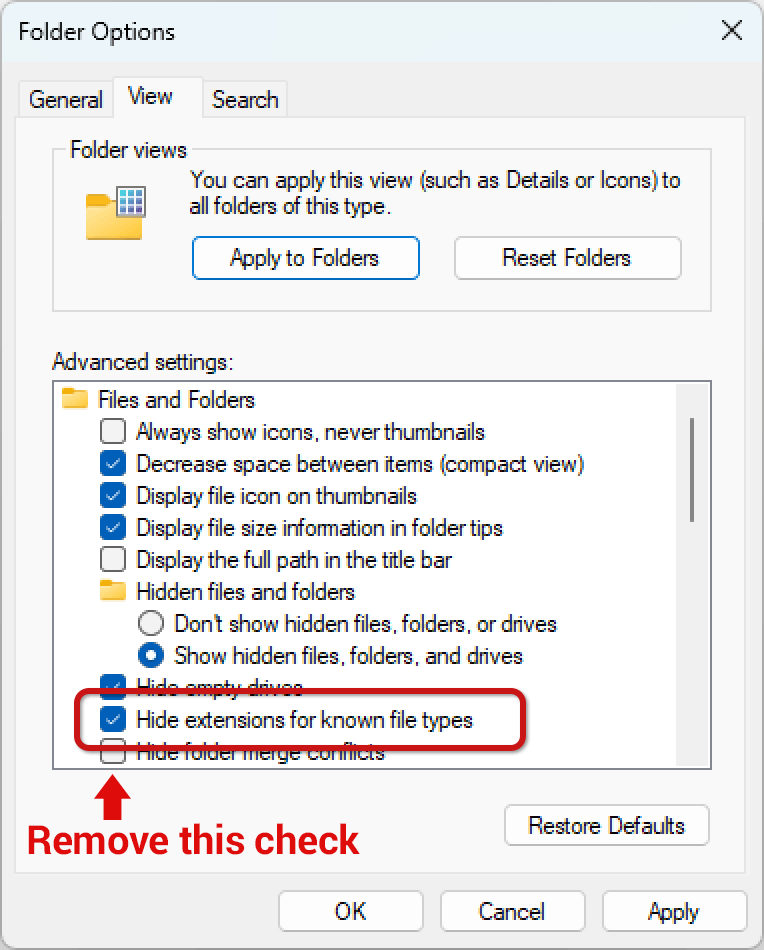
- Look in the Advanced Settings area for Hide extensions for known file types, as shown here . Remove the check from Hide extensions for known file types.
- Click OK.
That's it! You should now see file extensions on every file.
Using Super Nintendo SRM Saves
I have a video tutorial for using SRM saves. It's a bit old with Windows 10, but the directions are still relevant for Windows 11.
Or, you can follow these text directions. Here's how to use game saves with Snes9x, RetroArch, or BSNES:
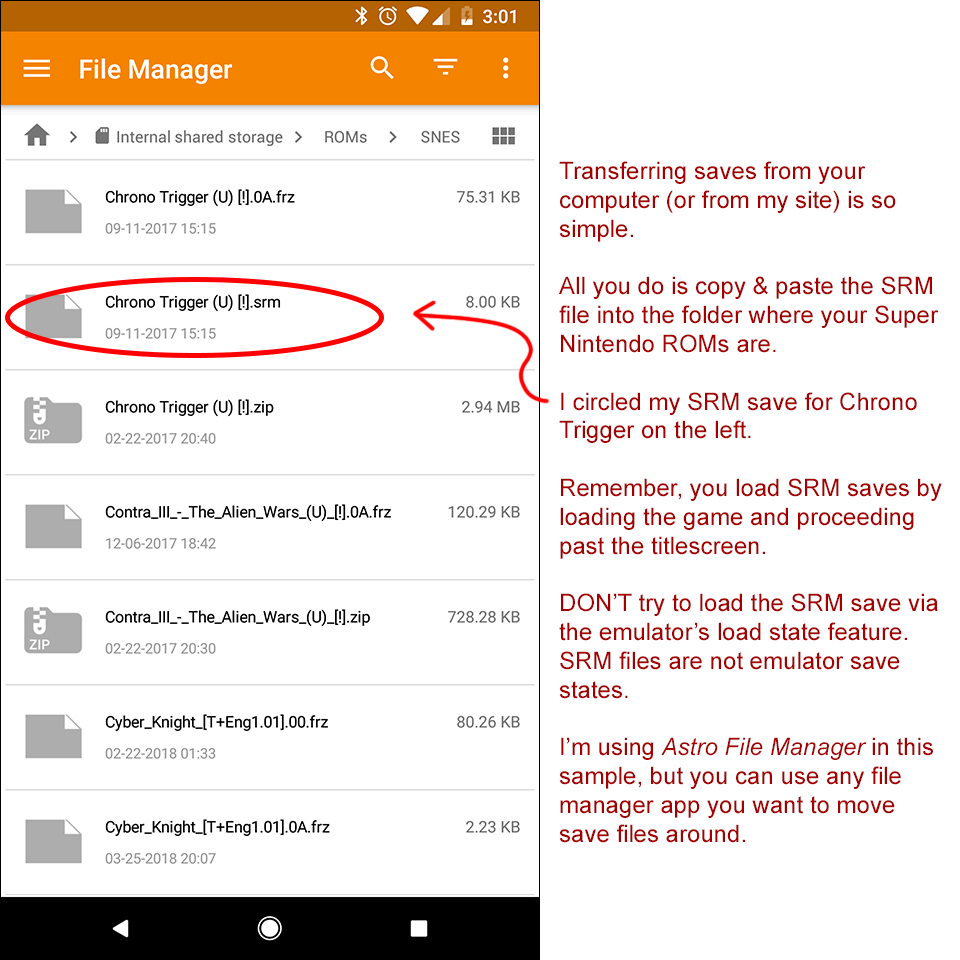
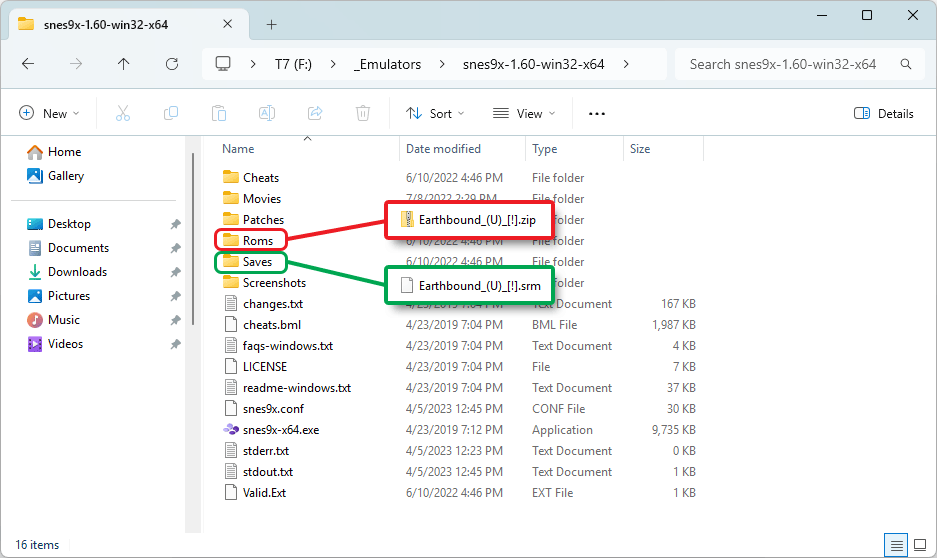
- Let's say you downloaded Earthbound and one of my saves for it. You would have two files: “Earthbound_(U)_[!].zip” (the ROM) and “earthbsave12-Zombies.zip” (the save). Extract the SRM save file from the zip file - particularly, for my Earthbound saves the SRM file is called “earthbound.srm”. If you need help with using zip files in Windows, check out YouTube.
- Show file extensions, if you haven't already.
- Next, we need to rename the SRM file to the exact filename as the ROM. Keeping in mind that the ROM is called “Earthbound_(U)_[!].zip” - go ahead and right-click the SRM file, click Rename, and type “Earthbound_(U)_[!].srm” as the new filename.
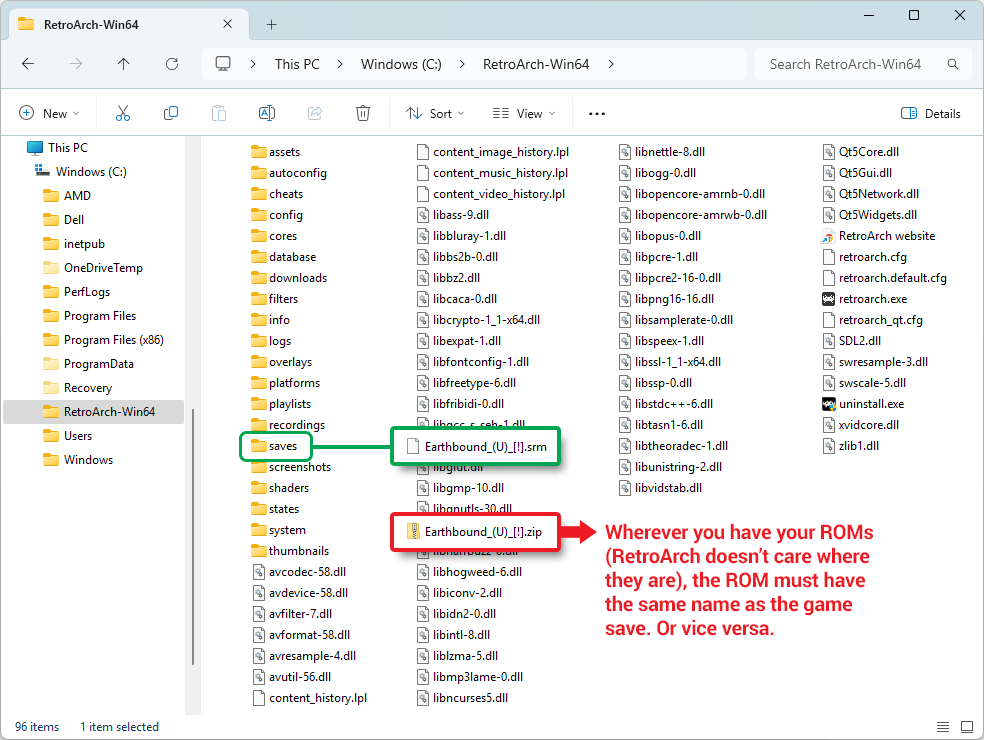
- This next step is very important. Where you place the SRM file matters. Many emulators such as Snes9X and RetroArch have a dedicated “Saves” folder. If you see a Saves folder, then move the SRM file into it (see the picture below). Otherwise, keep the SRM file in the same folder as the ROM.
Note: If you just downloaded Snes9X for the first time then you won't see a Saves folder. Snes9X will create a Saves folder after the first time you load a game. - That's it! Load the game in Snes9X or ZSNES, continue past the title screen, and the save(s) should be there.
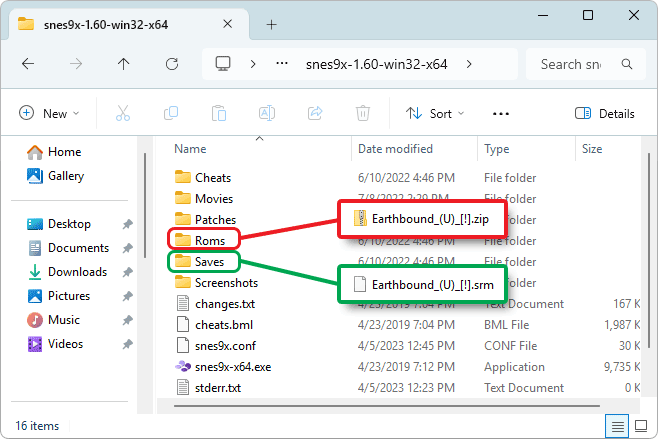
The ROM and SRM save file in Snes9X with the same filename
If you're still having trouble, well, you didn't fully read my directions! Here are some of the common things people do wrong:
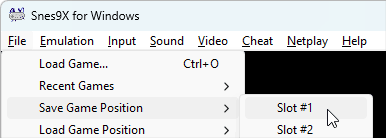
- An SRM file is not a save state. You don't load it by going to Load game position or Open State.
- An SRM file is not an actual game. You don't load it by going to File > Load Game as if you were opening a ROM. SRM files cannot be 'loaded' or 'opened' through an emulator's menus.
- The game saves in my website were captured from the North American versions of the games. They won't work on the European or Japanese versions.
Using Genesis GS0 States (instead of SRMs)
“GS0” is the file format for save states with “Gens”, a once popular Genesis emulator. Most my Genesis game saves come with both the SRM and the GS0 file. I captured them with Gens, but keep note that Gens save states are also fully supported by “Kega Fusion” (a top competitor to Gens).
I need to tell you about a problem with Genesis SRMs. The SRMs I've collected via Gens (which all the SRMs in FantasyAnime come from) work fine between Gens and Kega Fusion. However, they don't work with other Genesis emulators. Furthmore, Kega Fusion's SRMs don't work on any other emulator. Due to these complications, I feel safer just focusing on telling you about GS0 save states.
I have a video tutorial for using GS0 saves. It's a bit old with Windows 10, but the directions are still relevant for Windows 11.
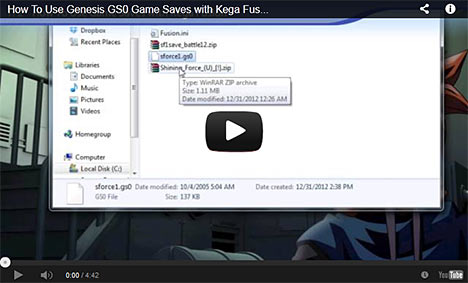
Or, you can follow these text directions. Here's how to use GS0 save state files with Kega Fusion or GensGS:
- Let's say you downloaded Shining Force 2 and one of my saves for it. You would have two files: “Shining_Force_II_(U)_[!].zip” (the ROM) and “sf2save_battle43.zip” (the save). Extract the GS0 save file from the zip file.
- If you don't see a GS0 file extension in the zip file and, as a result, you're not sure which file is indeed the GS0, follow these steps to show file extensions.
- Open Kega Fusion or GensGS, then load the ROM.
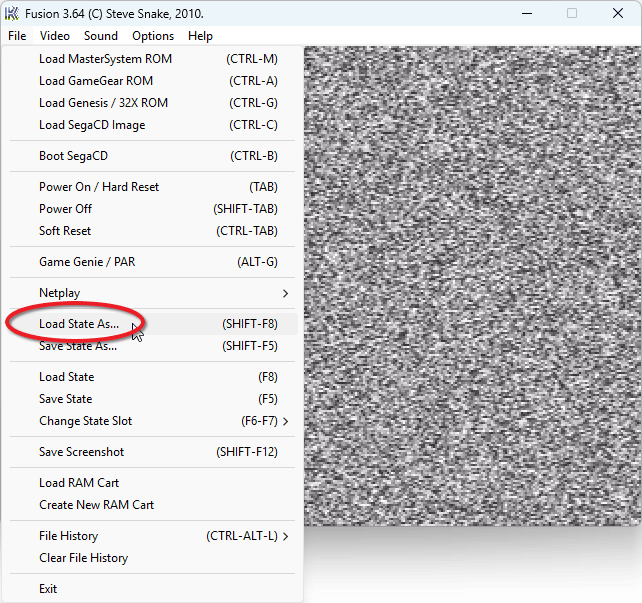
- On Kega Fusion, go to File > Load State As, as shown here . On GensGS, go to File > Load State.
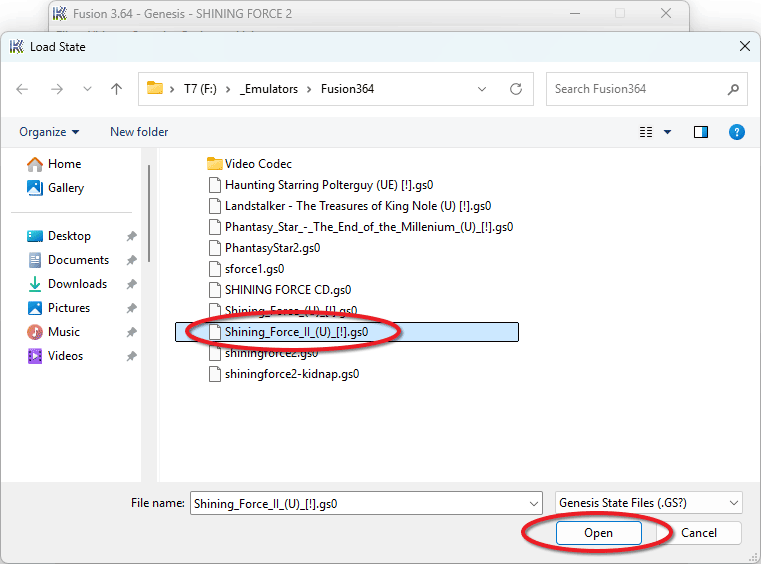
- Choose the GS0 save file and click Open, as shown here .
Using Game Boy, Game Boy Advance, and Game Gear SAV Saves
Using SAV files is literally the same process as using SRM files. For the sake of tutorial-ing I'll give you specific directions:
- Let's say you downloaded Final Fantasy Legend for Game Boy and one of my saves for it. You would have two files: “Final_Fantasy_Legend,_The_(U)_[!].zip” (the ROM) and “fflsave_world4-1.zip” (the save). Extract the SRM save file from the zip file - particularly, for my Final Fantasy Legend saves the SAV file is called “ffl1rom.sav”. If you need help with using zip files in Windows, check out this article. Extract the SAV into the same folder that the ROM is located. It's very important that the ROM and the SAV are in the same folder!
- Show file extensions, if you haven't already.
- Next we need to rename the SAV file to the exact filename as the ROM. Keeping in mind that the ROM is called “Final_Fantasy_Legend,_The_(U)_[!].zip” - go ahead and right-click the SRM file, click Rename, and type “Final_Fantasy_Legend,_The_(U)_[!].sav” as the new filename.
- That's it! Load the game in the emulator, continue past the title screen, and the save should be there.
Note: Some emulators use SRM instead of SAV. Just change the file extension from SRM to SAV or vice versa, and you should be good to go.
Using PlayStation MCR Saves
Using MCR's with DuckStation
Currently, DuckStation is the #1 PlayStation 1 emulator. It comes with a robust memory card editor. My DuckStation tutorial covers how to use it:
The process is simple:
- Newer versions of DuckStation require you to rename the MCR file to MCD for the memory card editor to detect it. For example, if the file is called “Final Fantasy VII (Disc 1).mcr”, rename it to “Final Fantasy VII (Disc 1).mcd”.
- In DuckStation, go to Tools > Memory Card Editor to bring up the editor.
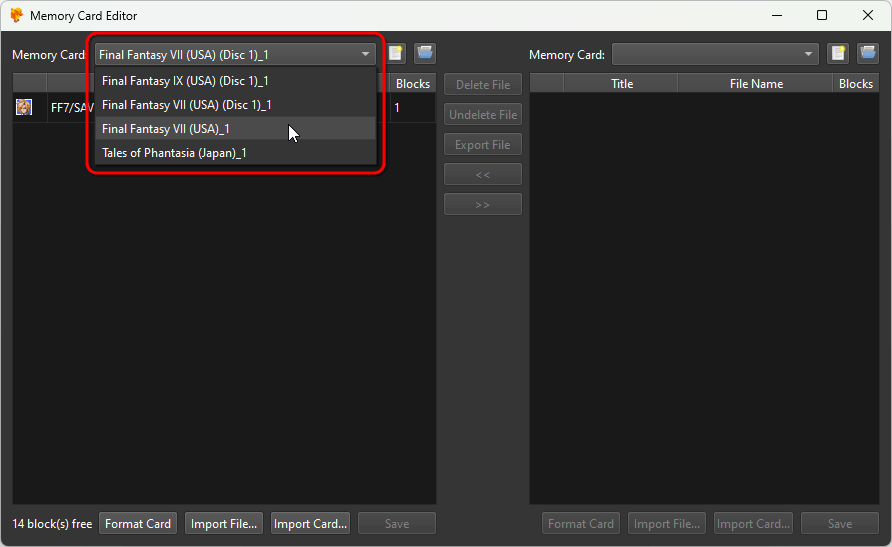
- On the left side, for maximum compatibility I recommend clicking Format Card first. Then, select your local memory card for the game - as shown here .
- On the right side, select my MCD memory card file.
From that point, you can transfer saves from one card to the other. You can also delete saves and format the memory card.
MCD not MCR:
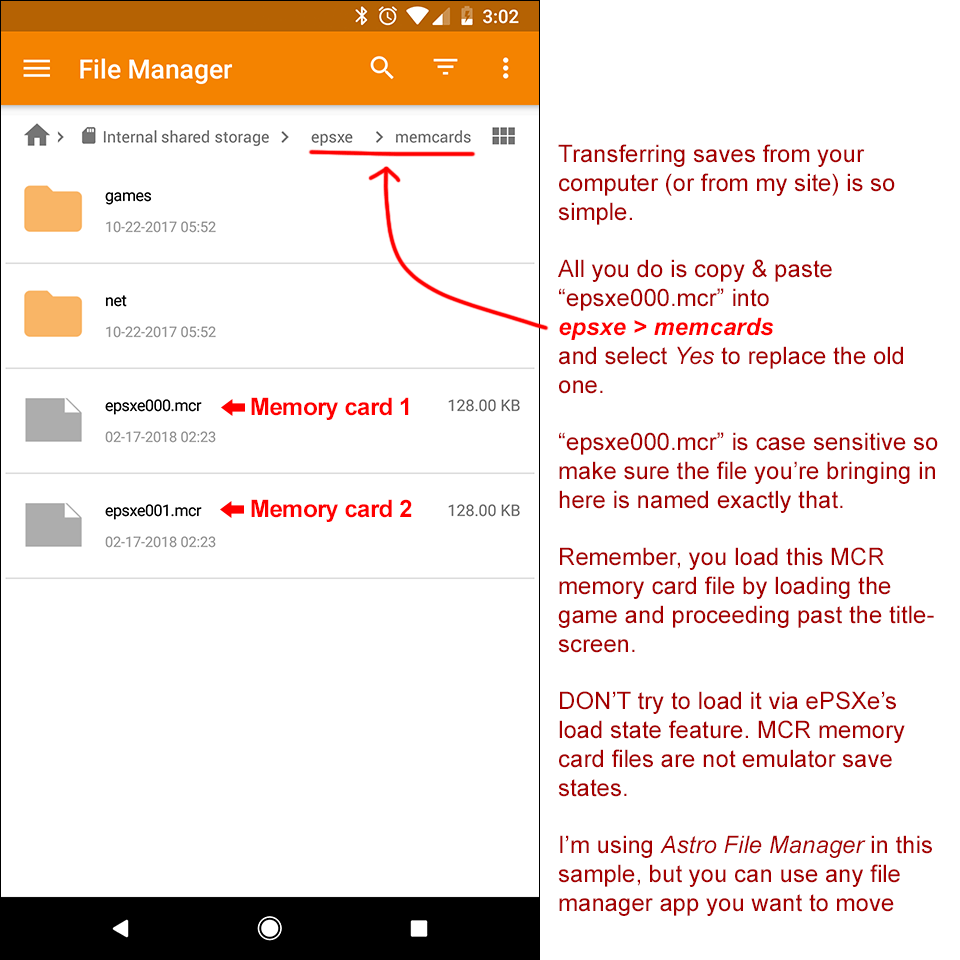
Using MCR's with ePSXe
I captured the MCR file available in my FantasyAnime.com with ePSXe, so if you're using ePSXe all you need to do is drag the save over to ePSXe's memory card folder and choose Yes to replace the file. If you currently have any saves on memory card 1, make sure to make a backup copy because replacing it will erase them. I also have a video tutorial covering these steps for ePSXe.
Using MCR's with other PSX emulators
You need to rename “epsxe000.mcr” to whatever the emulator calls its memory card files, then drag it to the memory card folder and choose Yes to replace the file. If you currently have any saves on the memory card you're about to replace, make sure to make a backup copy because replacing it will erase them.
Transferring To Emulators on Wii, PS3, Xbox, etc.
There are so many different emulators on video game consoles. They're all setup differently. There is no universal set of directions I can give you on transferring saves to them. Your best bet is to try the reverse: transfer a save from the console emulator to a PC emulator. For example, transfer a save from Snes9X on Wii to Snes9X on PC. If you can figure that out, then you'd know what to do in order to transfer a save back to the console emulator. If transferring an SRM file doesn't work, try transferring a save state file.
Transferring PlayStation 1 MCR Saves to the PSP
Unfortunately, it's not possible to transfer PlayStation 1 MCR saves to a PSP system. That is, it's not possible on a non hacked PSP. But, you can transfer saves if you manage to hack your PSP. Then you could use a MCR-to-VMP utility to convert the save and transfer it over for use. This is all I know on the subject, so Google around if you need further help.
Transferring Saves to Emulators on Android
All of the gave saves available on Windows work perfectly fine on Android video game emulators! All except Genesis saves. You can transfer the save one of two ways: (1) connect your phone to your computer and copy it over, or (2) put your save on the cloud (i.e. Dropbox, Google Drive, etc.) and download it to your phone.
- Game Boy, Game Boy Advance, Game Gear - To use their SAV files you're using the same exact process as you do on the PC. But remember, they may not work on every single emulator.
 SNES - Android emulators (at least the ones I've used thus far) all use SAV for SNES & Genesis. Even though Windows' SNES saves are in SRM format, they still work on (most) Android emulators! All you need to do is change the SRM file extension to SAV. So just follow the same process for using SRM saves, but in addition to renaming the file you're changing the file extension. However, I need to point out that saves from PC emulators don't work on every single Android emulator. I know for sure that they work with Snes9x EX+.
- Genesis - Unfortunately, Genesis SRMs/SAVs and GS0s do not work on Android emulators, even if you properly rename them. I haven't been able to figure out why.
 PlayStation 1 - To use MCR memory card files, you're using the same exact process as you do on the PC. You'll most likely have to rename the MCR to the same name that the emulator uses for its MCR files. If you're using someone else's MCR memory card file (like one from my site), make sure your game's ISO is the same region. For example, North American saves won't work on European games.
![]() The video tutorial I posted in the SRM section also covers using SRM saves with Android emulators (at the end of it). When you connect your Android phone to your computer, you can simply drag & drop game save files to where they need to go.
The video tutorial I posted in the SRM section also covers using SRM saves with Android emulators (at the end of it). When you connect your Android phone to your computer, you can simply drag & drop game save files to where they need to go.
What about iOS? iOS officially added video game emulators to the App Store in 2024. I don't own any Apple products, unfortunately. I don't know how to transfer save files to iOS. Nor do I know if iOS video game emulators support transferred save files.
Can emulator saves be transferred to PC/iOS/Android games?
This question comes up a lot since many RPG classics such as Final Fantasy 1-9, Chrono Trigger, Shining Force 1-2, Phantasy Star 1-4, Castlevania: Symphony of the Night, etc. are officially available on PC, iOS, and Android. Unfortunately, saves from emulators cannot be transferred to these official releases, nor can they be converted. Emulator saves can only be used with fan-made emulators. So if you had your heart set on transferring, say, Chrono Trigger saves to your Android device, you need to forego the idea of using the official release of Chrono Trigger and switch to an SNES emulator with the Chrono Trigger ROM.

