DuckStation Tutorial
Setting things up
- Download & installation
- Error: MSVCP140_1.dll is missing
- Q: DuckStation crashes when I open it!
- Setting up the BIOS
- Where DuckStation saves everything
- Showing the toolbar (recommended!)
- Setting up the keyboard or gamepad
Playing games
- Loading a PSX ISO
- Q: My games aren't showing in the game list!
- Q: My PAL PS1 game is giving an SBI error!
- Full screen
- Boosting performance
- Running games at 60fps
- Upscaling graphics
Features
- Enabling PGXP corrections
- Disc swapping for multiple-CD games
- Save states
- Switching memory to shared memory
- Memory card: copying/moving/deleting saves
- Fast forward
- Capturing screenshots
- Using cheats
Other info & troubleshooting
View this guide on Google Docs to:
- Save as PDF or any common doc format
Share
About DuckStation for Windows
 DuckStation's mascot
This tutorial is to help you with DuckStation for Windows. DuckStation is considered a top PlayStation 1 emulator. All games emulate flawlessly. In addition to upscaling 3D graphics (a staple feature in all PS1 emulators), DuckStation comes equipped with all the modern PGXP correction features. These corrections fix the inaccuracies that are evident when PlayStation 1 graphics are enhanced.
DuckStation itself is very easy to use. As someone who's been making emulator tutorials for over two decades, I'm thoroughly impressed with how user-friendly DuckStation is. Unlike ePSXe, it doesn't use plug-ins. Setting up DuckStation takes less than a minute! Best of all, DuckStation auto-updates ! So you never need to worry about going out of your way to keep DuckStation up-to-date. This is a valuable feature that video game emulators rarely offer.
Should you use DuckStation?
With all the emulator offerings as of 2026, should you use DuckStation? Yes, there's no question about it. DuckStation is the best PlayStation 1 emulator. RetroArch, the top multi-system emulator, is another good option for PlayStation 1 emulation. It can emulate PlayStation 1 games as good as DuckStation. However, swapping discs with multiple-CD games can be a hassle with RetroArch.
You might be thinking, “What about ePSXe?” ePSXe hasn't been updated since 2016. It is outdated when compared to DuckStation and RetroArch.
Download & installation
 Downloading DuckStation
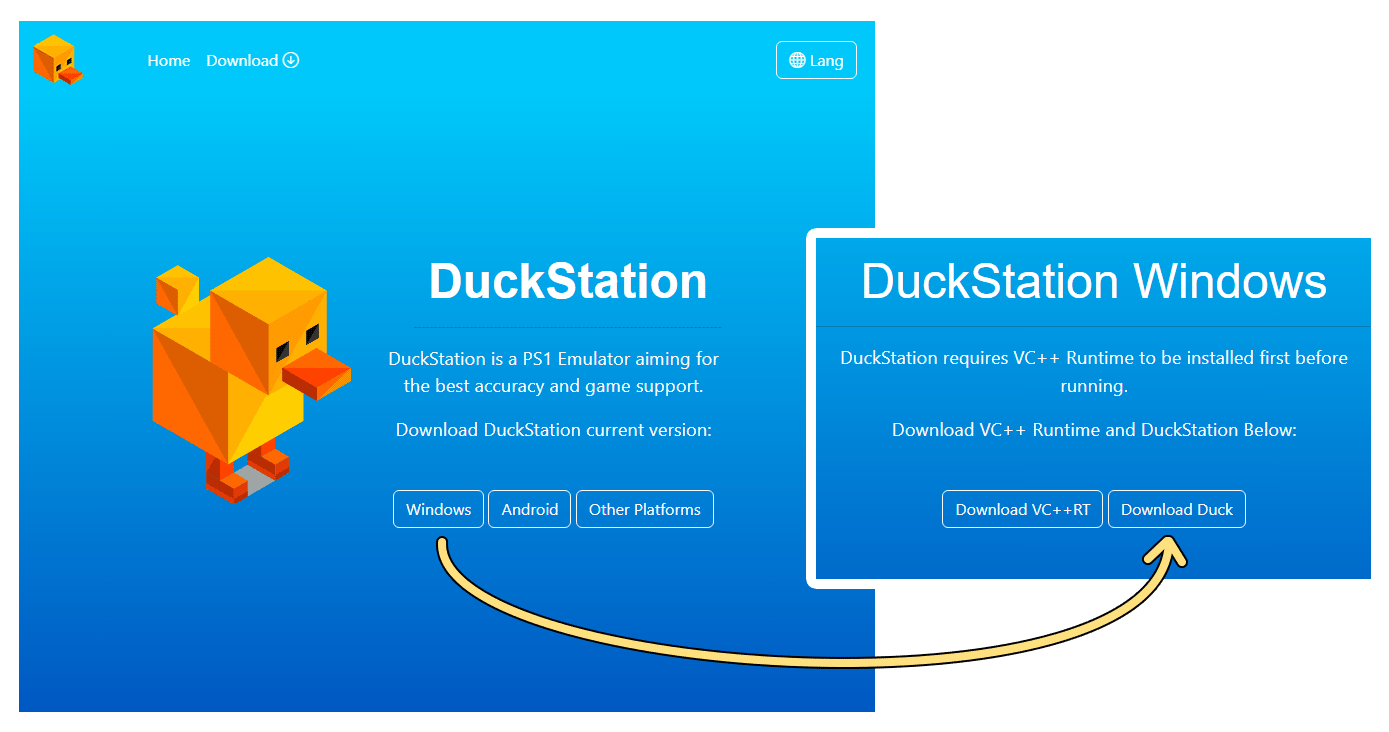
You can download DuckStation from its homepage:
Click Windows, then Download Duck. You don't need to download the “VC++RT” runtime. If DuckStation requires it to run, it'll prompt you with a download shortcut when you open DuckStation for the first time.
If you're using Google Chrome, it might warn you about downloading DuckStation. This type of warning is a precaution Chrome gives for any EXE download. There's no cause for alarm here. I assure you, DuckStation is a safe emulator. Click the down arrow icon and select Keep to allow DuckStation to download to your device.
DuckStation is a standalone program, so it does not have an install wizard. Installation is simple: just extract DuckStation from its zip file. To make things clearer, check out the video below that shows how to 'install' a portable emulator (it shows Snes9x, but DuckStation is the same process). It's pretty straight-forward - all that you're doing is extracting a zip file while doing a little bit of folder management. If you want to 'uninstall' a portable emulator, simply delete it!
In the video, I'm recommending “Documents” to house your emulators. But, you could also place emulators in “Downloads”, a folder on your desktop, an external HDD, or a thumb drive. These are common locations with full read/write access. Keeping it on your computer is better than external storage because it runs better & faster.
To open DuckStation, double-click on ![]() . You may want to right-click it and create a shortcut to this EXE for your desktop or something, to remind you which of the three exe's you need to use.
. You may want to right-click it and create a shortcut to this EXE for your desktop or something, to remind you which of the three exe's you need to use.
Error: MSVCP140_1.dll is missing
If you open DuckStation and receive the following error message:
The program can't start because MSVCP140_1.dll is missing from your computer. Try reinstalling the program to fix this problem.
That's coming up because you're using an older version of Windows. Fortunately, this has an easy fix! All you need to do is download the latest Visual Studio. On that page, look for the Visual Studio section . So download & install Visual Studio. You don't need to restart your computer after the install. Then try DuckStation again.
Q: DuckStation crashes when I open it!
So if you double-clicked on ![]() and DuckStation opens & immediately closes (it crashes), or just nothing happens, then you probably have a legacy-related issue on your hands. I recommend double-checking to make sure you're using the latest version of DuckStation.
and DuckStation opens & immediately closes (it crashes), or just nothing happens, then you probably have a legacy-related issue on your hands. I recommend double-checking to make sure you're using the latest version of DuckStation.
DuckStation is designed for modern computers and Windows 10/11. If you're using an older version of Windows or an old computer, DuckStation may not be supported. In this case, my first recommendation is to try RetroArch with the Beetle PSX core. If RetroArch doesn't work well for you either, then old PlayStation 1 emulators are your only option. Hence, you should try ePSXe or pSX.
*If DuckStation is crashing while a game is running, that's a different issue that I cover further down.
Setting up the BIOS
The PlayStation 1 BIOS is required to boot games. This is a separate download after you've downloaded DuckStation. Of which, you can download it right here:
- PlayStation 1 BIOS (236 KB). Download by right-clicking the download link and go to Save Link As. When saving, rename the “_ip” file extension to “zip”. If you don't see the file extension, try showing them. I also made this GIF animation to show you how to change the file extension.
With the BIOS in hand, let's proceed with setting it up:
- Extract “Scph1001.bin” from the above zip file.
- After opening up DuckStation for the first time, it will create its directories in Documents. We need to reach this folder to add the BIOS.
- Newer versions of DuckStation: They added a shortcut that automatically opens up DuckStation's data folder in Windows Explorer. In DuckStation's top menu, access the shortcut by going to Tools > Open Data Directory.
- Older versions of DuckStation: You need to navigate Windows to find DuckStation's data folder. First, open Windows File Explorer. The easiest way to open it is to click the folder icon in your home row of apps. If a folder icon isn't present, you can also do this: in the “Search” area type “file” and you'll see a File Explorer app appear at the top of the search results - as shown here . With File Explorer open, click Documents . Once in Documents, click DuckStation .
-
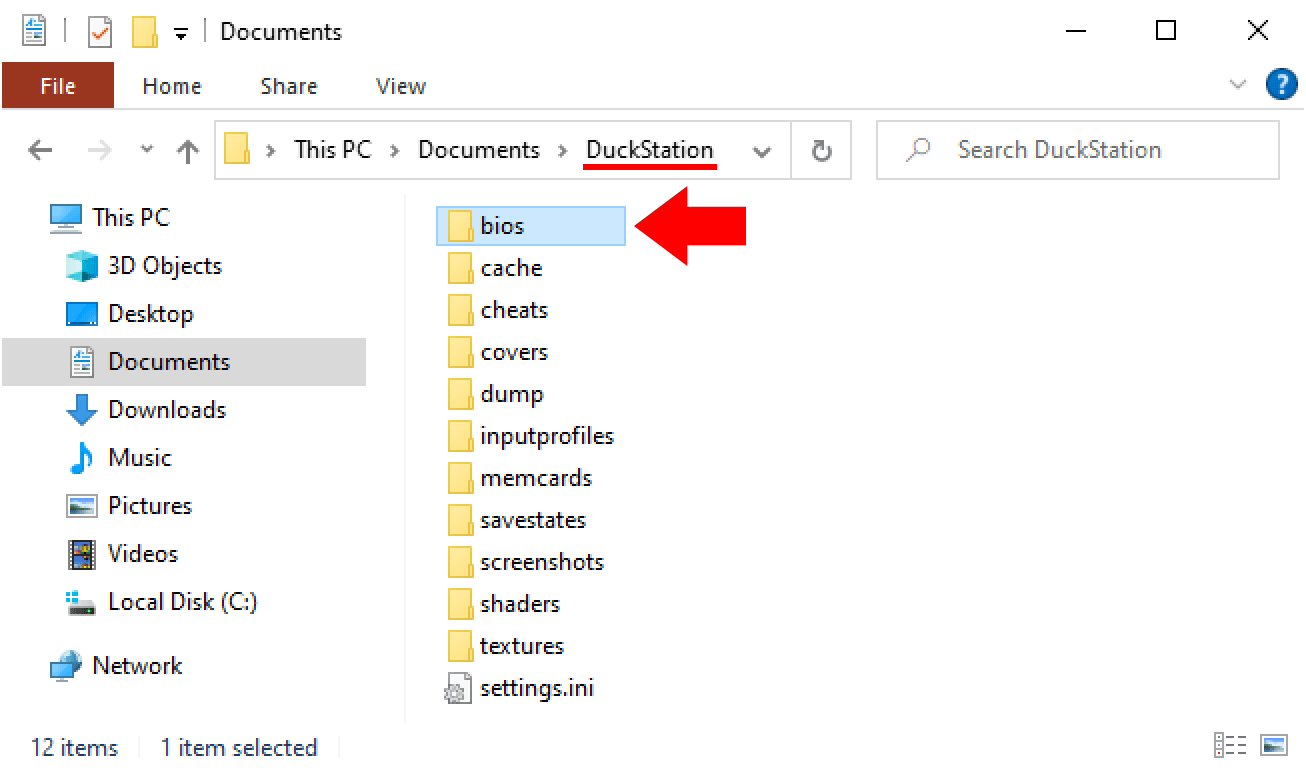
Inside DuckStation's folder, you'll find a folder called “bios”. Inside this bios folder is where you need to place inside “Scph1001.bin”.
 Place the bios in the bios folder
- That's it! Once “Scph1001.bin” is in the bios folder, the next time you open DuckStation it'll detect it and you'll be able to boot up games.
Where DuckStation saves everything
This is important so I wanted to highlight this. As mentioned above, DuckStation will create its directories in the Documents folder . And then inside DuckStation's folder you'll see such folders as:
- memcards - When you save at a save point within a game, this is where that save file is stored.
- savestates - When you use DuckStation to save a state, this is where those save files are stored.
- screenshots - When you snap a screenshot, this is where DuckStation will save it.
So you need to know where these folders are so you can grab your screenshots. Also, if you want to backup your saves or transfer them to another computer, you'd need to copy over the “memcards” and “savestates” folders.
Showing the toolbar (recommended!)
Newer versions of DuckStation hide the toolbar by default. I highly recommend showing it. It visualizes the most used features of DuckStation as easily accessible, large buttons. I don't know why they began hiding this valuable bar by default.
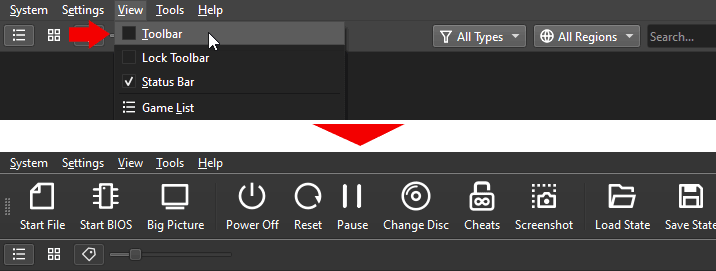
You can enable the toolbar by going to View > Toolbar, as shown above.
Setting up the keyboard or gamepad
The default keyboard keys are different than the defaults of other video game emulators:
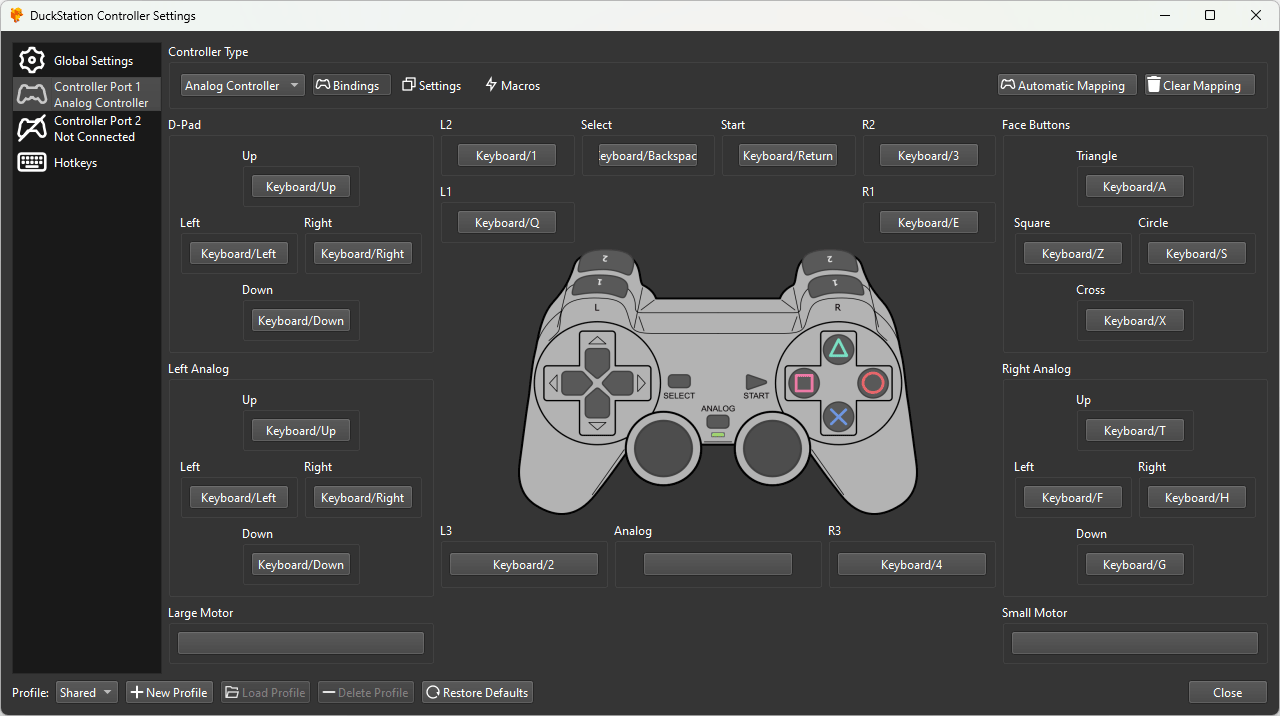
The direction keys are W, S, A, and D and the rest of the buttons are in the numeric pad. If this is weird for you, you can reconfigure these keys.
- To find the above screenshot, go to Settings > Controllers. Then, click the tab for
- To reconfigure a key or set it to a gamepad button, simply click it and press the new keyboard key or gamepad button.
Loading a PSX ISO
DuckStation has two ways to load PlayStation 1 games. You can (1) load games by manually selecting them, just as you would with most video game emulators, or (2) you can tell DuckStation where your PlayStation 1 games are stored and have it populate a game list within DuckStation.
I'm going to go over both ways. But first, I need to walk you through extracting PlayStation 1 games:
- Downloaded PlayStation 1 ISO's typically come in a CHD file or 7Z file. They're less commonly in a ZIP, RAR, and ECM file. CHD files don't need to be extracted (you can skip these extracting steps if your game is a CHD). 7Z/RAR/ECM must be extracted. To extract a 7Z or RAR file, you can use 7-Zip (it's free).
- To extract an ECM file watch this video. Although DuckStation supports ECM files so you don't have to extract it if you don't want to. I recommend it, though, because the game loads faster when it's extracted.
- Using 7-Zip is easy. Just right-click the 7Z or RAR file and go to 7-Zip > Extract Here, as shown here .
- Once the ISO is extracted, now take notice of the file format of the ISO. DuckStation only supports ISO files that are in BIN (BIN/CUE), IMG, ISO, CHD, MDS, PBP, or ECM format. Here's a visual example of how they look like (the icons will look differently):
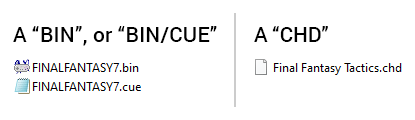
If the PSX game you downloaded came in a weird format such as NRG, UIF, DAA, CDI, XBX, B51, BWI, etc. - they are not supported. I recommend trying to find your game(s) in CHD or BIN/CUE format.- Don't see file extensions? Try showing them.
Now to load your game(s):
Option #1 - Loading games manually
This is the traditional method of loading a game with a video game emulator.
- Click on the Start File button:
 , or go to System > Start File (if this large icon isn't present, you can show it).
 - Look through your computer for your ISO and load it as if you were loading a ROM. If your game is in BIN/CUE format, select the CUE file. That's it! The game may not load immediately so give it a minute.
Option #2 - Creating a game list
You can save a few clicks by telling DuckStation where your PlayStation 1 games are. It will place your games in a list that you immediately see every time you open DuckStation.
- Click on Settings and look at these options I highlighted :
- Game List - This is the master window where you can manage your game list.
- Add Game Directory - Select this to add a new folder with PS1 ISOs.
- Scan for New Games - Select this to scan for new games in your folder(s).
- Rescan All Games - Select this to perform a full scan in your folder(s).
- From here it's easy: just select Add Game Directory to add a new folder. DuckStation will ask you if you want to scan recursively . This is only necessary if you have folders within your ISOs folder.
- The game list is immediately populated in DuckStation (or might take a few minutes if you have hundreds of games). The list will look something like this:
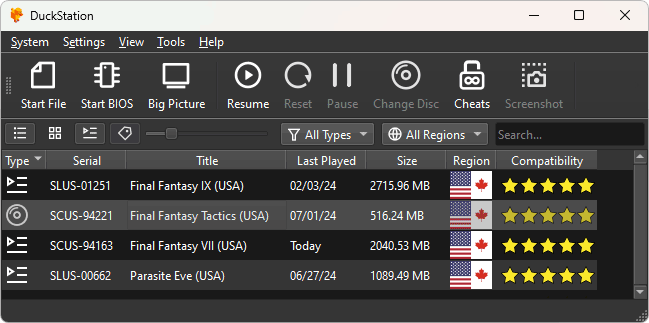
- To load a game, simply double-click it. The game may not load immediately so give it a minute.
- Tip: DuckStation lets you load a game directly from a save state! Right-click the game and go to Load State, as shown here . Or click a game, then click the Load State icon.
- And then if you want to make changes to your game list, go to Settings then Game List. In Game List you can add/remove folders, enable/disable recursive scanning, exclusive folders, and scan folders.
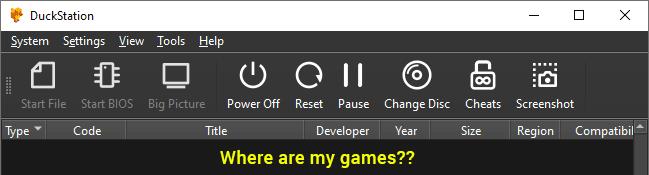
If you followed these steps and DuckStation isn't showing your games in the game list or it's only showing some of your games in the game list, keep reading.
Q: My games aren't showing in the game list!
Firstly, this section is assuming you've already read through “Loading a PSX ISO”. You've tried and failed at making a game list after following my directions. Well, if your PlayStation 1 ISOs are not valid ISOs, that's the reason why they're not showing up. To confirm that a PlayStation 1 ISO is valid, it needs to successfully run when you click on to load a game (or go to System > Start File).
So if you're absolutely sure your PlayStation 1 ISOs are valid and they're still not showing in the game list, then your ISOs are probably 'old'. DuckStation can be a bit quirky with old ISOs. Resolving the issue is simple: you need to download new ISOs.
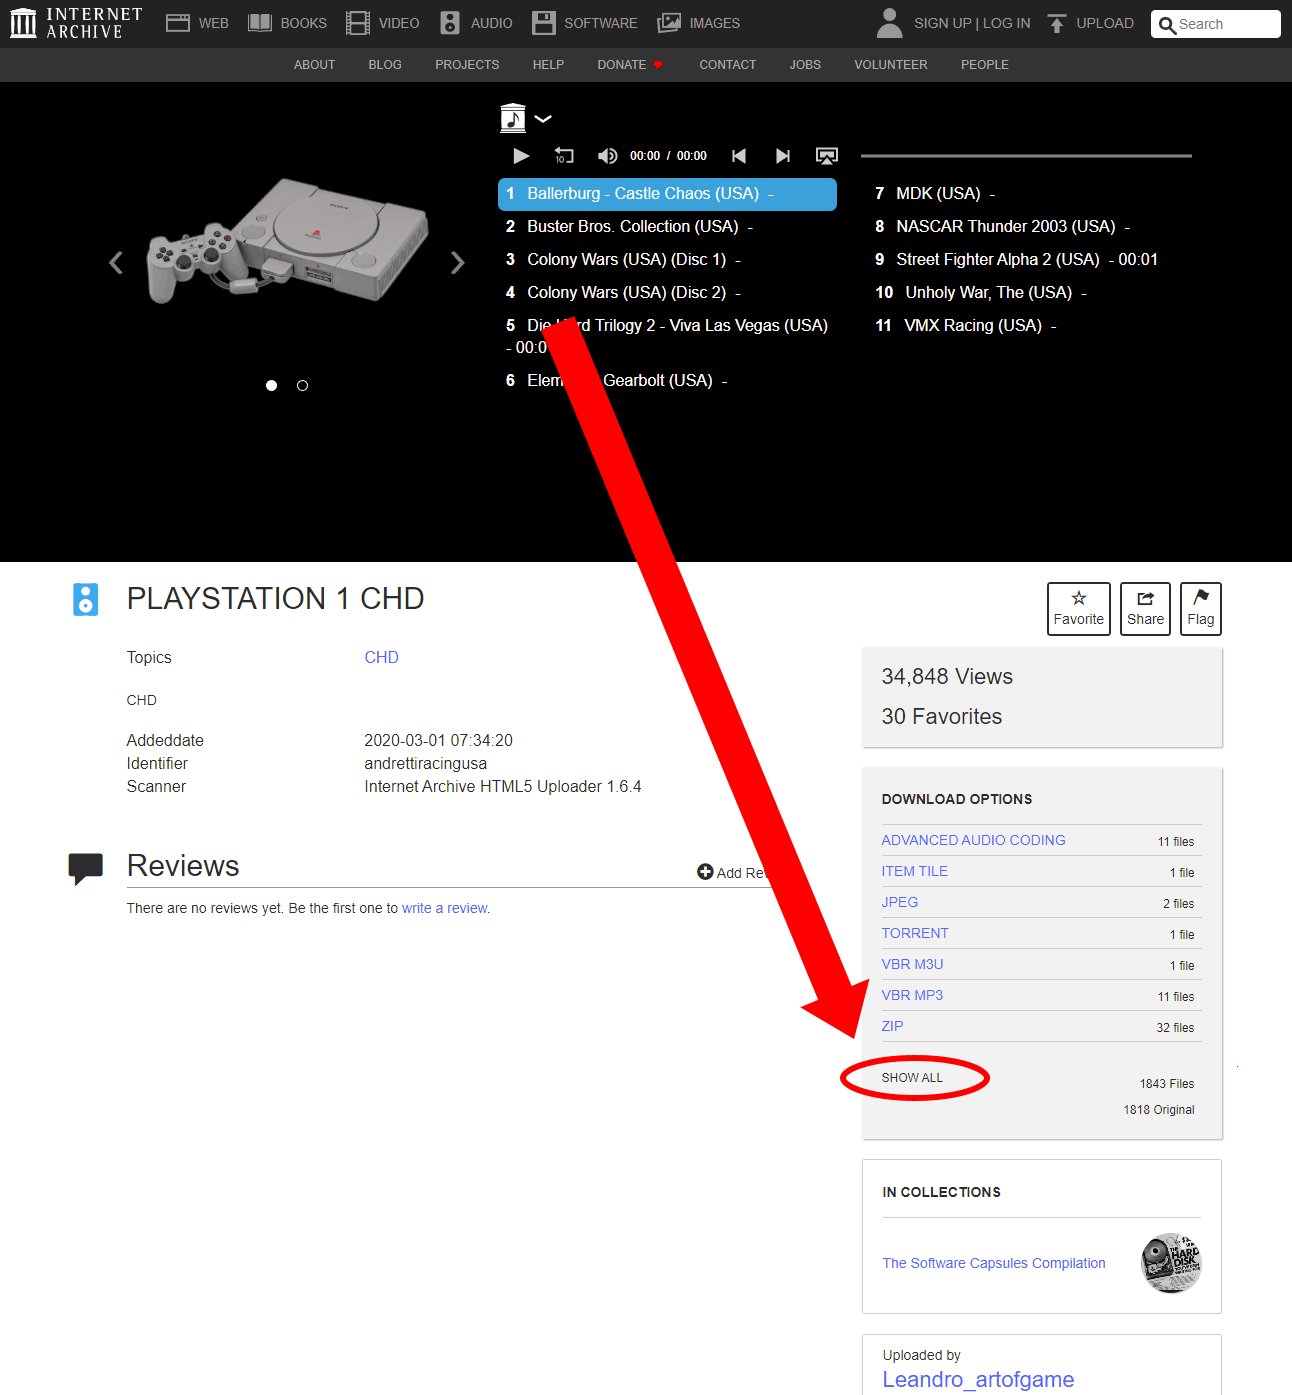
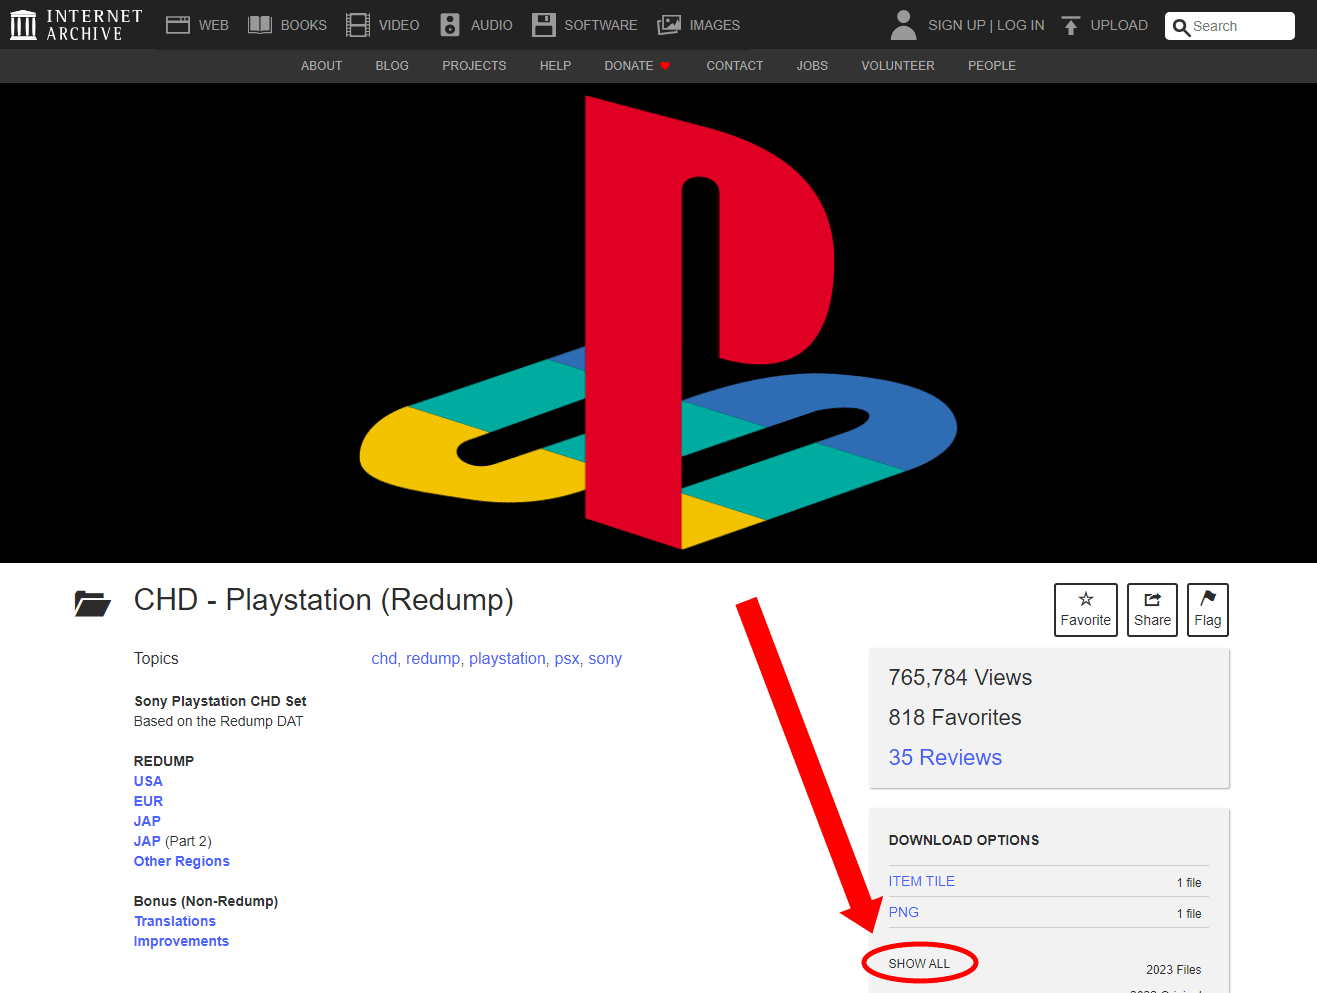
What I recommend is downloading PlayStation 1 ISOs in “CHD” format. CHD is a relatively new format that has become the new standard for CD-based games. You can find them on Google by searching “archive.org playstation 1 chd”. Click the first search result, then click SHOW ALL, as shown here . Then download all the games you want :)
Q: My PAL PS1 game is giving an SBI error!
Upon loading a PAL version of a PlayStation 1 game, you may receive this error:
You are attempting to run a libcrypt protected game without an SBI file:
[name of your game]
Your dump is incomplete, you must add the SBI file to run this game.
Some PAL PS1 games (mostly by Infogrames and EA) use LibCrypt anti-piracy protection. For these games, you must have the SBI file in order to emulate them properly.
Depending on where you downloaded the game, an SBI file might already be included in it. If that's the case, simply make sure the SBI file and your PS1 ISO have the same name. If the SBI file isn't there with your PAL ISO, you can download a collection of all SBI files below.
- All PAL PS1 SBI files (109 KB)
If you need more help, check out this page on CDRomance.
Full screen
To enter full screen mode, simply press Alt+Enter. When you wish to go back to window mode, press Alt+Enter again.
Stretch to fill
In full screen, DuckStation defaults the screen ratio to the normal 4:3 size. However, if you wish you can stretch it to fill the screen.
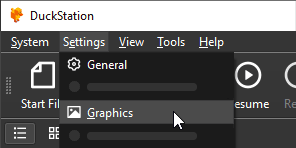
- Go to Settings > Graphics.
- Look in the “Aspect Radio” drop-down menu, and select Stretch To Fill - as shown here .
Start in full screen
If you wish, you can set it so that games automatically load in full screen. Go to Settings > Interface and put a check in Start Fullscreen, as shown here .
Boosting performance
By default, DuckStation uses “OpenGL” to process the video output (a standard method with Windows). However, if you have a good video card you can set DuckStation to use that instead, resulting in a boost in performance.
- Go to Settings > Graphics.
- In the Adapter dropdown selection , select your video card. If you don't have a good video card, selecting it here may not do anything to boost performance.
Running games at 60fps
The question “Can DuckStation run games at 60fps?” is a loaded question. I'll start by saying: at default, DuckStation will always try to run games at 60fps (frames per second). Hitting the 60fps threshold depends on the game and your hardware. DuckStation will have a harder time hitting 60fps if you've upscaled the graphics, enabled PGXP corrections, or enabled anything else that takes up more CPU.
Frame rates are dependent on how a game is programmed. If a game has an unlocked frame rate, it can achieve 60fps. If a game has a locked frame rate, it can't go past 30fps. Even more complicated, games often have a mix of locked and unlocked instances. For example, gameplay might be capped at 30fps, but opening the menu runs at 60fps.
DuckStation has an 'overclock' feature that, once enabled, tries to force games to run at 60fps. Be warned, though, that enabling this feature may cause games to crash. Also, simply enabling overclocking may not be enough for certain games. I recommend looking online to see if 60fps cheats or hacks are available for the specific game you're playing. Keep note that overclocking still needs to be enabled when these cheats or hacks are in use.
Overclocking can be enabled by going to Settings > Console, then put the check in Enable Clock Speed Control - as shown here . DuckStation will prompt you with a warning that enabling this may crash games. Then, adjust the slider to increase the percentage past 100% for how much you want DuckStation to overlock emulation.
Additionally, I recommend showing the GPU usage on-screen so you can see if the overlocking is working. Go to Settings > On-Screen Display. Then, put a check in Show FPS. During gameplay, DuckStation will show you a little FPS indicator.
Upscaling graphics

You can set the resolution in the settings by going to Settings > Graphics > Internal Resolution, as shown here .
Recommended: Upscaling via shortcuts
Older versions of DuckStation conveniently set the Page Up & Page Down keys to upscale/downscale the resolution on the fly. I don't know why they did away with this. It's a great way to find out what resolution your computer can handle. Fortunately, you can bring this feature back. Here's how:
- Go to Settings > Hotkeys.
- You'll arrive here . Set “Increase Resolution Scale” to Page Up and “Decrease Resolution Scale” to Page Down. Then close Settings.
During gameplay, press Page Up to have DuckStation jump in resolution: 2x, 3x, 4x, etc. “3x” is equivalent to 720p. If you have a fast computer, you'd probably be able to handle “5x” (1080p) or “9x” (4K). To go back to a resolution, press the Page Down key. Expect to be pressing Page Up & Page Down a few times to find out what your computer can handle.
Enabling PGXP corrections
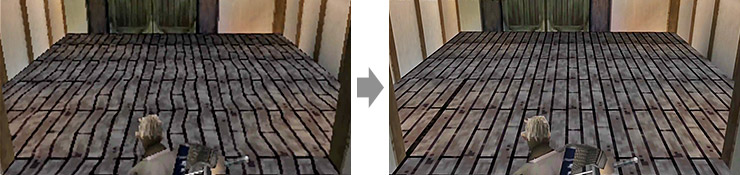
'PGXP corrections' are the hottest feature of modern PlayStation 1 emulators. The original PlayStation 1 wasn't designed to be upscaled to high resolutions. So when PlayStation 1 emulators upscale graphics, you begin to notice obvious faults in the 3D animation and 3D texturing.
 (Left) Normal, (Right) PGXP Mode
View the sample comparisons around here. The image above shows PGXP correcting texture mapping. The GIF animation shows PGXP correcting jittery animation. Pretty cool, huh? Here's how to enable these features:
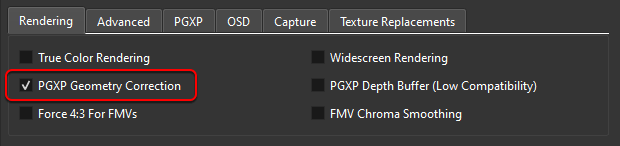
- Go to Settings > Graphics.
- On the first tab, “Rendering”, put a check in PGXP Geometry Correction.
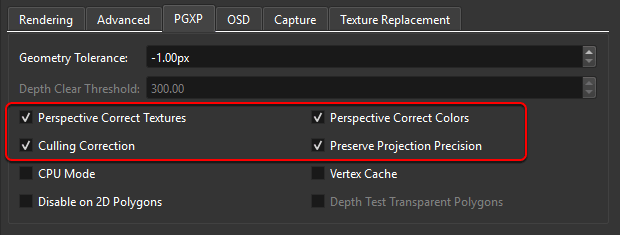
- Then, click on the “PGXP” tab. Put a check in the four options circled below.
Disc swapping for multiple-CD games
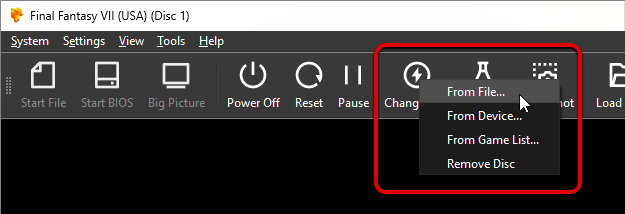
When you reach the point of a multiple-CD game when you need to swap discs, click on the Change Disc icon (if these large icons aren't present, you can show them). You're given a few options:
- From File - You can manually navigate your computer to select the next ISO file.
- From Game List - If you set up a game list, you can select the next disc from the game list.
- From Playlist - If you set up an M3U file for the game's ISO files, the discs would appear here in a list. In my RetroArch tutorial, I explain how to create an M3U file for disc-swapping. Having an M3U file is convenient, but if you're not too computer savvy I don't recommend going through the trouble because the process can be a hassle. I recommend the File or Game List options above.
Once you've selected the ISO for the next disc, press Start or whatever other buttons the game wants you to press to proceed.
Save states
Save states is a feature that saves the exact spot you are in any game. You can recall your save state at any time. Here, take a look at the save state menu . You can collect up to 10 different save states per game. The menu also offers 10 different global save states, but I think you should ignore these.
There are three different ways to access save states:
Method #1 - Keyboard shortcuts
- Load state = F1
- Save state = F2
- Previous save slot = F3
- Next save slot = F4
Method #2 - Via the System menu
To save a state, go to System > Save State and select the Game Save # you want - as shown here . To load a save state, go to System > Load State and select the Game Save # you want.
Method #3 - Via the home row buttons
The Load State and Save State buttons work the same way as using the System menu: 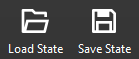
If these large icons aren't present, you can show them.
You can change the keyboard shortcuts
If you don't like pressing F1-F4 for save states, you can change these shortcuts to other keyboard keys (or gamepad buttons) in Settings > Hotkeys. Then, scrolll down to the “Save States” section, as shown here . You can even set specific keys for saving/loading specific save states. If you mess up and want to delete a set shortcut, right-click on it.
New to emulation? If you're new to video game emulation, I don't want to confuse you into thinking that save states are what you're supposed to use as the only means to save your progress with DuckStation. Save states are an optional feature. You can still save your game at save points as you would on a real PlayStation 1. In-game saves are loaded at the game's title screen (like on a real PS1) - they're not loaded via the System menu.
Pro Tip: I recommend that you use both save states and in-game saving to save your games. That way you'll always have a backup if you lose a save.
Switching memory to shared memory
Unlike other PlayStation 1 emulators (mainly speaking of ePSXe), by default DuckStation creates a memory card per game. This method offers many advantages. But yet, the traditional method with all games sharing the same memory card has some advantages too. Or maybe you're just nostalgic of the traditional method. In any case, if you wish you can set DuckStation to share the memory card.
- Click on Settings > Memory Cards.
- Look under “Memory Card 1”. In the Memory Card Type dropdown, select Shared Between All Games - as shown here .
Memory card: copying/moving/deleting saves
DuckStation gives you the option to manage your saves in an exclusive editor or using the PlayStation 1's native interface. The difference is that DuckStation's editor is far more robust and lets you select any memory card file on your computer.
Option #1 - Managing memory in DuckStation
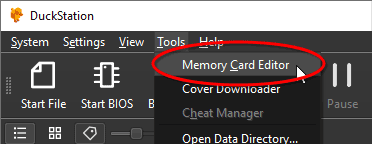
- Click on Tools > Memory Card Editor. In the Memory Card Editor, select the memory card you want to work with.
- OR if you set up a game list, you can right-click a game and go to Edit Memory Cards, as shown here . This will pre-select the game's memory card, as opposed to Step 1 where you need to manually select the memory card file.
- The Memory Card Editor has all of these goodies:
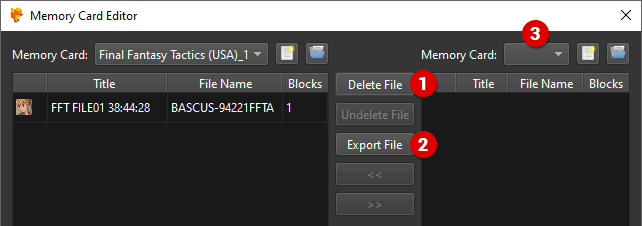
- When you select a save file, you can 1 Delete it, or 2 Export it into its own separate memory card.
- You can 3 select a different memory card file to copy save files to/from it.
Is it not working? Did you copy over a save, boot up the game, and found that the new save isn't there? I've found to have better luck formatting the memory card before copying a game over. This graphic explains this . Also, if the game is open, make sure to completely close it & restart it (a hard restart) after copying over the save. If you don't do this then DuckStation may undo the new save you just copied over.
Option #2 - Managing memory natively
You can only use this option if you set memory cards to be shared instead of per-game.
- Go to System > Start BIOS, or click on the Start BIOS button:
 (if this large icon isn't present, you can show it)
 - You should arrive at the BIOS main screen . Choose Memory Card to proceed.
- Now you're at the memory card management screen:

This is the screen where you can manage your memory card saves. You would do so exactly as you would on the real PlayStation 1 system.
Need to transfer saves from another emulator? Read this section: Transferring MCR or GME saves to DuckStation
Fast forward
There are two ways to enable fast forward:
Fast forward (on press)
To enable fast forward, press the Tab key. This will have fast forward active for as long as Tab is held down.
Toggle fast forward on/off
If you want fast forward to keep going without having to hold down the Tab key, you can toggle it on and off. However, by default DuckStation doesn't have a keyboard shortcut set for this. You need to configure it yourself. To do so:
- Go to Settings > Hotkeys.
- At the Hotkey Settings, you'll find the shortcut slots for fast forward . Set a keyboard key or gamepad button to Toggle Fast Forward. If you mess up and want to delete a set shortcut, right-click on it.
Capturing screenshots
Press the F10 key to capture a screenshot. DuckStation will capture it as a PNG image and toss it in the “screenshots” folder. Remember, this screenshots folder is located in Documents then DuckStation .
I think the F10 shortcut is the most convenient, but know you can also capture screenshots via the System menu and the Screenshot icon - as shown here .
You can change the shortcut
If you don't like pressing F10 to capture screenshots, you can change it to another keyboard key (or gamepad button) in Settings > Hotkeys. Then, look for Save Screenshot. If you mess up and want to delete a set shortcut, right-click on it.
Native resolution screenshots
By default, DuckStation will capture the screenshot in the current resolution/upscaling you currently have set and any enhancements you enabled. If you wish, screenshots can be captured in the PlayStation 1's native 1:1 resolution without any emulator-driven enhancements. To do so:
- Go to Settings > Capture.
- In the “Screenshot Size” drop-down, select Internal Resolution or Internal Resolution (Aspect Uncorrected) - as shown here .
Using cheats
DuckStation auto-downloads cheats! It's an awesome feature.
Important note: As of around June 2025, DuckStation removed the standalone “Cheat Manager” as a global feature. Cheats are no longer accessed from the main toolbar or Tools menu. Instead, they've been integrated into the emulator's per-game interface.
Anyhow, here's how to enable cheats:
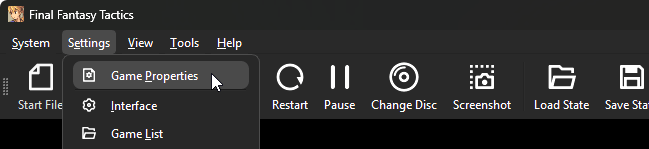
- Load the game you want to apply cheats to.
- Click Settings > Game Properties, as shown below.
- On the Game Properties screen, click Cheats . You should already see a list of pre-downloaded cheats.
- Put a check in all the cheats you want enabled. Also, put a check in Enable Cheats so that they're turned on. Altogether, you'll have a setup like this .
- Want to add your own cheat? Click the
 button. In the form fill out the name. Then, paste the code into the last field. Currently, only Gameshark codes are supported. Click Save when you're done. When you see your custom code in the cheat list, don't forget to click its checkbox to give it a check.
- Want to add your own cheat? Click the
- That's it! You can close the Game Properties window and enjoy these cheats in your game. You may need to restart the game to see them in effect.
Transferring MCR or GME saves to DuckStation
The RPG shrines in my FantasyAnime.com are loaded with periodical “MCR” memory card saves (from ePSXe). GameFAQs has memory card saves, too, in “GME” format. Can MCR and GME saves be used with DuckStation? They certainly can! Here's how:
- The first step is to rename your memory card file. Files with an MCR or GME file format must be renamed to MCD format. For example, if it's called “finalfantasyvii_disc1.mcr”, rename it to “finalfantasyvii_disc1.mcd”.
- Open the Memory Card Editor. Click on Tools > Memory Card Editor.
- In the Memory Card Editor , select the memory card file for the game you want saves transferred to. Then click the
 icon to select the memory card file you want to copy saves from. In my example picture, I selected a memory card file from ePSXe.
 - With both memory card files open, select the save slot you want to copy over, then click the '<<' icon.
Important note: You may run into this issue when transferring saves between memory cards. When you copy over a save and boot up the game, the save you copied over isn't showing up. I've found to have better luck formatting a memory card before copying a game over.
Q: Can I transfer my memory card to another PSX emulator?
Yes! You just need to rename the file and copy it over. For example, let's say you want to copy over a memory card file to ePSXe. You'd rename “finalfantasyvii.mcd” to “epsxe001.mcr”. If you're not sure what to rename the file to for the target emulator, just look in the emulator's memory card folder to see how it names its memory card files. That's all there is to it.
If you want to do the opposite and transfer a memory card file to DuckStation, read the section about Memory Card Management.
Q: DuckStation crashes during gameplay!
Crashing during gameplay is a tricky issue to troubleshoot because there are many issues that could have caused it. By “crashing” I'm talking about DuckStation suddenly closing, the game freezes, or the game freezes on a black or white screen. Let's try approaching this one issue at a time:
Attempt #1: Maybe it's just a hiccup
Perhaps the crash was just a harmless one-time hiccup with your computer (or device). If that's the case, simply restarting your computer will resolve it.
Pro Tip: You should always save your games with both internal saving (at a save point) and save states so that you always have a backup save.
Attempt #2: Rule out your ISO
Make sure you're using a bad ISO. A partially corrupt ISO would cause the game to crash. PlayStation 1 ISOs in “CHD” format are relatively new and have become the modern standard for CD-based games. So I recommend using CHD for all of your games. To find PlayStation 1 CHD games, search Google with “archive.org playstation 1 chd”. Click the first search result, then click SHOW ALL, as shown here . Then download all the games you want :)
Attempt #3: Rule out configurations
Were you tweaking around settings in DuckStation's configurations? It's possible you did something that causes games to crash. If that's the case, this issue can easily be resolved by deleting DuckStation's configuration file so that it wipes everything to default (like new). Remember when I talked about where DuckStation saves everything? In DuckStation's folder within Documents, delete the settings file . Then start up DuckStation and see if the crashing persists.
Attempt #4: Update DirectX
Try installing the full DirectX package to ensure DirectX is running the best it can (don't forget to restart your computer after installation). You should also make sure your video card has the latest driver.
If you did all the above and DuckStation is still crashing, I would guess either DuckStation isn't fully compatible with the given game or DuckStation isn't fully compatible with your computer. There would be no fix for this. You can try RetroArch with the Beetle PSX core. If you're using an old computer or an older version of Windows, try ePSXe or pSX.
Dumping your PSX games to ISO
Perhaps you prefer using your own PlayStation 1 games instead of downloading them from the Internet? Or maybe you just want to keep backup copies of your PlayStation 1 games? Whatever the case, here's how you can dump your games:
- Download & install RetroArch for Windows. It's the #1 multi-system emulator. I have a tutorial for RetroArch for Windows as well.
- Put your game CD in your computer's CD-ROM drive. Open RetroArch and select Dump Disc, as shown here
- On the next screen, select your CD-ROM drive (the first option, most likely).
- You're going to see this progress bar appear on the lower-left of the screen:

Depending on the speed of your CD-ROM drive, this will probably take 5-20 minutes to finish. - When RetroArch finishes dumping your game CD, the progress bar will disappear. It doesn't prompt you with an alert sound or anything. If your CD-ROM was humming during the dumping, you'll know RetroArch finished when your CD-ROM's humming sound stops.
- RetroArch dumps the ISO of your game CD in its Downloads folder. So the next step is locating the Downloads folder. If you didn't set a custom location for RetroArch during its installation, then it's in its default location in Windows (C:) > RetroArch-Win64 - as shown here .
- In RetroArch's Downloads folder, you should see a BIN file and a CUE file with a weird filename like “cdrom-200000-1000000”, as shown here . Double-click on the CUE file and choose to open it in Notepad. You'll see the text that's shown in my picture.
- Next, rename the CUE file and BIN file to the name of your game. Open the CUE file in Notepad to rename the ISO as well. You can name these files to any name you want. The only requirement is that both files & the name in the CUE file must be the same exact name. Look here - these three instances need to be changed to the same name.
- That's it! You've successfully dumped your PlayStation 1 game. You can use it with any PlayStation 1 emulator or any multi-system emulator that supports PlayStation 1.
Finding PSX ISOs
In the late 2010s, a new ISO was introduced called “CHD”. This format is now commonly used for systems such as PlayStation 1, Sega Saturn, Sega CD/Mega CD, and PC Engine CD/TurboGrafx16-CD. CHD guarantees that games will run effectively on modern video game emulators (from a file compatibility perspective).
To find PlayStation 1 ISOs in CHD, I recommend searching Google with “archive.org playstation 1 chd”. Clicking the first link typically brings you directly to the list of CHD ISO downloads. If the link takes you to a landing page , click SHOW ALL to reach the downloads page.
If you want more options for downloading ROMs, check out my links page.