PCSX2 Tutorial
Setting things up
- Installation
- The BIOS
- First Time Configuration + BIOS setup
- Where PCSX2 saves everything
- Showing the toolbar (recommended!)
- Setting up the keyboard or gamepad
- Using a PS3, PS4, or Xbox controller
Playing games
- Loading a real PS2 game you own
- Loading a PS2 ISO
- Fullscreen
- Increasing the resolution
- Q: Games get stuck at loading screen!
- Q: I hear sound but get a black screen!
- Q: My PS2 game is not an ISO. Help!
Features
View this guide on Google Docs to:
- Save as PDF or any common doc format
Share
About PCSX2
PCSX2 was the first PlayStation 2 emulator - it started in 2001! Through persistent development, it has remained the best one around! It's capable of playing most titles without any major glitches. It conveniently comes equipped with its own plug-ins, which can be customized. PCSX2 requires a fast computer in order to run well. You might have trouble with it if you're using a budget laptop or a Windows tablet.
One drawback with PCSX2 is, out of the box, it runs barebones with its defaults and doesn't have any enhancements enabled. In this tutorial, after I help you get PCSX2 running, I will show you how to enable graphical enhancements to benefit from the hottest features that modern emulation has to offer for PlayStation 2.
With other emulators, you can get away with using your keyboard for gameplay. However, with PCSX2 it's pretty difficult, given the PlayStation 2 controller's mini joysticks. I strongly recommend purchasing a gamepad for this emulator.
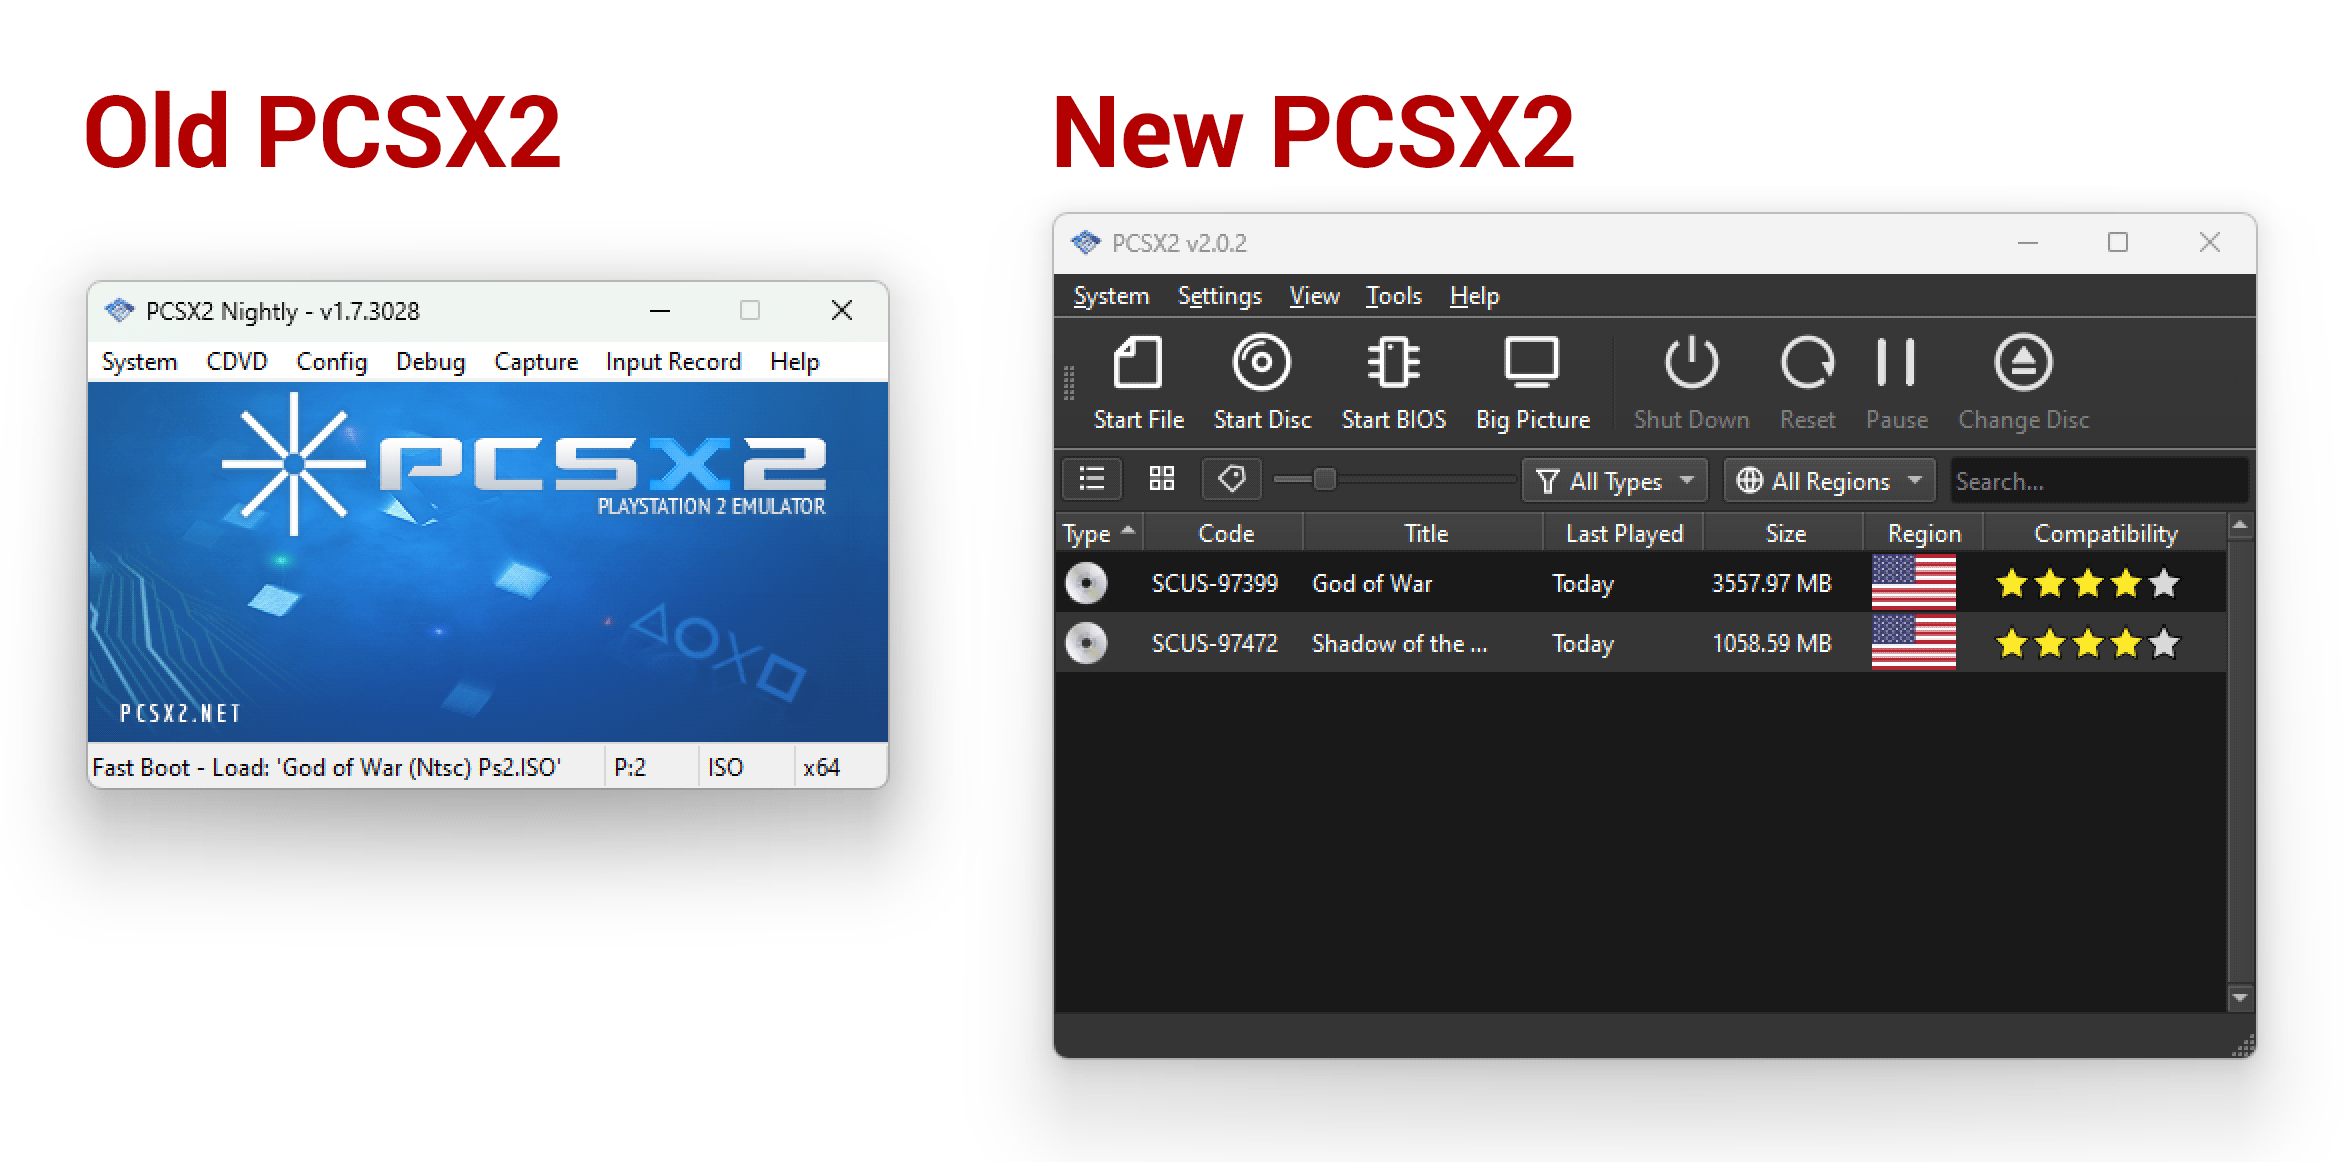 PCSX2: Old vs. New
Important note: In July 2024, the PCSX2 team released a significant version 2.0 update. PCSX2 was practically re-written from the ground up! All the menus were changed. This tutorial was updated to support this new version. If you're using an older version of PCSX2 (any version below 2.0), please update it so that you can benefit from this tutorial. But if for whatever reason you refuse or cannot use the new version, I still have a backup of my old PCSX2 tutorial that covers v1.x.x.
Downloading PCSX2
 Downloading PCSX2
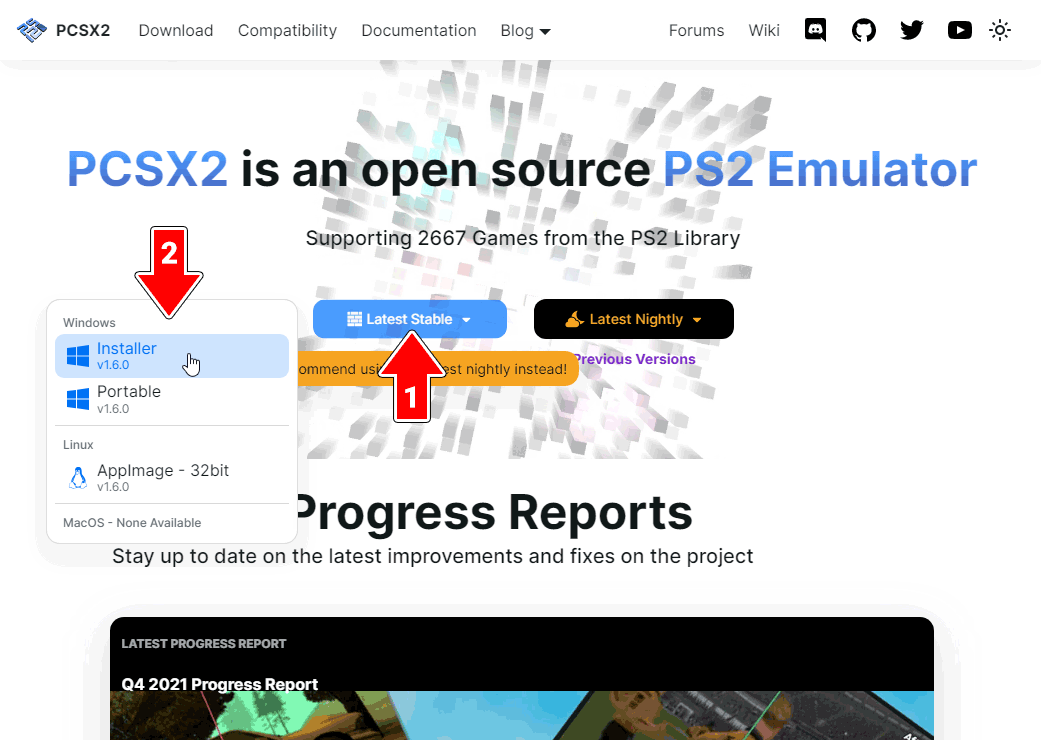
 You can download PCSX2 from the official homepage. Click on the blue Latest Stable button. You'll be prompted with options for “Installer” and “Portable”. What's the difference?
- The Installer version - This is an easy install wizard that installs PCSX2 like a normal Windows app. If in the future you want to uninstall PCSX2, you can do it through Windows. If you're not very computer savvy, I recommend the Installer.
- The Portable version - A 'portable' program is one that can be placed anywhere on your computer or external drive. The program is self contained in the folder. Hence, that is the nature of PCSX2's portable version. However, although a portable program can be placed anywhere, it's still important to only place it in a common location on your computer such as Documents, Downloads, or create a folder on your desktop. If in the future you want to uninstall PCSX2, simply delete its folder.
Installation
As pointed out above, you have two versions: 'installer' and 'portable'.
Installing via the installer
- Double-click on the install EXE for PCSX2 .
- Windows might prompt you with a warning . Don't be scared - this is just a standard practice by Windows with any EXE downloaded from the Internet. To move past this window, click More info then Run anyway.
- On the first screen , PCSX2 will ask you if you want to do a Standard install or Portable install. You've already decided to use this install wizard, so let's proceed with the normal install - click Standard Installation then Next.
- On the Select Install Location screen, just click Next.
- On the Select Start Menu Folder screen, just click Next.
- On the Select Additional Tasks screen, by default “Create a desktop shortcut” is checked. If having a shortcut on the desktop isn't important to you, you can uncheck this. Otherwise, click Next to proceed.
- On the Ready To Install screen, it just reviews everything. Click Install to proceed.
- That's it! PCSX2 will install. Click Finish when it's done.
Installing the portable version
Installation is simple: just extract PCSX2 from its zip file. To make things clearer, check out the video below that shows how to 'install' a portable emulator (it shows Snes9x, but PCSX2 is the same process). It's pretty straight-forward - all that you're doing is extracting a zip file while doing a little bit of folder management. If you want to 'uninstall' a portable emulator, simply delete it!
In the video, I'm recommending “Documents” to house your emulators. But, you could also place emulators in “Downloads”, a folder on your desktop, an external HDD, or a thumb drive. These are common locations with full read/write access. Keeping it on your computer is better than external storage because it runs better & faster.
Also, when you open PCSX2 for the first time, Windows might prompt you with a warning . Don't be scared - this is just a standard practice by Windows with any EXE downloaded from the Internet. To move past this window, click More info then Run anyway.
The BIOS
The PlayStation 2 BIOS is required in order to boot games. This is a separate download after you've downloaded PCSX2. Below you can download this BIOS.
- PlayStation 2 BIOS (12.7 MB). Download by right-clicking the download link and go to Save Link As. When saving, rename the “_ip” file extension to “zip”. If you don't see the file extension, try showing them. I also made this GIF animation to show you how to change the file extension.
Continue reading below for what to do next after you download the BIOS.
First Time Configuration + BIOS setup
This section assumes you've already installed PCSX2 and downloaded the BIOS (above).
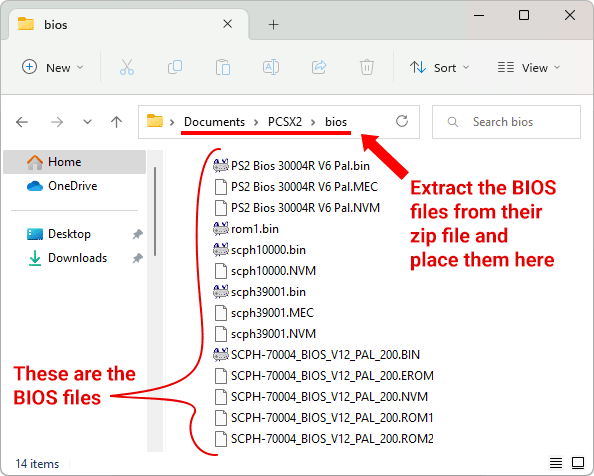
- PCSX2 doesn't care where the BIOS files are located on your computer. But to keep things easy and tidy, I recommend placing them in PCSX2's BIOS folder in Documents. Go to your downloads folder, move my BIOS zip file to PCSX2's BIOS folder, and extract its contents. It would look something like below:
- Don't don't know how to unzip (extract) zip files? YouTube has help videos. Remember, my BIOS zip file needs its file extension renamed from “_ip” to “zip” to work as a zip file.
- If you opted for the portable version, there won't be any folders for PCSX2 in Documents yet. Those folders are automatically created after the first time you open PCSX2.
- Open PCSX2. If you used the install wizard, you can double-click its icon on your desktop or find PCSX2 in the Windows Start menu. If you opted for the portable version, double-click on PCSX2's EXE.
- PCSX2 welcomes you with the First Time Configuration screen . By default, the dark theme is selected, and automatic updates are enabled. If you're happy with these settings, click Next.
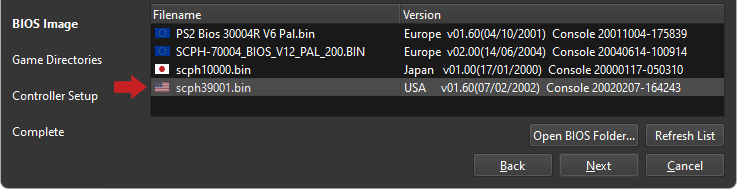
- Next is the “BIOS Image” screen. If you followed step #1 and placed the BIOS files in PCSX2's BIOS folder, then you'll see them here:
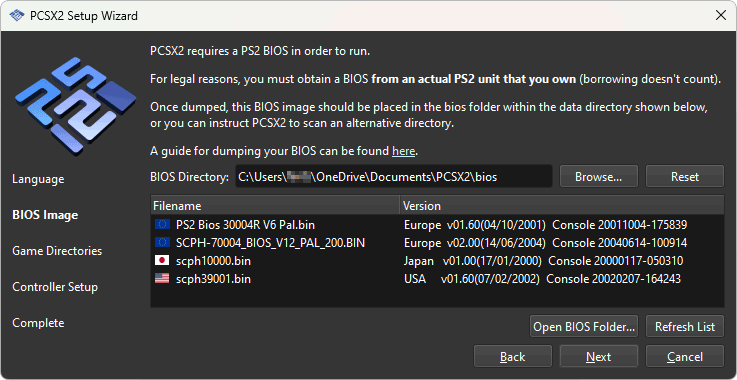
If this screen is empty, then you missed a step, or you're using the portable version, or perhaps you prefer having the BIOS files reside somewhere else. Go into your computer and make sure the BIOS files reside in the folder you want. Return to this wizard, then click Browse to find that folder.- Did you accidentally close this First Time Configuration wizard? You can access the BIOS screen by going to Settings > BIOS - you'll arrive here . From here, select the USA BIOS , then you can close this window (there's no “Next” button like in the First Time Configuration wizard).
- The last step for the “BIOS Image” screen is to select the BIOS you want to be the default. I'm in North America, so I clicked on the USA BIOS:
Click Next when you're ready. - Next is the “Game Directories” screen. This is where you tell PCSX2 the folder where your games are located. You don't have to set this now if you haven't decided yet where you want your games to be. Otherwise, click Add if you want to set the games folder now. When you finish, click Next to proceed.
- Next is the “Controller Setup” screen. Here you can set up a gamepad or default PCSX2 to the keyboard. I think, for now, set it to the keyboard and worry about the gamepad later. Click Automatic Mapping, then Keyboard. When you're ready, click Next to continue.
- Click Finish to close the First Time Configuration wizard. That's it! PCSX2 is now fully installed and ready.
Where PCSX2 saves everything
This is important so I wanted to highlight this. As mentioned above, PCSX2 will create its directories in the Documents folder . And then inside PCSX2's folder you'll see such folders as:
- memcards - When you save at a save point within a game, this is where that save file is stored.
- sstates - When you use PCSX2 to save a state, this is where those save files are stored.
- snaps - When you snap a screenshot, this is where PCSX2 will save it.
You need to know where these folders are so you can grab your screenshots. Also, if you want to backup your saves or transfer them to another computer, you'd need to copy over the “memcards” and “sstates” folders.
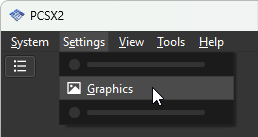
Showing the toolbar (recommended!)
I highly recommend showing the toolbar. It visualizes the most used features of PCSX2 as easily accessible, large buttons. I don't know why they hide this valuable bar by default.
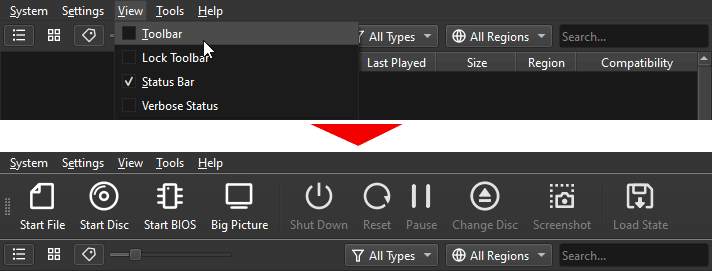
You can enable the toolbar by going to View > Toolbar, as shown above.
Setting up the keyboard or gamepad
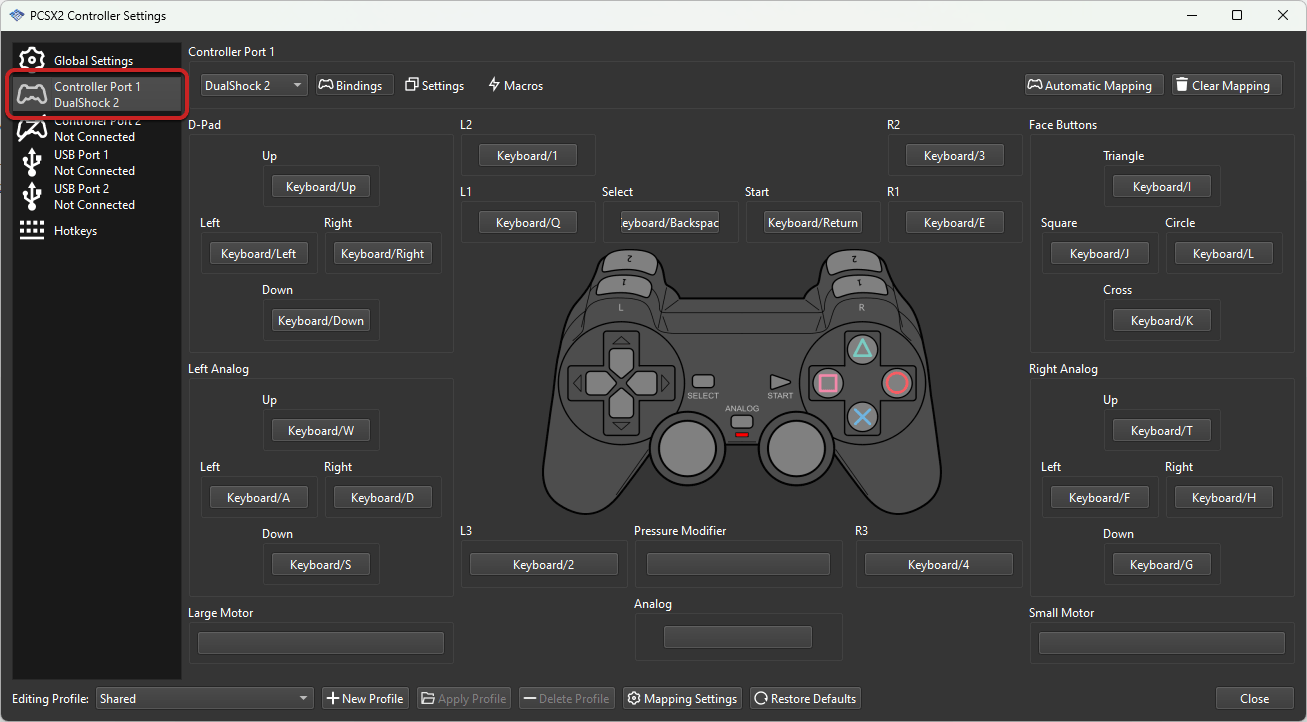
In the First Time Configuration wizard, I had you set the keyboard as the default input. So your next question might be: what are the keyboard keys to play games? Or, what about setting up a gamepad? Everything pertaining to input can be managed on the Controllers screen.
- Click Settings > Controllers.
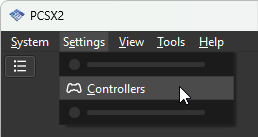
- On the Controllers screen, click
 for the settings of Player 1 (as shown below). Here you can find all the keyboard keys that are set by default.
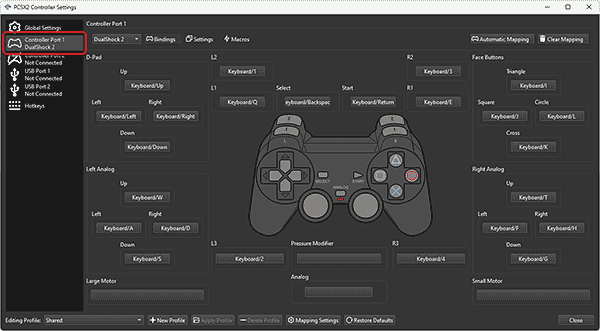
- To set up a gamepad, turn it on and make sure it's detected by Windows. Then, click Automatic Mapping > Gamepad. PCSX2 should automatically configure your gamepad. If it failed to do so, or you don't like how it was configured, you can manually reassign buttons (keep reading).
- If PCSX2 did not detect your gamepad, this is an issue with your gamepad. Try the general troubleshooting in my gamepads guide.
- To manually reassign a button on your gamepad, click on it, then press the button on your gamepad that you want it assigned to. Repeat this for every button to completely set up your gamepad. To remove a button assignment, simply right-click a button.
- When you're finished, click Close (on the bottom-right).
Using a PS3, PS4, or Xbox controller
PCSX2 doesn't require any special directions for using a PlayStation 2, PlayStation 3, or Xbox controller. However, the first time you plug one into your computer, it needs to be properly setup or requires special instruction for connecting. There are lots of videos on YouTube showing you how to do this:
- How to setup a PlayStation 2 controller on a PC
- How to setup a PlayStation 3 controller on a PC
- How to setup a PlayStation 4 controller on a PC
- How to connect an Xbox controller to a PC
Loading a real PS2 game you own
To load a real PlayStation 2 game that you own:
- Don't forget to configure the BIOS. Pop your game into your DVD-ROM drive. Wait a moment for Windows to detect it.
- Go to System > Start Disc, or click
 . You'll see the PlayStation 2 startup sequence (the BIOS). If all goes well, your game will begin after the sequence.
Note: I do not recommend playing your games via your DVD-ROM drive. PCSX2 is a rather demanding emulator on your CPU. Running the game from your DVD-ROM drive will slow it down and lower its performance. Rather, I recommend ripping your game to an ISO. I have directions for that towards the bottom of this guide.
Loading a PS2 ISO
PCSX2 has two ways to load PlayStation 2 games. You can (1) load games by manually selecting them, just as you would with most video game emulators, or (2) you can tell PCSX2 where your PlayStation 2 games are stored and have it populate a game list within PCSX2.
I'm going to go over both ways. But first, I need to walk you through extracting PlayStation 2 games:
- Downloaded PlayStation 2 ISO's typically come in a CHD file or 7Z file. They're less commonly in a ZIP or RAR file. CHD files don't need to be extracted (you can skip these extracting steps if your game is a CHD). 7Z and RAR must be extracted. To extract them, you can use 7-Zip (it's free).
- Using 7-Zip is easy. Just right-click the 7Z or RAR file and go to 7-Zip > Extract Here, as shown here .
- Once the ISO is extracted, now take notice of the file format of the ISO. PCSX2 only supports ISO files that are in BIN (BIN/CUE), ISO, MDF, CHD, CSO, ZSO, GZ, ELF, IRX, GS, and DUMP format. Here's a visual example of how they look like (the icons might look differently):
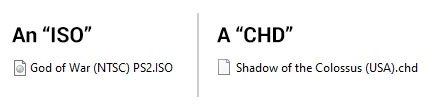
If the PSX game you downloaded came in a weird format such as NRG, UIF, DAA, CDI, XBX, B51, BWI, etc. - they are not supported. I recommend trying to find your game(s) in CHD or BIN/CUE format.- Don't see file extensions? Try showing them: Windows 11, Windows 10.
Now to load your game(s):
Option #1 - Loading games manually
This is the traditional method of loading a game with a video game emulator.
- Click on the Start File button:
 , or go to System > Start File (if this large icon isn't present, you can show it).
 - Look through your computer for your ISO and load it as if you were loading a ROM. If your game is in BIN/CUE format, select the CUE file. That's it! The game may not load immediately so give it a minute.
Option #2 - Creating a game list
You can save a few clicks by telling PCSX2 where your PlayStation 2 games are. It will place your games in a list that you immediately see every time you open PCSX2.
- Click on Settings and look at these options I highlighted :
- Game List - This is the master window where you can manage your game list.
- Add Game Directory - Select this to add a new folder with PS1 ISOs.
- Scan for New Games - Select this to scan for new games in your folder(s).
- Rescan All Games - Select this to perform a full scan in your folder(s).
- From here it's easy: just select Add Game Directory to add a new folder. PCSX2 will ask you if you want to scan recursively . This is only necessary if you have folders within your ISOs folder.
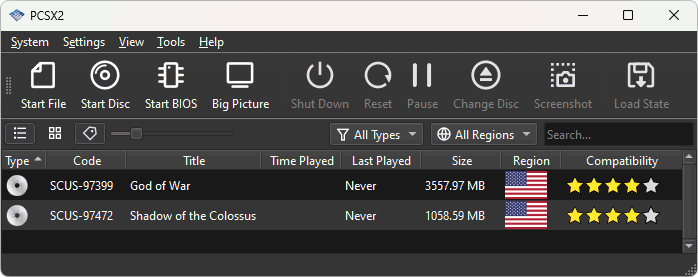
- The game list is immediately populated in PCSX2 (or might take a few minutes if you have hundreds of games). The list will look something like this:
- To load a game, simply double-click it. The game may not load immediately so give it a minute.
- Tip: PCSX2 lets you load a game directly from a save state! Right-click the game and go to Load State, as shown here .
- And then if you want to make changes to your game list, go to Settings then Game List. In Game List you can add/remove folders, enable/disable recursive scanning, exclusive folders, and scan folders.
Fullscreen
Press Alt+Enter to enter fullscreen. Press Alt+Enter again to go back to window mode. You can also double-click on the screen to toggle between window mode and fullscreen.
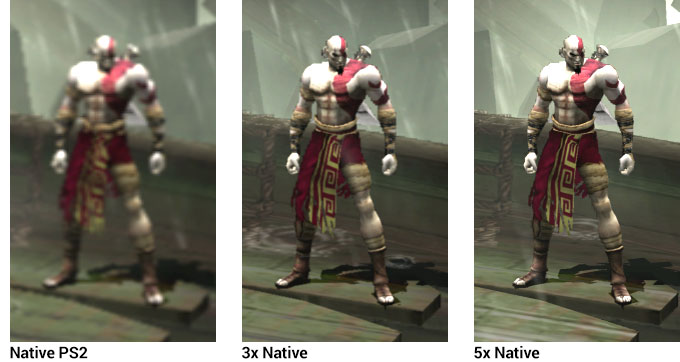
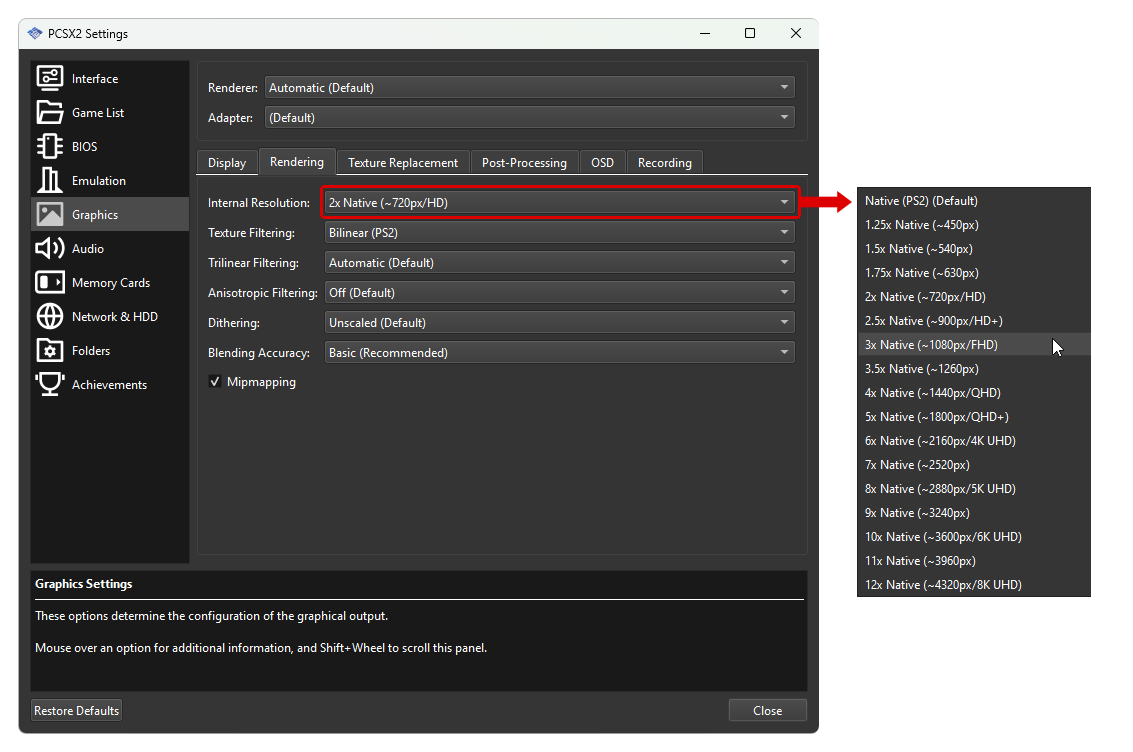
Increasing the resolution
By default, PCSX2 renders graphics in the native PlayStation 2 resolution. On our sharp HD monitors, this resolution looks very blurry (see below). However, you have the option to upscale graphics by increasing the resolution.
Here's how to increase the resolution:
- Go to Settings > Graphics, as shown below:
- Select the “Internal Resolution” drop-down selection, as shown below:
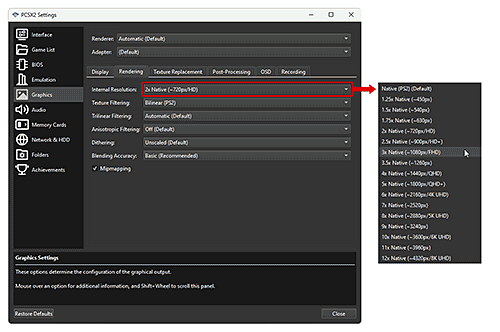
Choose a higher resolution, then click Close (on the bottom-right) to return to the game.- Optional: You can enable Anisotropic Filtering to preserve detail at extreme viewing angles (see this example ). Set Anisotropic Filtering to 8x or 16x for best results.
- See if the higher resolution is to your liking. Also, play the game some to find out if your computer can handle it at this higher resolution. You'll likely need to return to the Graphics settings and test other resolutions to see what looks good and runs well.
There's a quicker, easier way to toggle between resolutions.
Recommended: Upscaling via shortcuts
You can set a duo of keyboard keys to upscale/downscale the internal resolution. This is a fantastic way to quickly find out what resolution your computer can handle, as opposed to always manually changing the resolution via the Graphics menu. I recommend setting the Page Up & Page Down keys for this. Here's how:
- Go to Settings > Hotkeys.
- You'll arrive here . Set “Increase Resolution Scale” to Page Up and “Decrease Resolution Scale” to Page Down. Then close Settings.
During gameplay, press Page Up to have PCSX2 jump in resolution: 2x, 3x, 4x, etc. “3x” is equivalent to 720p. If you have a fast computer, you'd probably be able to handle “5x” (1080p) or “9x” (4K). To go back to a resolution, press the Page Down key. Expect to be pressing Page Up & Page Down a few times to find out what your computer can handle.
Q: Games get stuck at loading screen!
You may find that some games get stuck at the loading screen when you try to load them. There are several possible factors to this problem. Try running through this checklist:
- Download other games and try loading them. Rule out if this is a game-specific issue or a global issue with all your games. If it's a global issue, PCSX2 may not be setup correctly or PCSX2 may not be compatible with your computer.
- Make sure the file format of your game is supported by PCSX2 and extracted from its archive. I talk more about this below in My PS2 game is not an ISO. Help!
- It's possible the problematic game is partially corrupt or a bad file. Try downloading it from other websites.
- You may be able to fix it by tweaking around settings. Try YouTube videos about black screen troubleshooting.
Q: I hear sound but get a black screen!
If you load a game and you hear the game's audio but get a black screen, you possibly either have a BIOS issue or a video issue.
Resolving BIOS issues
- Firstly, I recommend using my BIOS files. Just to rule out if the BIOS files you downloaded from another website are no good.
- Go to Settings > BIOS. You'll arrive in the BIOS section . Select the BIOS according to the region for the game you're trying to play. For example, if you're trying to play a USA game, select the USA BIOS.
- Click Close (on the bottom-right). Then, restart your game.
Resolving black screen video issues
- Go to Settings > Graphics.
- In “Renderer”, select OpenGL - as shown here .
- Click Close (on the bottom-right) then restart your game. If this is a video-related issue, this should fix it.
If it's not fixed, perhaps try Software as the renderer. If that doesn't fix it, I'm afraid PCSX2 may not be compatible with your device. However, if the black screen is the result of the game crashing (you don't hear audio), that's a different issue. Try black screen troubleshooting.
Q: My PS2 game is not an ISO. Help!
PCSX2 only supports games (a.k.a. disc images) in BIN (BIN/CUE), ISO, MDF, CHD, CSO, ZSO, GZ, ELF, IRX, GS, and DUMP. Or more specifically, the filename of your game needs to be “Shadow of Colossus.chd”, “Shadow of Colossus.iso”, etc. Keep reading if the PS2 game you downloaded is not in these formats.
Wait, I don't see file extensions
Windows hides file extensions by default. Here are directions on how to enable them.
If your game is in 7Z, RAR, ZIP
These formats are forms of compression, and your PS2 game is inside of it! You need to extract it. Windows can extract ZIP files by default: here are directions. To extract a 7Z or RAR file, you can use 7-Zip (it's free).
If your game is in UIF, DAA, CDI, XBX, B51, BWI
These ISO formats are exclusive to specific burning software. Google around to find what program is associated with that format. Once found, install it and burn the game to a DVD. However, if you want my opinion, I say just forget about it. You should try to download the game from somewhere else to get it in CHD or ISO format. Working with these proprietary ISO formats are too much trouble.
Save states
Save states is a feature that saves the exact spot you are in any game. You can recall your save state at any time. Here, take a look at the save state menu . You can collect up to 10 different save states per game.
There are three different ways to access save states:
Method #1 - Keyboard shortcuts
- Save state = F1
- Load state = F3
- Next save slot = F2
- Previous save slot = Shift+F2
Method #2 - Via the System menu
To save a state, go to System > Save State and select the Game Save # you want - as shown here . To load a save state, go to System > Load State and select the Game Save # you want.
Method #3 - Via the home row buttons
The Load State and Save State buttons work the same way as using the System menu: 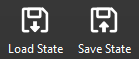
If these large icons aren't present, you can show them.
You can change the keyboard shortcuts
If you don't like pressing F1-F3 for save states, you can change these shortcuts to other keyboard keys (or gamepad buttons) in Settings > Hotkeys. Then, scroll down to the “Save States” section, as shown here . You can even set specific keys for saving/loading specific save states. If you mess up and want to delete a set shortcut, right-click on it.
New to emulation? If you're new to video game emulation, I don't want to confuse you into thinking that save states are what you're supposed to use as the only means to save your progress with PCSX2. Save states are an optional feature. You can still save your game at save points as you would on a real PlayStation 2. In-game saves are loaded at the game's title screen (like on a real PS2) - they're not loaded via the System menu.
Pro Tip: I recommend that you use both save states and in-game saving to save your games. That way you'll always have a backup.
Fast forward
Fast forward is the feature that speeds up the game. To access it, press the Tab key. To end the fast forwarding, press the Tab key again.
If the fast forward speed is too slow for you, you can adjust that. Go to Settings > Emulation. In the “Fast-Forward Speed” drop-down, select a speed higher than 200%.
Capturing screenshots
Simply press the F8 key to capture a screenshot. PCSX2 will save the screenshot in your current resolution and with your current video settings as a PNG image. The screenshot is saved to the “snaps” folder. To find the snaps folder on your computer, go to your “Documents” folder then “PCSX2” > “snaps” - as shown here .
If you enabled the toolbar, you can just click the screenshot button: 
Backing up your PS2 games to ISO
Perhaps you prefer using your own PlayStation 2 games instead of downloading them from the Internet? Or maybe you just want to keep backup copies of your PlayStation 2 games? Whatever the case, here's how you can dump your games:
- Download & install RetroArch for Windows. It's the #1 multi-system emulator. I have a tutorial for RetroArch for Windows as well.
- Put your game CD in your computer's DVD-ROM drive. Open RetroArch and select Dump Disc - as shown here
- On the next screen, select your DVD-ROM drive (the first option, most likely).
- You're going to see this progress bar appear on the lower-left of the screen:

Depending on the speed of your DVD-ROM drive, this will probably take 5-20 minutes to finish. - When RetroArch finishes dumping your game CD, the progress bar will disappear. It doesn't prompt you with an alert sound or anything. If your DVD-ROM was humming during the dumping, you'll know RetroArch finished when your DVD-ROM's humming sound stops.
- RetroArch dumps the ISO of your game CD in its Downloads folder. So the next step is locating the Downloads folder. If you didn't set a custom location for RetroArch during its installation, then it's in its default location in Windows (C:) > RetroArch-Win64 - as shown here .
- In RetroArch's Downloads folder, you should see a BIN file and a CUE file with a weird filename like “cdrom-200000-1000000”, as shown here . Double-click on the CUE file and choose to open it in Notepad. You'll see the text that's shown in my picture.
- Next, rename the CUE file and BIN file to the name of your game. Open the CUE file in Notepad to rename the ISO as well. You can name these files to any name you want. The only requirement is that both files & the name in the CUE file must be the same exact name. Look here - these three instances need to be changed to the same name.
- That's it! You've successfully dumped your PlayStation 2 game. You can use it with any PlayStation 2 emulator or any multi-system emulator that supports PlayStation 2.
Finding ISOs
In my links page, I have some good links to sites where you can download ISOs.
Probably the best place for PlayStation 2 games is Archive.org. Although navigating that site isn't easy. It's easier to search Google with such phrases as “archive.org playstation 2 chd” to find their downloads. I offer some more help with that in this image .
Another way to find PlayStation 2 games is through Reddit. The best way to find them is by searching Google with such phrases as “reddit download playstation 2”.