DuckStation Tutorial
Setting things up
- Downloading DuckStation
- Notes about downloading ISOs
- Preparing your PSX ISOs
- Setting up the BIOS
- First-time setup wizard
Playing games
- Loading a PSX ISO
- Q: My PAL PS1 game is giving an SBI error!
- The Pause menu
- Q: Graphics appear broken!
- Setting up a gamepad
- PGXP corrections
- Disc swapping for multiple-CD games
Features
- Save states
- Memory card: copying/moving/deleting saves
- Fast forward
- Capturing screenshots
- Using cheats
Other info & troubleshooting
View this guide on Google Docs to:
- Save as PDF or any common doc format
Share
About DuckStation for Android
 DuckStation's mascot
This tutorial is to help you with DuckStation for Android. DuckStation is considered a top PlayStation 1 emulator. All games emulate flawlessly. In addition to up-scaling 3D graphics (a staple feature in all PS1 emulators), DuckStation comes equipped with all the modern PGXP correction features. These corrections fix the inaccuracies that are evident when PlayStation 1 graphics are enhanced.
DuckStation has been around longer on Windows. This Android counterpart is relatively new and still trying to nail down exactly how it should work. Hence, in future releases, you may find that certain menu items or features have been moved around. Or a new icon appears on the main screen offering a new feature.
Should you use DuckStation?
With all the emulator offerings as of 2026, should you use DuckStation? I suppose I would say yes just because it's free. ePSXe for Android is a good emulator, too. It's more user-friendly than DuckStation. ePSXe works on Chromebooks while DuckStation isn't available for them. But yet, ePSXe costs $4 US. It requires some setup as well.
Multi-system emulators such as RetroArch emulate PlayStation 1 great, too (and it's free). Although multi-system emulators can come off as intimidating if you're a beginner to emulation. Anyway, to wrap this up, 'free' can't be beat so going with DuckStation is fine.
Downloading DuckStation
This is the easy part. Simply search “duckstation” in the Google Play store. Or follow the direct link below:
Notes about downloading ISOs
How big is your phone?
PlayStation 1 ISOs are pretty big for our Android devices. A single-disc game can range from 200 to 400 MB. A multiple-disc game can be over 1 GB. If your Android device only has 64 GB of space (or worse, 32 GB), you'll probably only be able to have one or a couple of PlayStation 1 games at a time.
That's within reason, of course. I'm assuming your phone is already full of music, photos, and videos. Here's an idea: delete all the photos of your kids to fit more PSX ISOs, haha.
Downloads... disappear?
When it comes to downloading PSX ISOs, Android can be a bit wonky. Sometimes, while you're downloading a large file, it might suddenly disappear without warning. Sometimes it'll tell you the download finished, but it didn't. If your Wi-Fi connectivity is spotty, the download might stall and never continue. This can happen in any app, whether using Google Chrome or cloud storage, such as Google Drive or Dropbox.
To workaround these issues, what I recommend doing is to download your PSX ISOs on a PC (or a Mac). Then connect your Android device to the PC to transfer the PSX ISOs by cable. Here's some help with that.
CHD is all the rage
In the late 2010s, rom sites introduced a new ISO format called “CHD”. This format is now commonly used for CD-based systems such as PlayStation 1, Sega Saturn, Sega CD/Mega CD, and PC Engine CD/TurboGrafx16-CD. CHD guarantees that games will run effectively on modern video game emulators (from a file compatibility perspective). To find PS1 ISOs in CHD, I recommend searching Google with “archive.org playstation 1 chd”.
Preparing your PSX ISOs
Before we jump into loading games with DuckStation, your PlayStation 1 ISOs need to be collected into a folder. Upon downloading a PlayStation 1 ISO, it'll be in one of these formats:
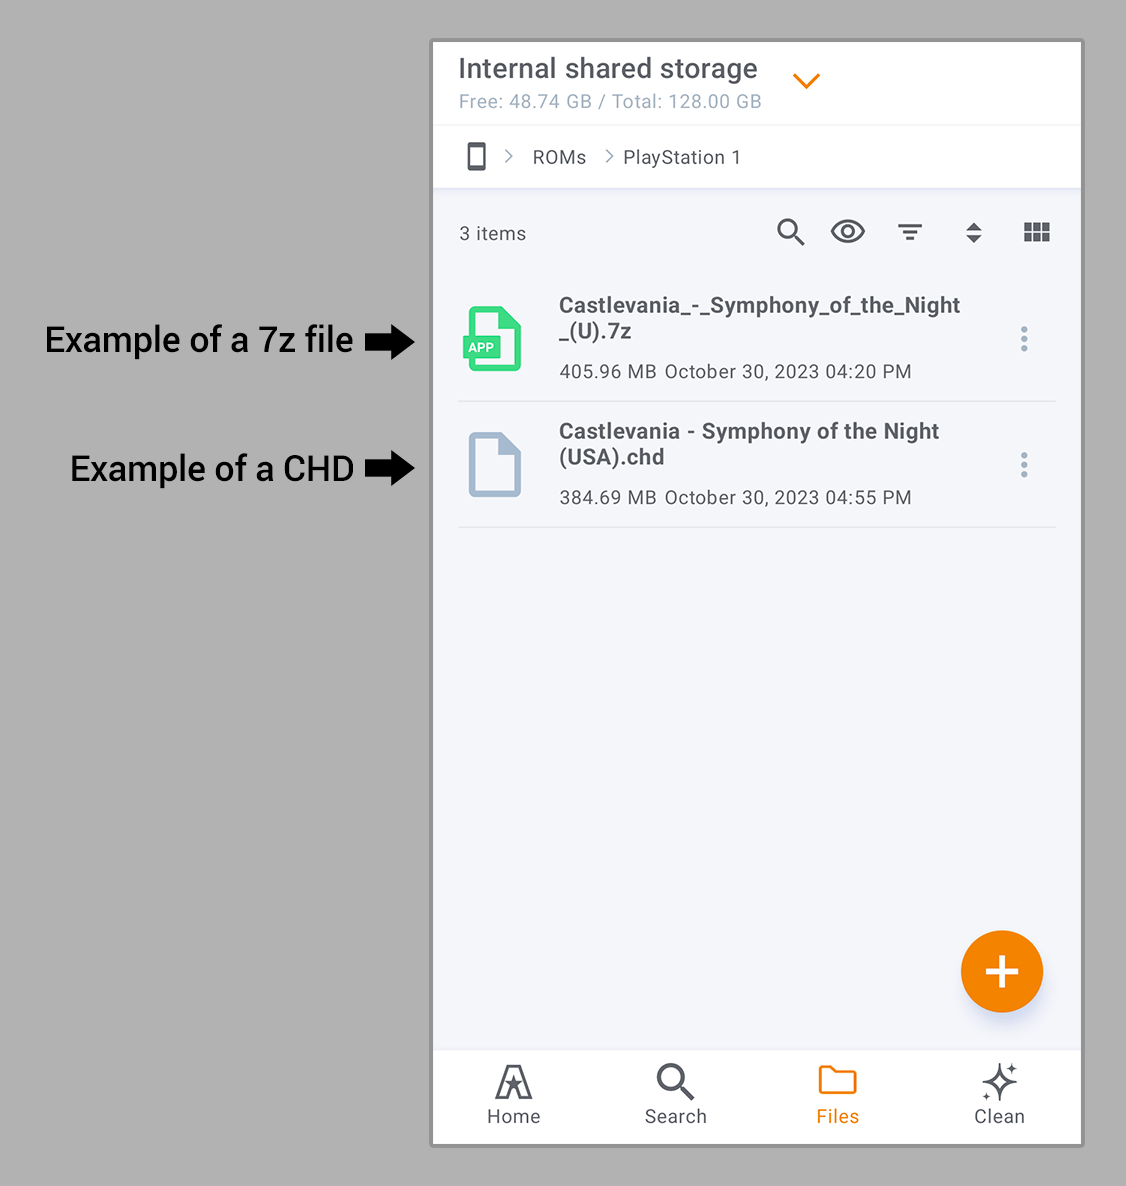 Examples of 7Z and CHD files
- 7Z, RAR, ZIP: These days, most ROM sites typically deliver ISOs in “7Z” format. They're less commonly delivered in ZIP and RAR. Think of 7Z and RAR as ZIP files, but with better compression. I'm going to help you extract them; they must be extracted to be loaded with DuckStation.
- CHD: If your PlayStation 1 ISOs are in “CHD” format upon download, they're uncompressed and ready! In this case, all you need to worry about is deciding where you want your PlayStation 1 ISOs to be located on your device. You can still follow my directions below; just ignore all the stuff about extracting a 7Z file. Also, you can use any file manager app to move around CHD files. You don't have to use “ZArchiver” in this case.
Anyhow, here are directions on how to extract 7Z files and organize your PlayStation 1 ISOs somewhere.
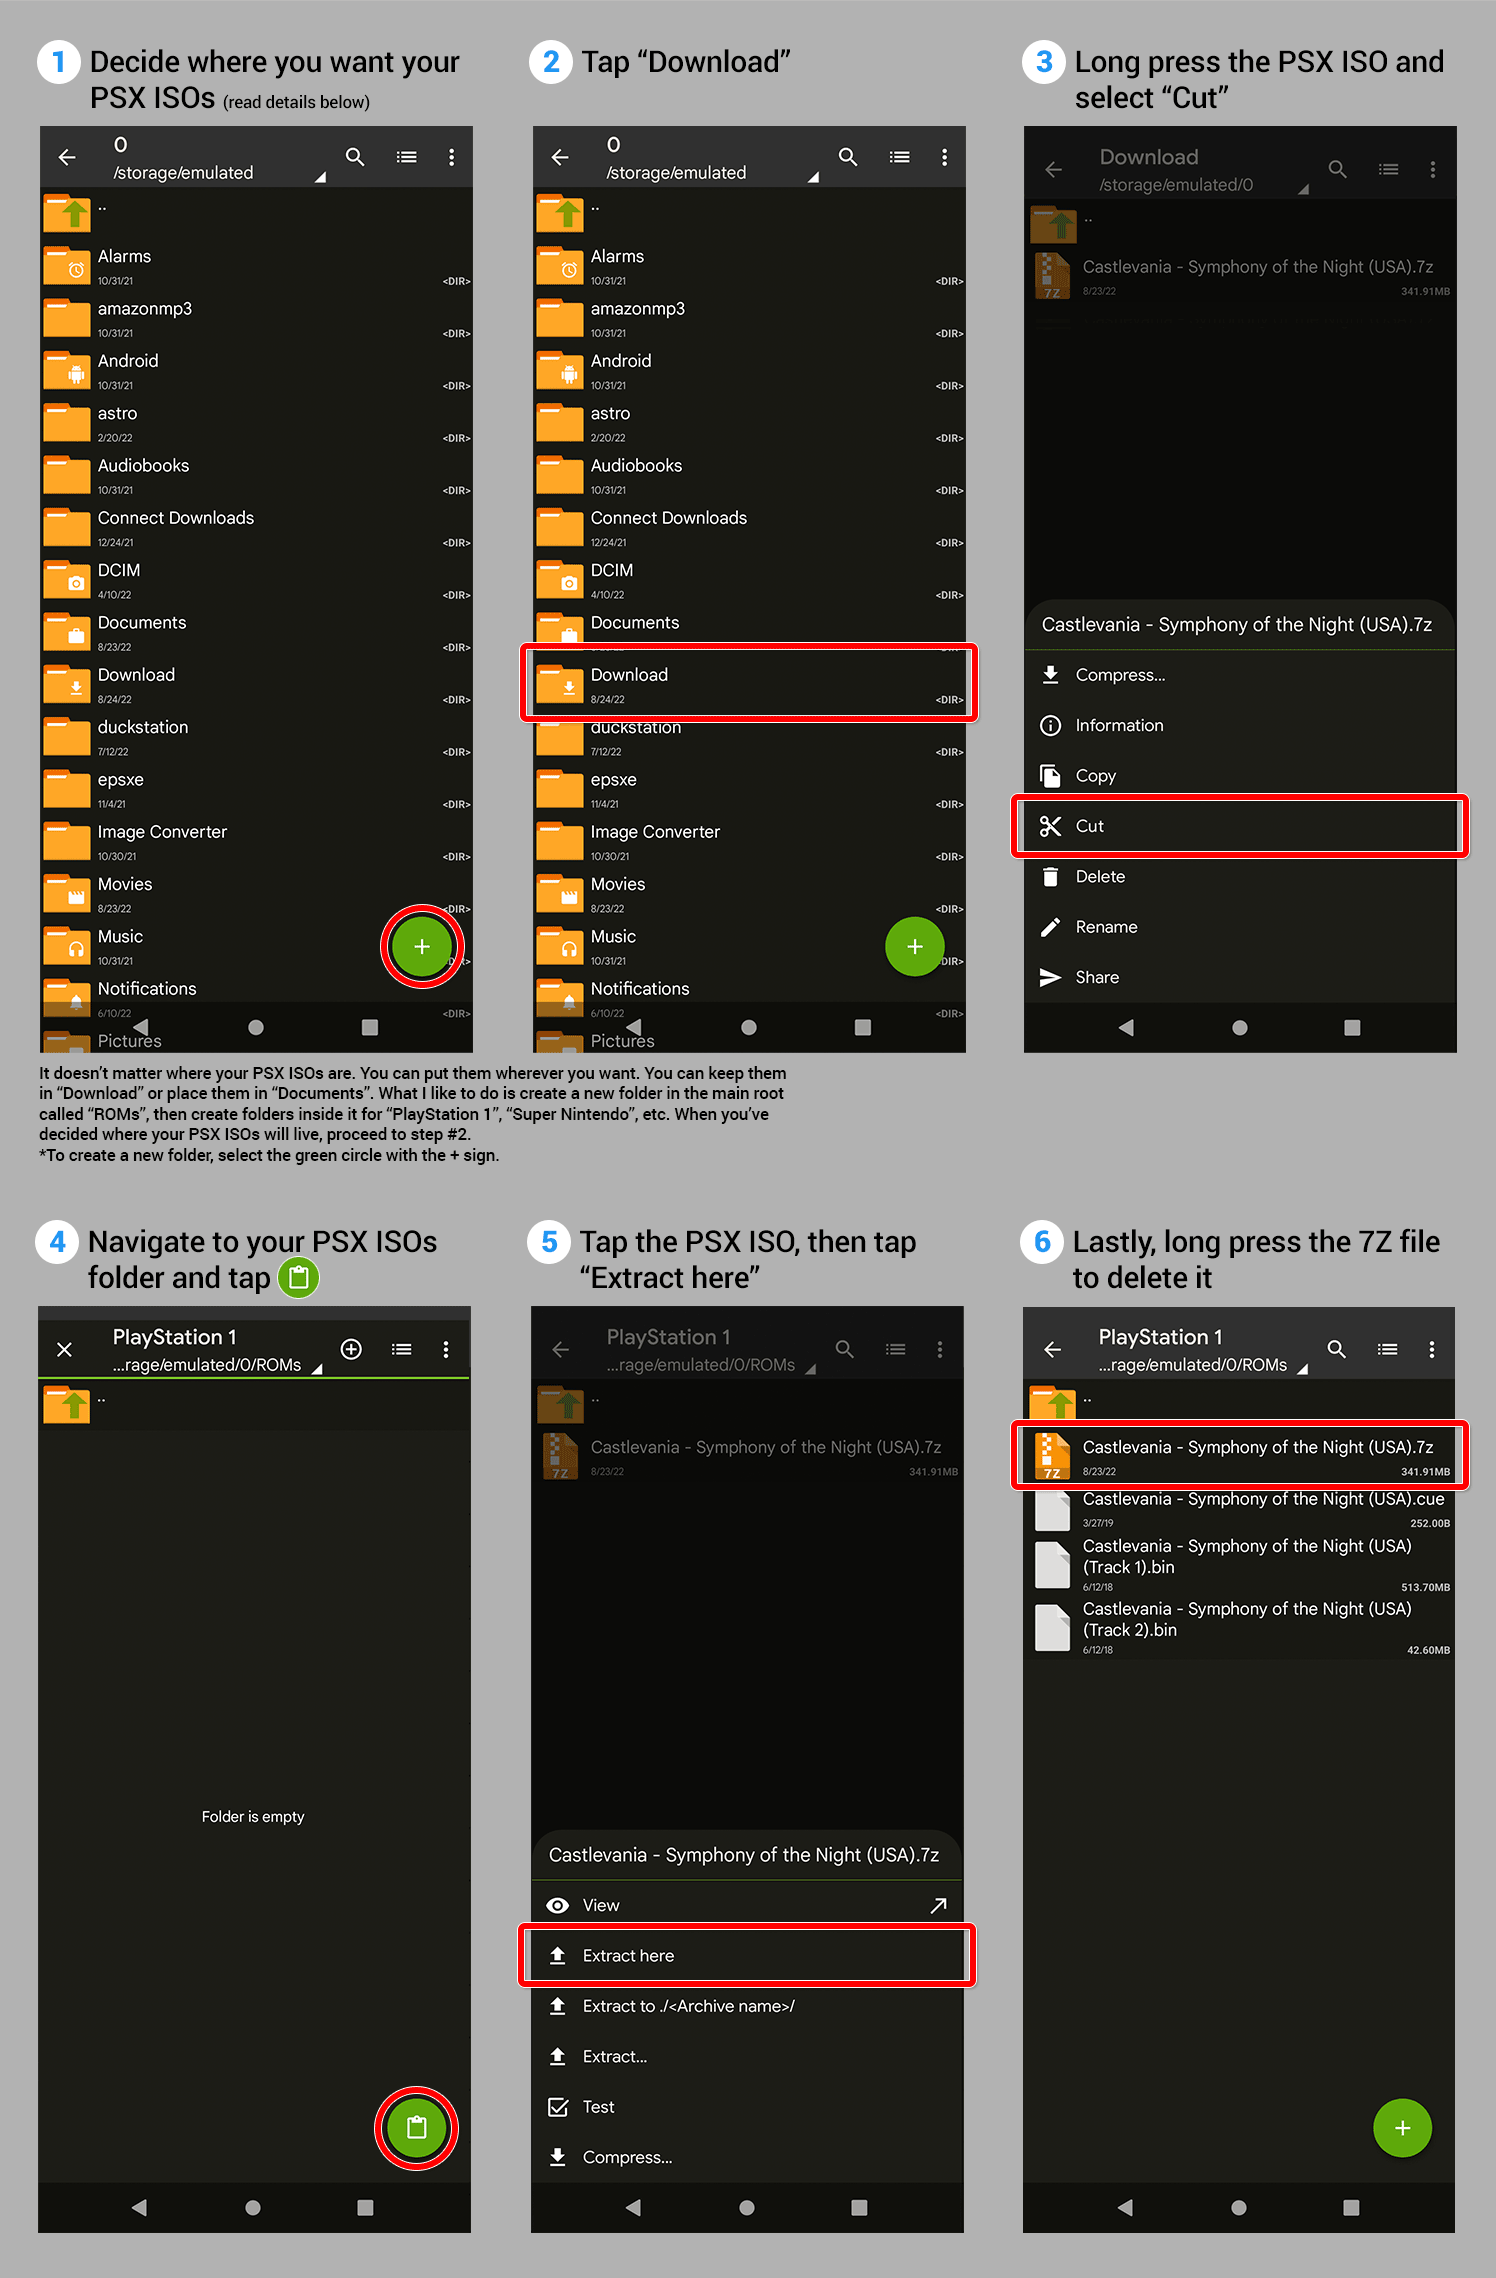 Steps to prepare PSX ISOs
- First, you're going to need an app that can extract 7Z files (and in less common cases, ZIP and RAR files). I recommend ZArchiver (it's free).
- Open ZArchiver. You need to decide where you're going to house your PSX ISOs. It doesn't matter where you put them. Some people keep them in the Downloads folder. What I like to do is create a folder called “ROMs” and inside that folder create folders for “PlayStation 1”, “Super Nintendo”, etc. In ZArchiver, to create a new folder, tap the
 then
then  . Proceed to the next step when you're ready.
 - Return to your device's main root directory (the default screen when you open ZArchiver). Tap Download. Once inside, long press your PSX ISO and tap Cut.
- Navigate to the folder where you want your PSX ISOs to be. Tap the clipboard icon
 to paste the PSX ISO there. Tap on the file (not a long press) and tap Extract here. Depending on the size of the file, it may take 10-20 seconds or two minutes to finish extracting.
 - Depending on how the ROM site set up the 7Z archive, it will either: (1) extract the ISO files here, or (2) extract the ISO files into a new folder with the name of the game. Either way is fine and doesn't require any extra steps for setting things up with DuckStation.
- Lastly, we don't need the 7Z file anymore so you can delete it. Long press it and tap Delete. Also, if you don't foresee yourself extracting more 7Z files in the future, you can go ahead and uninstall ZArchiver (long press its app icon and tap Uninstall).
Setting up the BIOS
These directions with the BIOS are assuming you've read through Preparing your PSX ISOs, and that you decided where your PlayStation 1 ISO's will be located on your device.
The PlayStation 1 BIOS is required to boot games. This is a separate download after you've downloaded DuckStation. Of which, you can download it right here:
- PlayStation 1 BIOS (236 KB). It's a zip file with the extension changed to “_ip”.
Next, move this zip file to a location where you want the BIOS to be on your device. It doesn't matter where. I recommend keeping everything neatly together, so the following directions will have you place the BIOS where your PlayStation 1 ISO's are located.
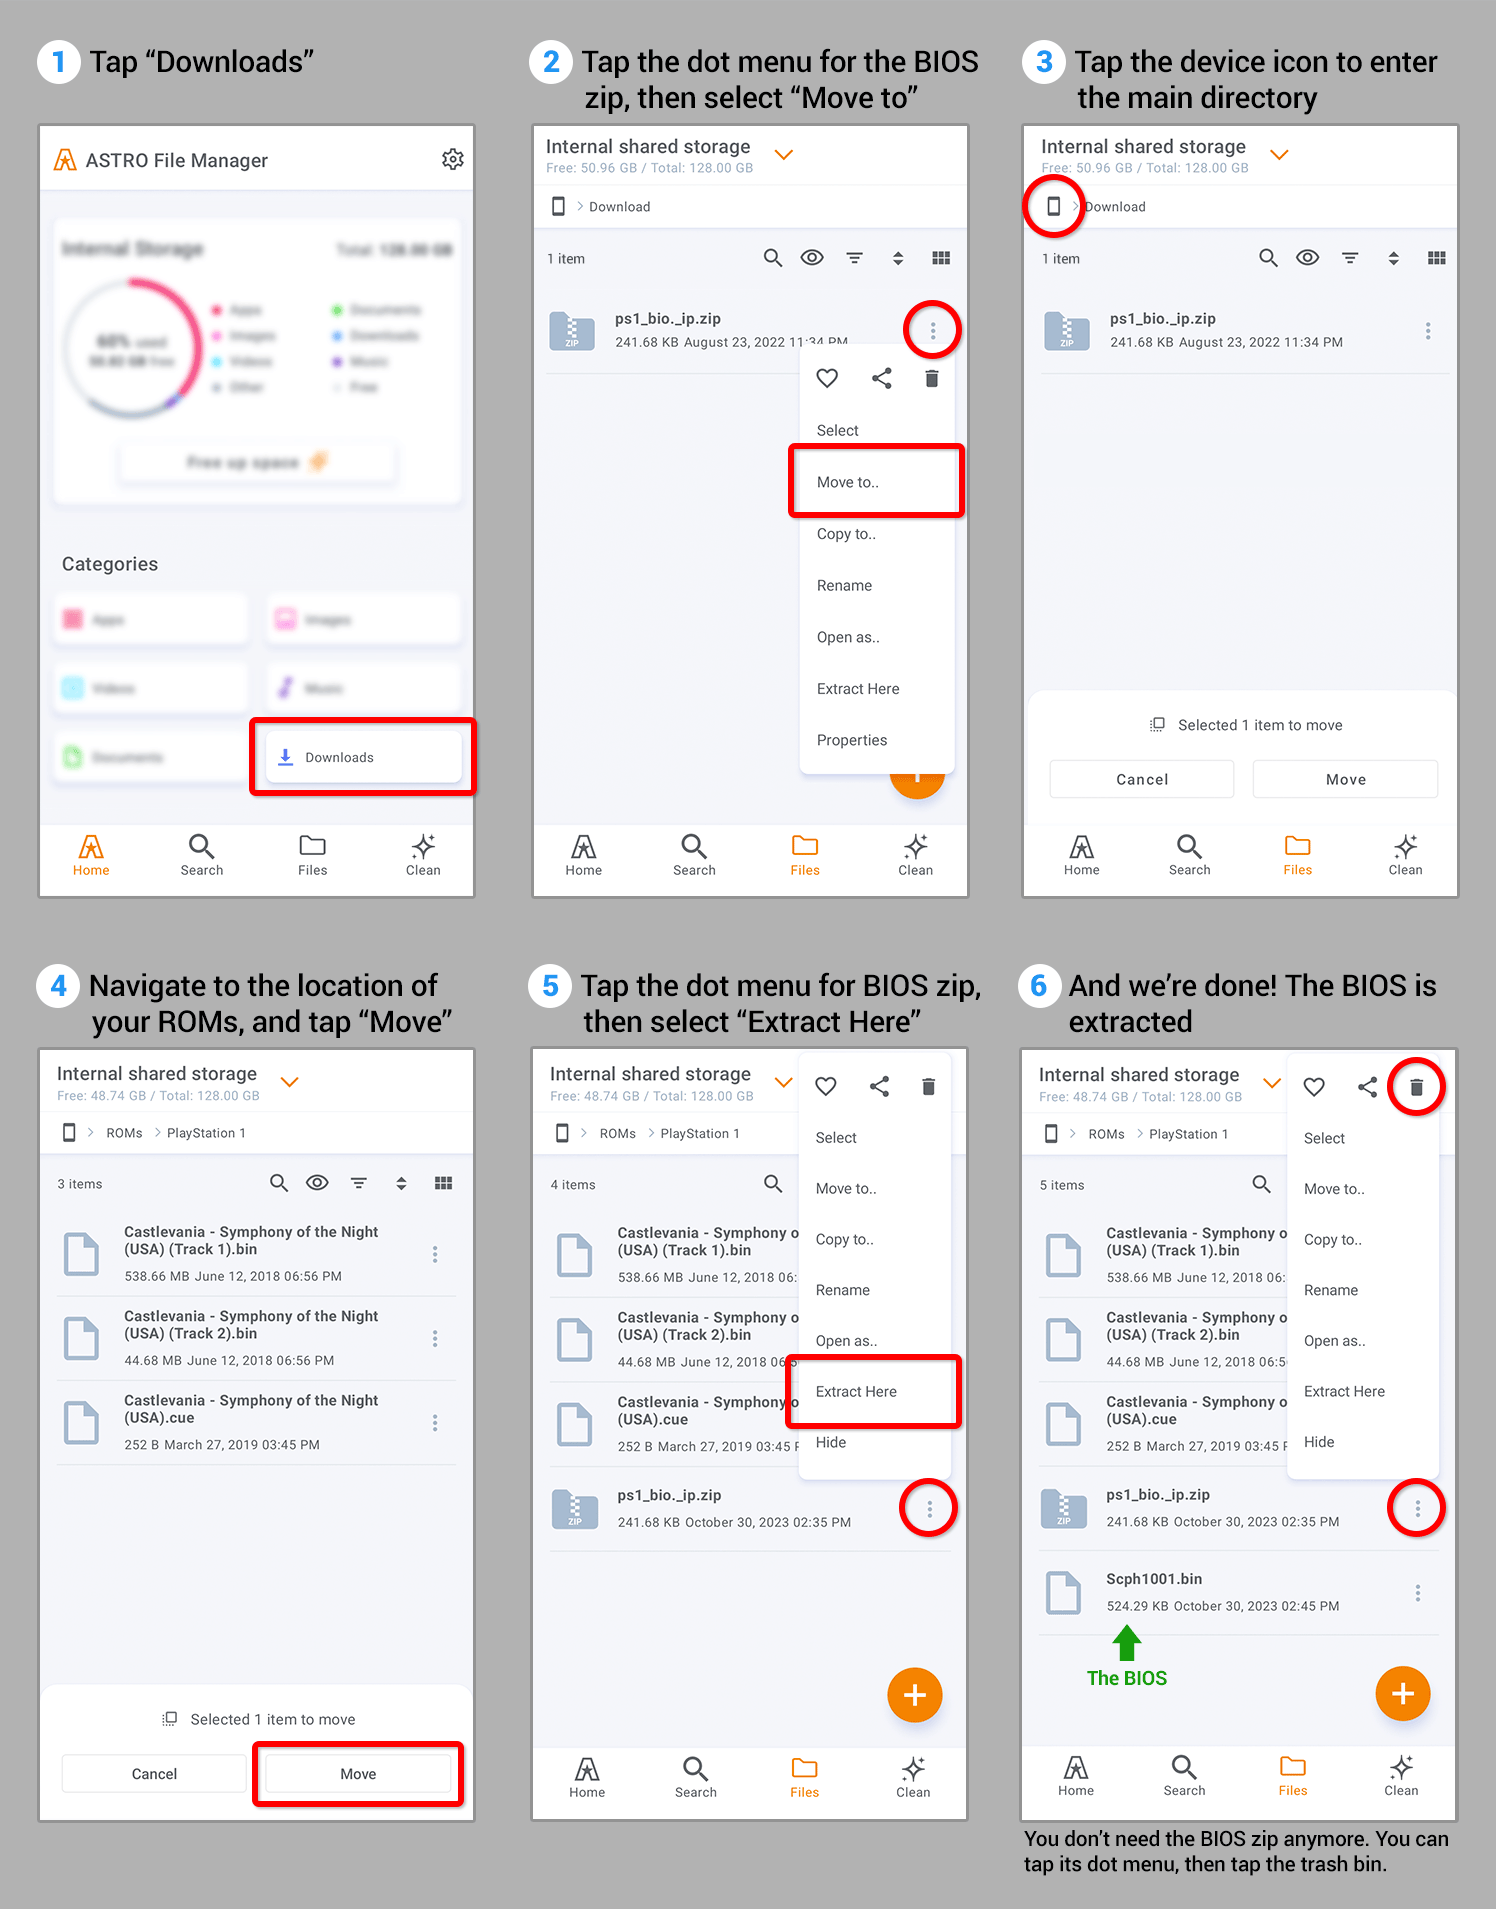 Steps to set up the BIOS
- You can use any file manager app for these steps. Your device most likely already comes with one. For these directions, I'm going to be using Astro File Manager (it's free).
- The first step is to navigate to your device's “Download” folder. Astro's opening screen has a direct shortcut to the Download folder.
- Note: If you're using an advanced file manager, it might start you at the true root of your device. If that's the case, you can find your main root directory by going to storage > emulated > 0.
- In your Download folder, you're going to see “ps1_bio._ip.zip” - that's my BIOS zip file. We need to move this to the folder where your PlayStation 1 ISO's are located (again, this is a recommendation, not a requirement). Select the dot menu
 then select Move to.
 - Select the device icon
 to go up one directory, which is the main root directory. From here, navigate to the folder where your PlayStation 1 ISO's are located.
 - Once there, we can finish the action of moving the BIOS zip file by selecting Move.
- Next, select the dot menu then select Extract Here. You'll see “Scph1001.bin” appear.
- We don't need the zip file anymore so you can delete it. Select the dot menu on it, then select the trash bin icon. The final step for adding the BIOS is a part of the process for loading a game, so keep reading.
First-time setup wizard
 First-time setup wizard
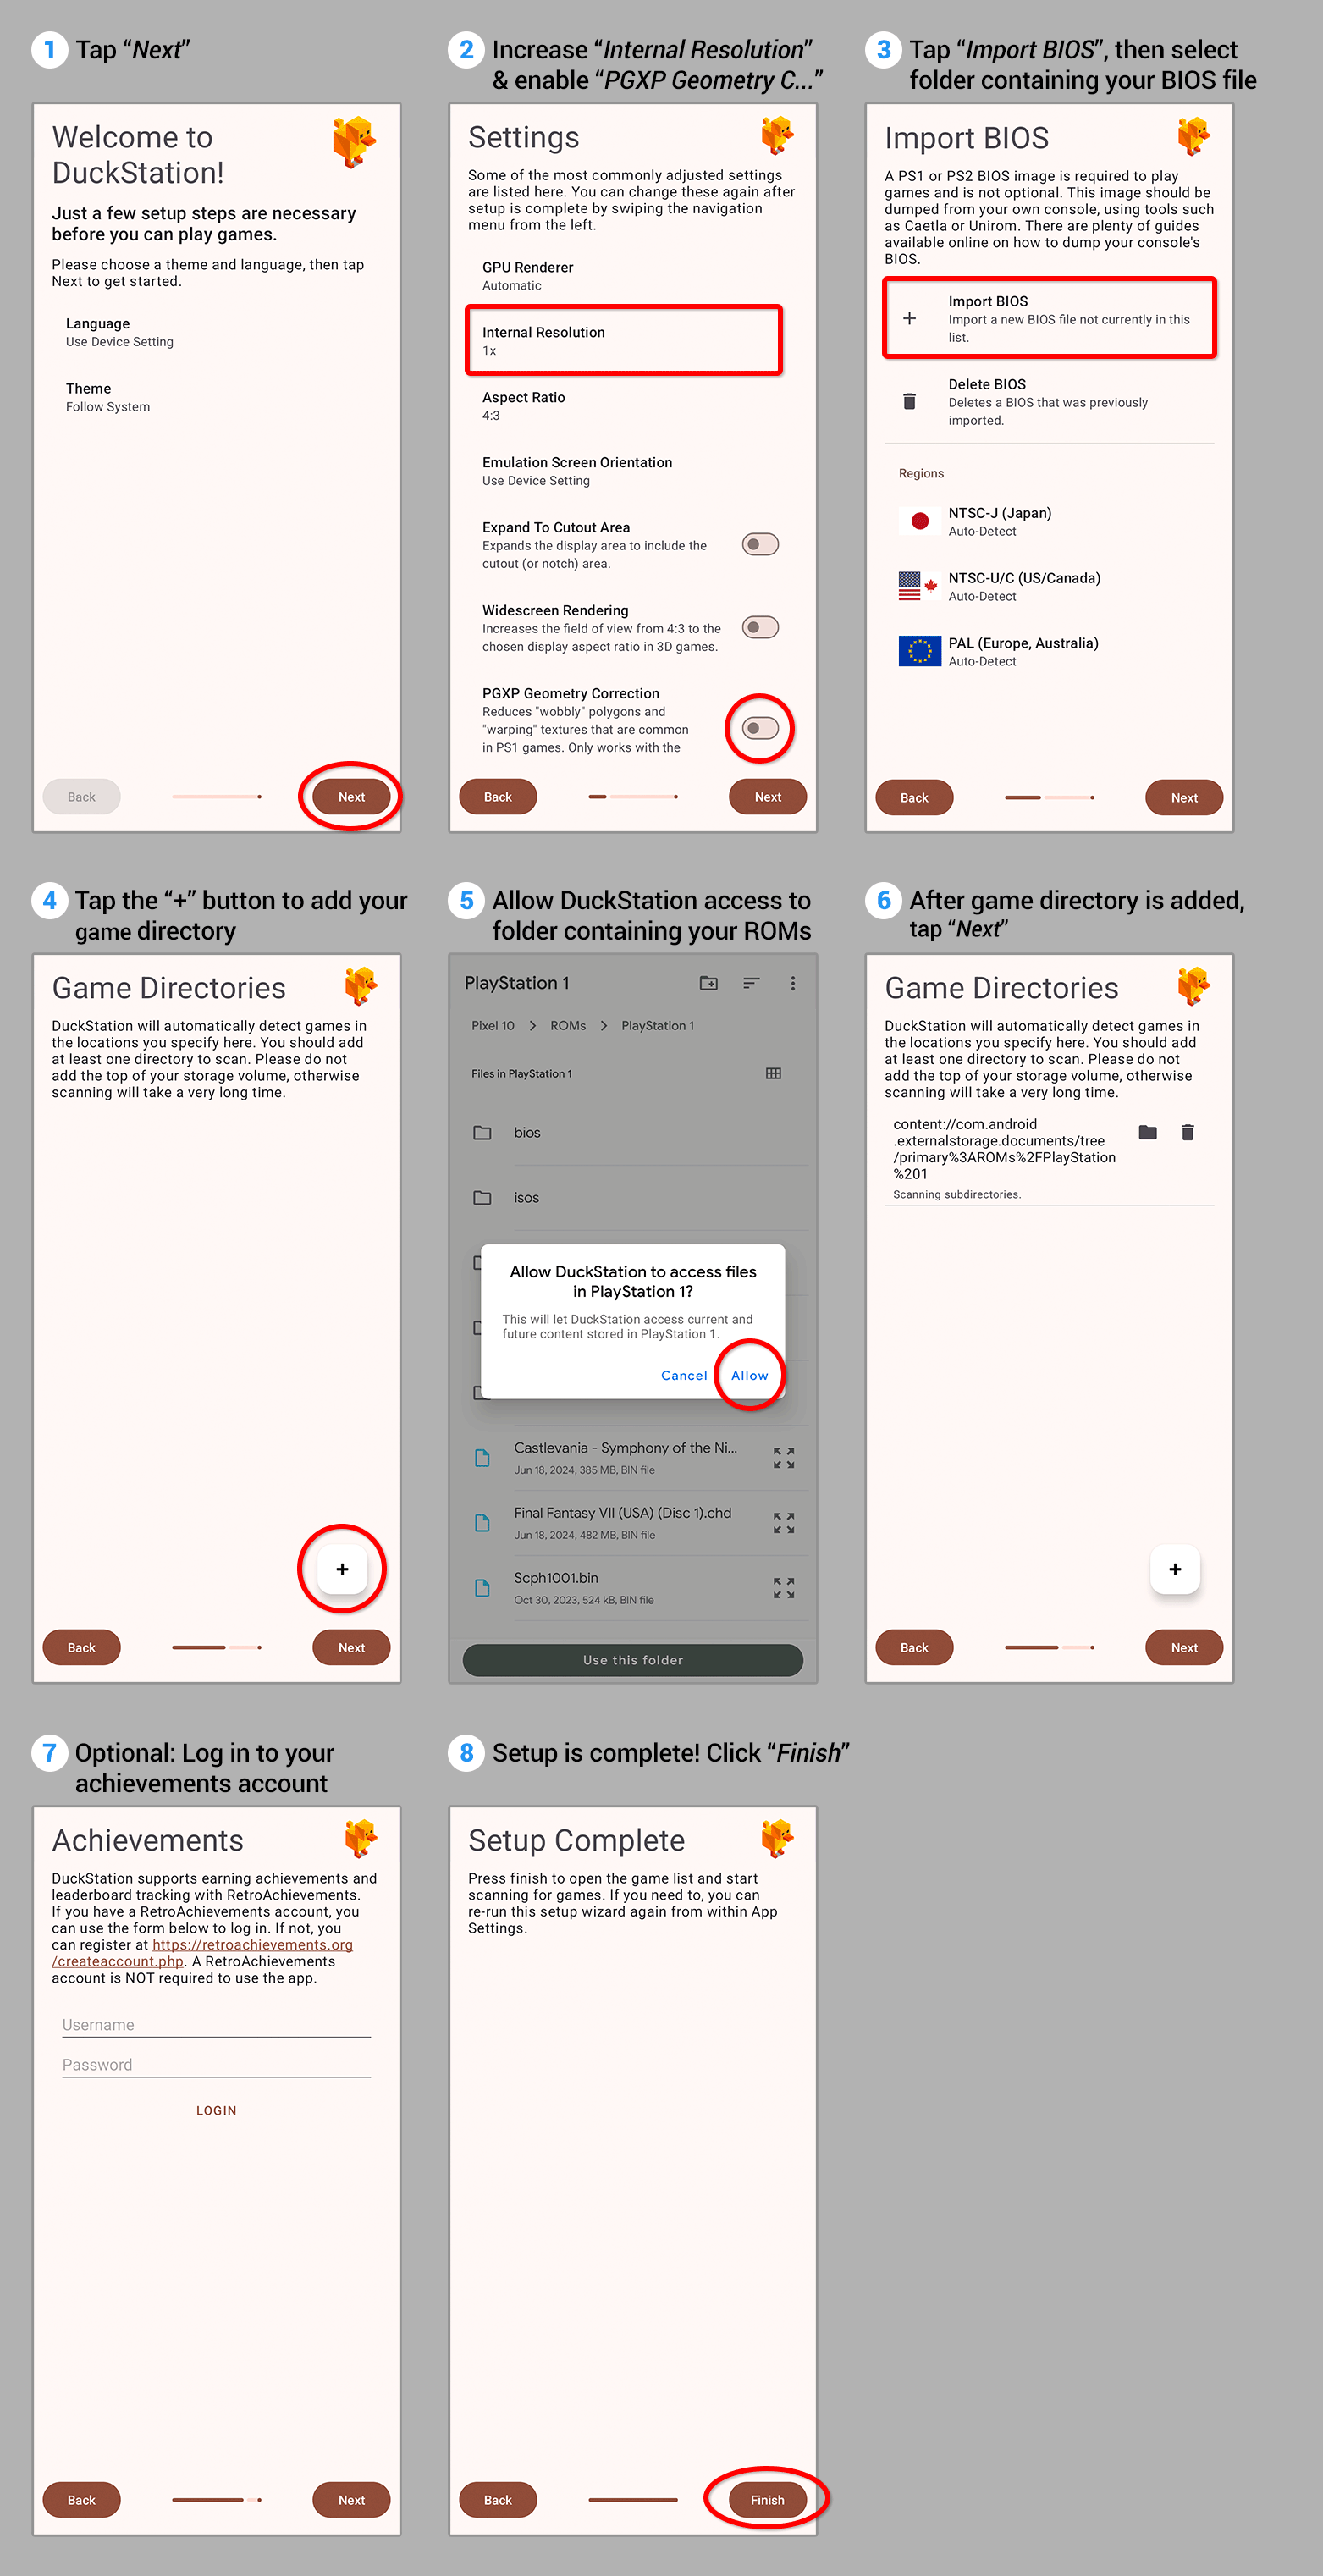
In 2025, DuckStation added a first-time setup wizard that appears the first time you open it. This wizard can't be skipped, but you can skip individual steps to do them later.
Important: Before proceeding with the first-time setup wizard, it's essential that you have read the sections in this tutorial that cover preparing your ISOs and setting up the BIOS.
- Step #1 of the wizard lets you change the default language and the theme of DuckStation (the colors & design of its user-interface). Tap Next to proceed to the next step.
- Step #2 of the wizard lets you adjust video-related settings. I recommend tweaking two settings:
- Tap “Internal Resolution” and set it to a higher resolution. 3x is good for phones for nice graphics. Tablets may need 5x or 6x for nice graphics.
- Tap the toggle next to PGXP Geometry Correction to enable it. Don't know what that is? I talk more about it here: PGXP Corrections.
- Step #3 of the wizard imports the BIOS. Tap Import BIOS, then select the folder the contains your BIOS file(s). DuckStation will automatically detect the region for each BIOS file that you have. When you're ready, tap Next to proceed to the next step.
- Step #4 of the wizard adds your games to DuckStation. Similar to adding the BIOS, all you need to do here is select the folder where your ROMs are located. Tap the “+” icon, navigate to the folder where your ROMs are located on your device, then grant DuckStation permission to access that folder. When you're ready, tap Next to proceed to the next step.
- Step #5 of the wizard is optional. If you have an account with retroachievements.org, you can log in to your account here. Otherwise, tap Next to proceed to the next step.
- Step #6 of the wizard confirms it is complete. Tap Finish to close the wizard and enter DuckStation.
Loading a PSX ISO
 Loading a game
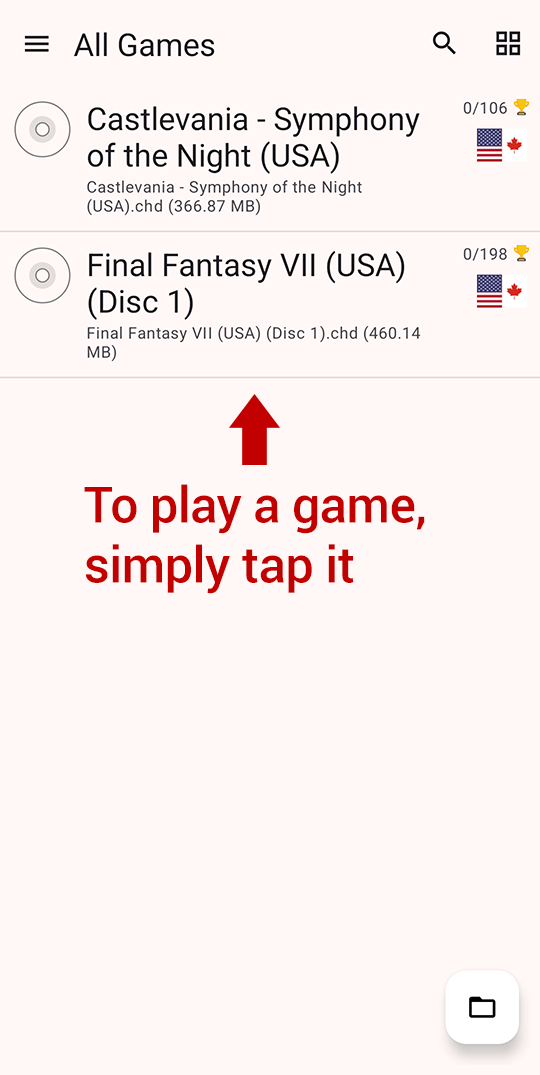
After completing the first-time setup wizard, DuckStation will show a list of all the games currently on your device. To play a game, simply tap the name of it. That's it!
Games not showing up?
After adding your game directory (your PSX ISOs folder) to DuckStation, you may run into an issue where not all of your games appear on the games list. It's important to note that DuckStation only supports ISOs that are in the following formats: BIN (BIN/CUE), ISO, IMG, CHD, ECM, MDS, and PBP. And they must be extracted from their 7Z, RAR, or ZIP archives. If you need help with extracting, the section further above about preparing your ISOs covers that.
After making changes to your ROMs, tap the ![]() then tap Scan For New Games or Rescan All Games.
then tap Scan For New Games or Rescan All Games.
Q: My PAL PS1 game is giving an SBI error!
Upon loading a PAL version of a PlayStation 1 game, you may receive this error:
You are attempting to run a libcrypt protected game without an SBI file:
[name of your game]
Your dump is incomplete, you must add the SBI file to run this game.
Some PAL PS1 games (mostly by Infogrames and EA) use LibCrypt anti-piracy protection. For these games, you must have the SBI file in order to emulate them properly.
Depending on where you downloaded the game, an SBI file might already be included in it. If that's the case, simply make sure the SBI file and your PS1 ISO have the same name. If the SBI file isn't there with your PAL ISO, you can download a collection of all SBI files below.
- All PAL PS1 SBI files (109 KB)
If you need more help, check out this page on CDRomance.
The Pause menu
The Pause menu is important. This is where you'll access all the features and everything DuckStation has to offer. When a game is running, you'll see a pause icon in the upper-right of the screen. Tap it to access the Pause menu.
 Core menus in the Pause screen
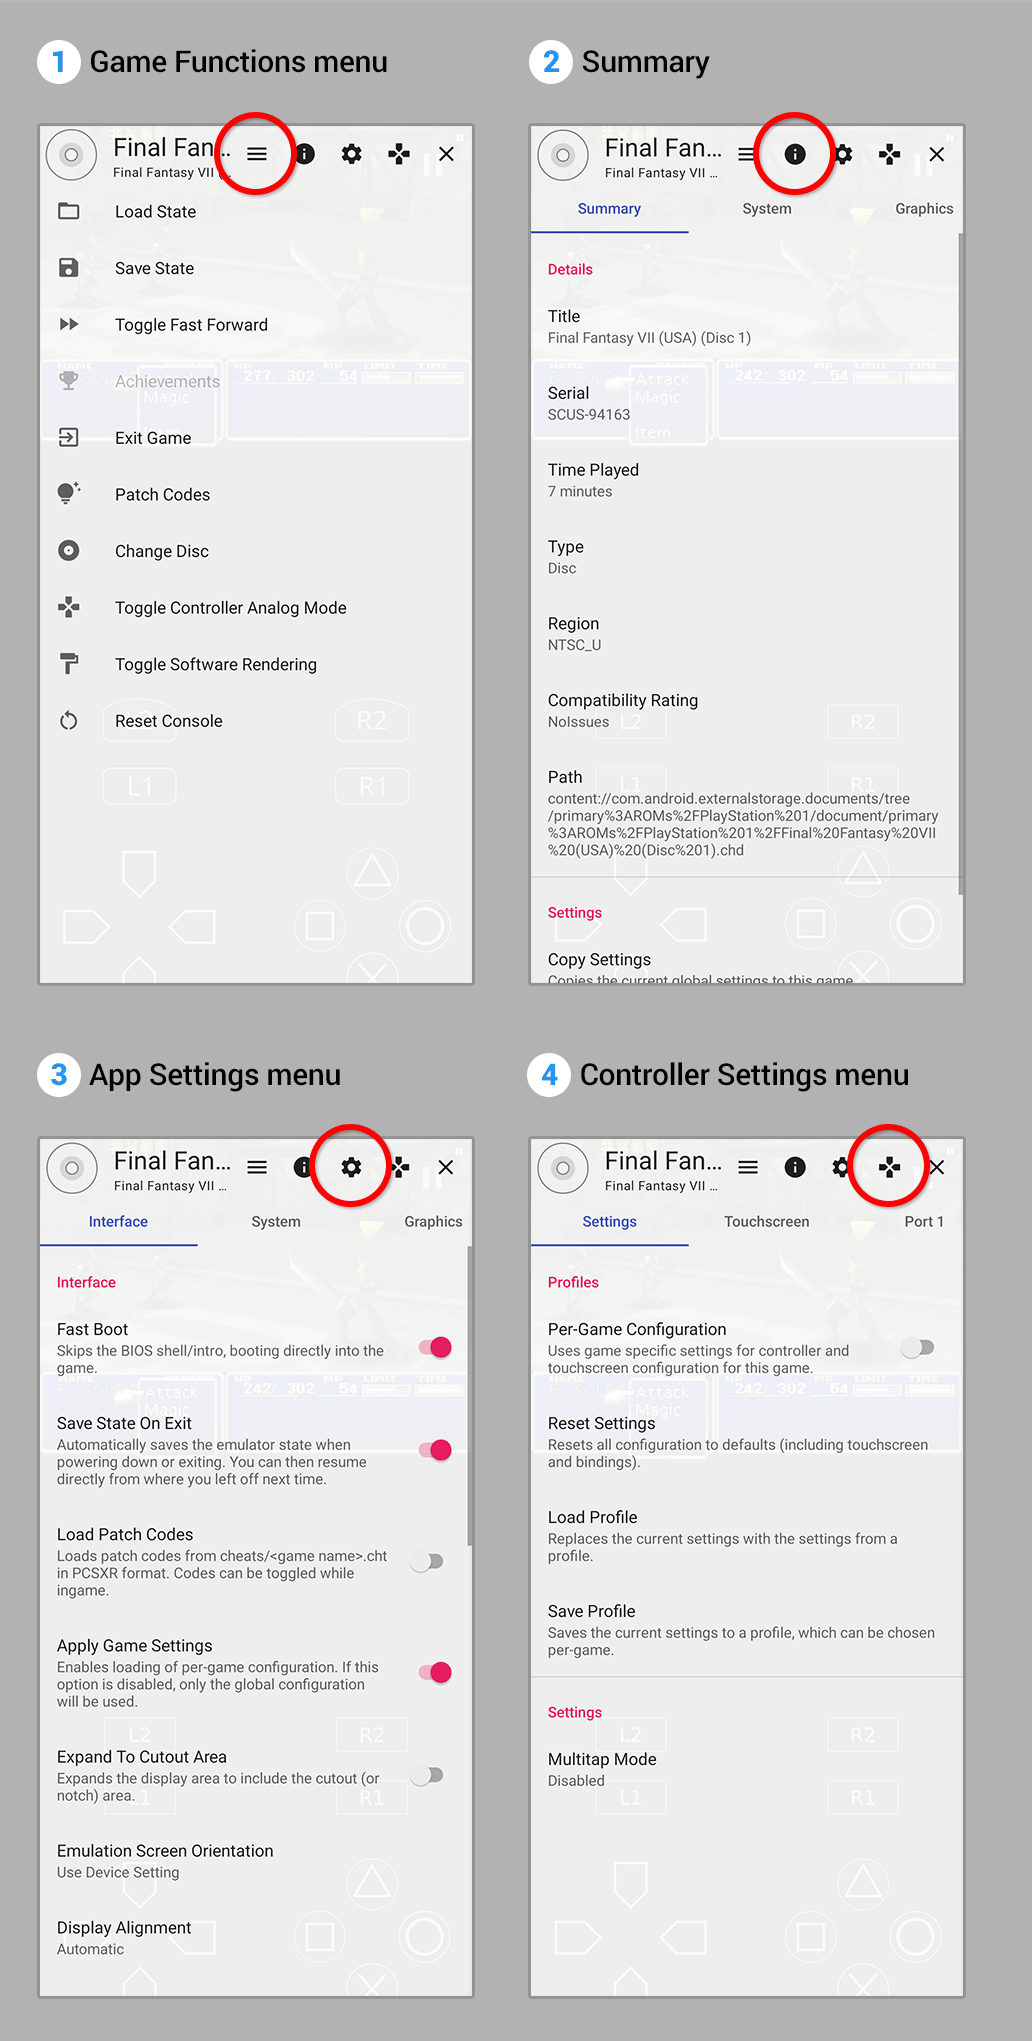
The Pause menu presents you with a row of four icons. The first three are menus.
 The Game Functions menu is what you immediately see when you tap the Pause icon. It contains game-specific features such as save states, fast forward, and pass codes (cheats). And this is where you'll go to reset the game or exit it.
 The Summary gives you some details about the ISO.
 The App Settings is where you can tweak the graphics and audio. This menu is important! This is where you go to troubleshoot your games if they're running slow or buggy.
 The Controller Settings menu gives you many options to customize the controls, onscreen overlay buttons, and gamepad configurations.
 This just closes the Pause menu.
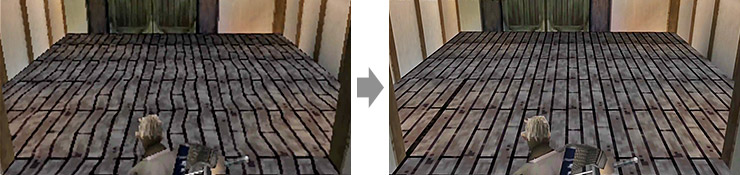
Q: Graphics appear broken!
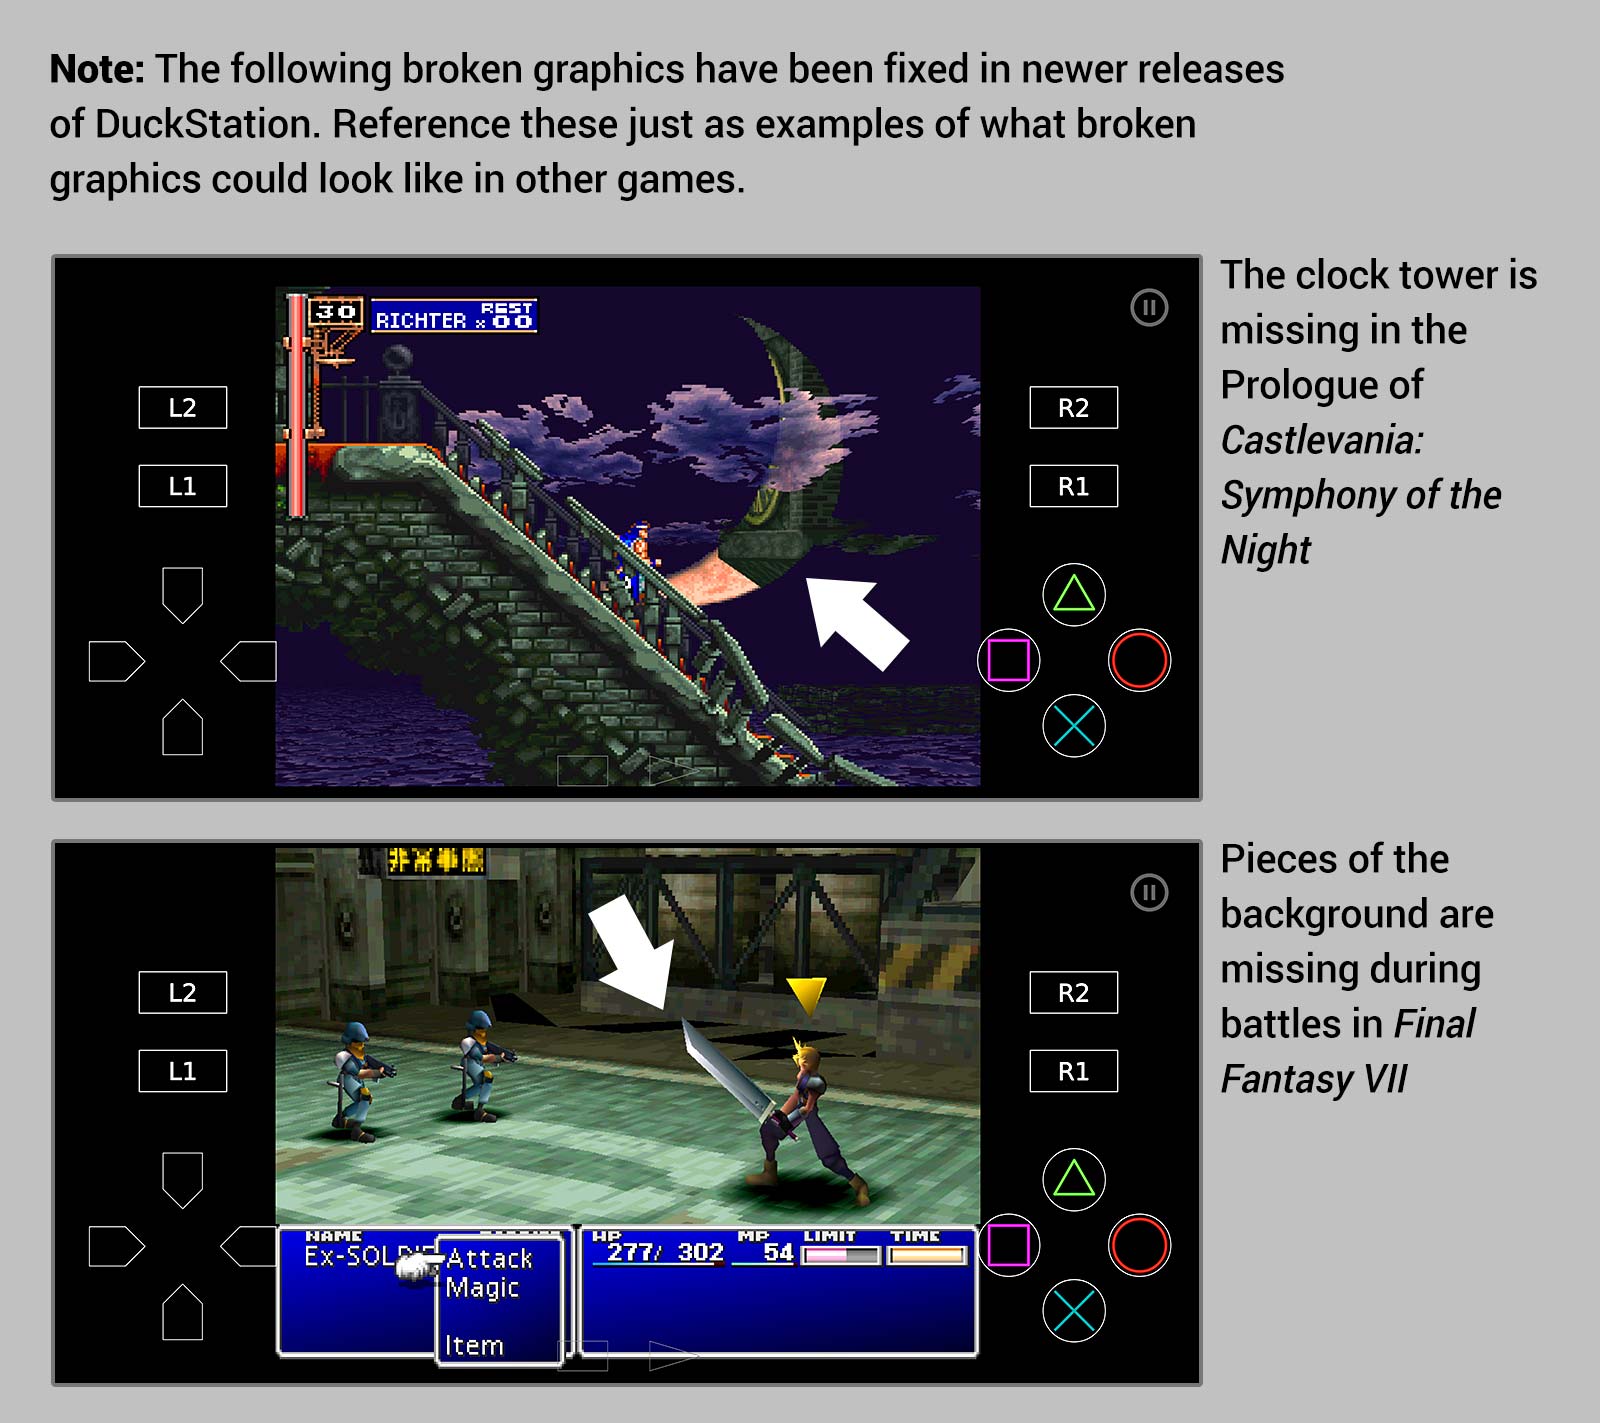 Showing broken graphics in two games
DuckStation is an awesome emulator, but it's not perfect. You may find that certain 3D graphics are broken. Maybe pieces of the floor are missing or other graphics have disappeared. Fortunately, this has an easy fix!
- While a game is running, tap the Pause icon
 .
. - Tap the sprocket for the general settings. Drag the menus left to scroll to the right, and look for Graphics.
- Scroll down and toggle off PGXP Texture Perspective Correction, as shown here . Return to the game and the graphics should be fixed.
This could be done globally to affect all games. I think it's better to do it on a per-game basis (the directions above) because not every game will have broken graphics.
Setting up a gamepad
This calls for several steps.
Pairing your gamepad
- Make sure your Bluetooth gamepad is fully charged and has LED lights indicating it's on.
- Put your gamepad in 'pairing mode'. Sometimes it's as simple as pressing the Start button and you'll see lights blinking on your gamepad. Gamepads that are compatible with multiple OSs might require a specific button to be pressed for pairing with Android. Read the documentation that came with your gamepad. Or go to the manufacturer's website and look for directions there.
- For example, the 8BitDo Pro 3 (the #1 gamepad at the moment) requires you to press Start+B to enter pairing mode for Android, then to hold the pairing button for 3 seconds.
- Next, enter the Bluetooth area in your phone to look for your gamepad to pop up in the list. Every Android device is different, so I can't tell you exactly where it is. Try looking up “[name of your phone] setup bluetooth” on YouTube. Or maybe one of these videos can help.
- Your device will indicate when your gamepad is successfully connected. The 8BitDo Pro will even vibrate upon a successful connection.
Setup with DuckStation
 Steps to set up a gamepad
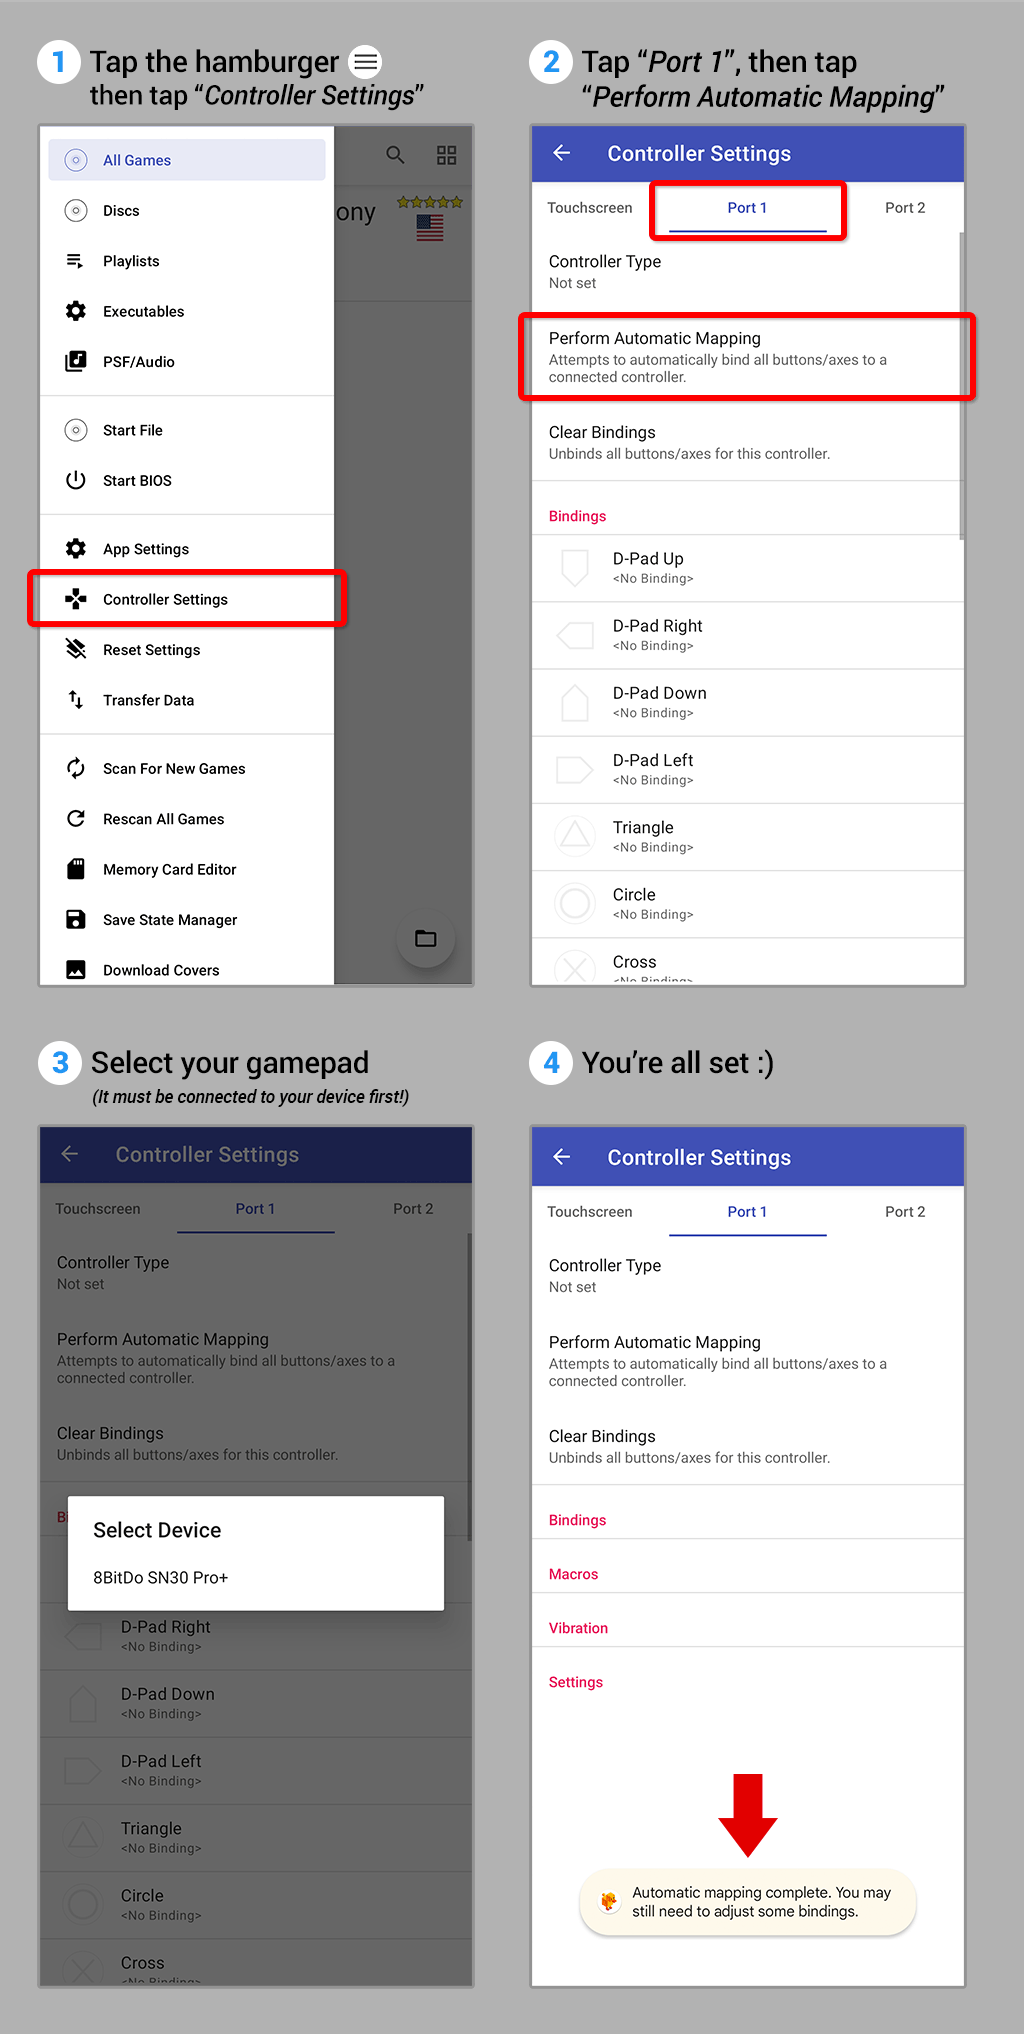
DuckStation doesn't automatically detect & configure the controller like RetroArch does. It requires setup.
- When a game isn't running, tap the hamburger menu and select Controller Settings.
- Alternatively, while a game is running, you can access Controller Settings by tapping the Pause icon then . The difference here is the changes you make will only be applied to the game that's currently running.
- Alternatively, while a game is running, you can access Controller Settings by tapping the Pause icon
- Tap Port 1, then tap Perform Automatic Mapping.
- DuckStation will prompt you with a confirmation - just tap OK. And you're done!
Didn't work? If automatic mapping was unsuccessful, you can try to manually configure the buttons one at a time on the “Port 1” screen. If your gamepad buttons are not responding, make sure it's connected to your Android device. And make sure your gamepad is fully charged (there should be an LED light indicating that it's on). If you're still having problems, that'll be specific to your gamepad - try searching Google or YouTube using the full name of your gamepad plus your exact issue. For example: 8bitdo pro 3 not responding.
PGXP corrections
'PGXP corrections' are the hottest feature of modern PlayStation 1 emulators. The original PlayStation 1 wasn't designed to be up-scaled to high resolutions. So when PlayStation 1 emulators upscale graphics, you begin to notice obvious faults in the 3D animation and 3D texturing.
 (Left) Normal, (Right) PGXP Mode
View the sample comparisons around here. The image above shows PGXP correcting texture mapping. The GIF animation shows PGXP correcting jittery animation. Pretty cool, huh?
My directions for the first-time setup wizard has you enable PGXP corrections. So, you don't need to do anything extra to enable it. Just load a game and enjoy what modern PlayStation 1 emulation has to offer :)
However, PGXP corrections can be a little buggy sometimes. If you ever want to turn them off (or on), here's how to find them:
As mentioned in fixing buggy graphics, only “PGXP Texture Perspective Correction” needs to be turned off to fix broken graphics (if that happens to you).
Disc swapping for multiple-CD games
When you're playing a multiple-CD game and you reach the point to swap discs, here's what to do:
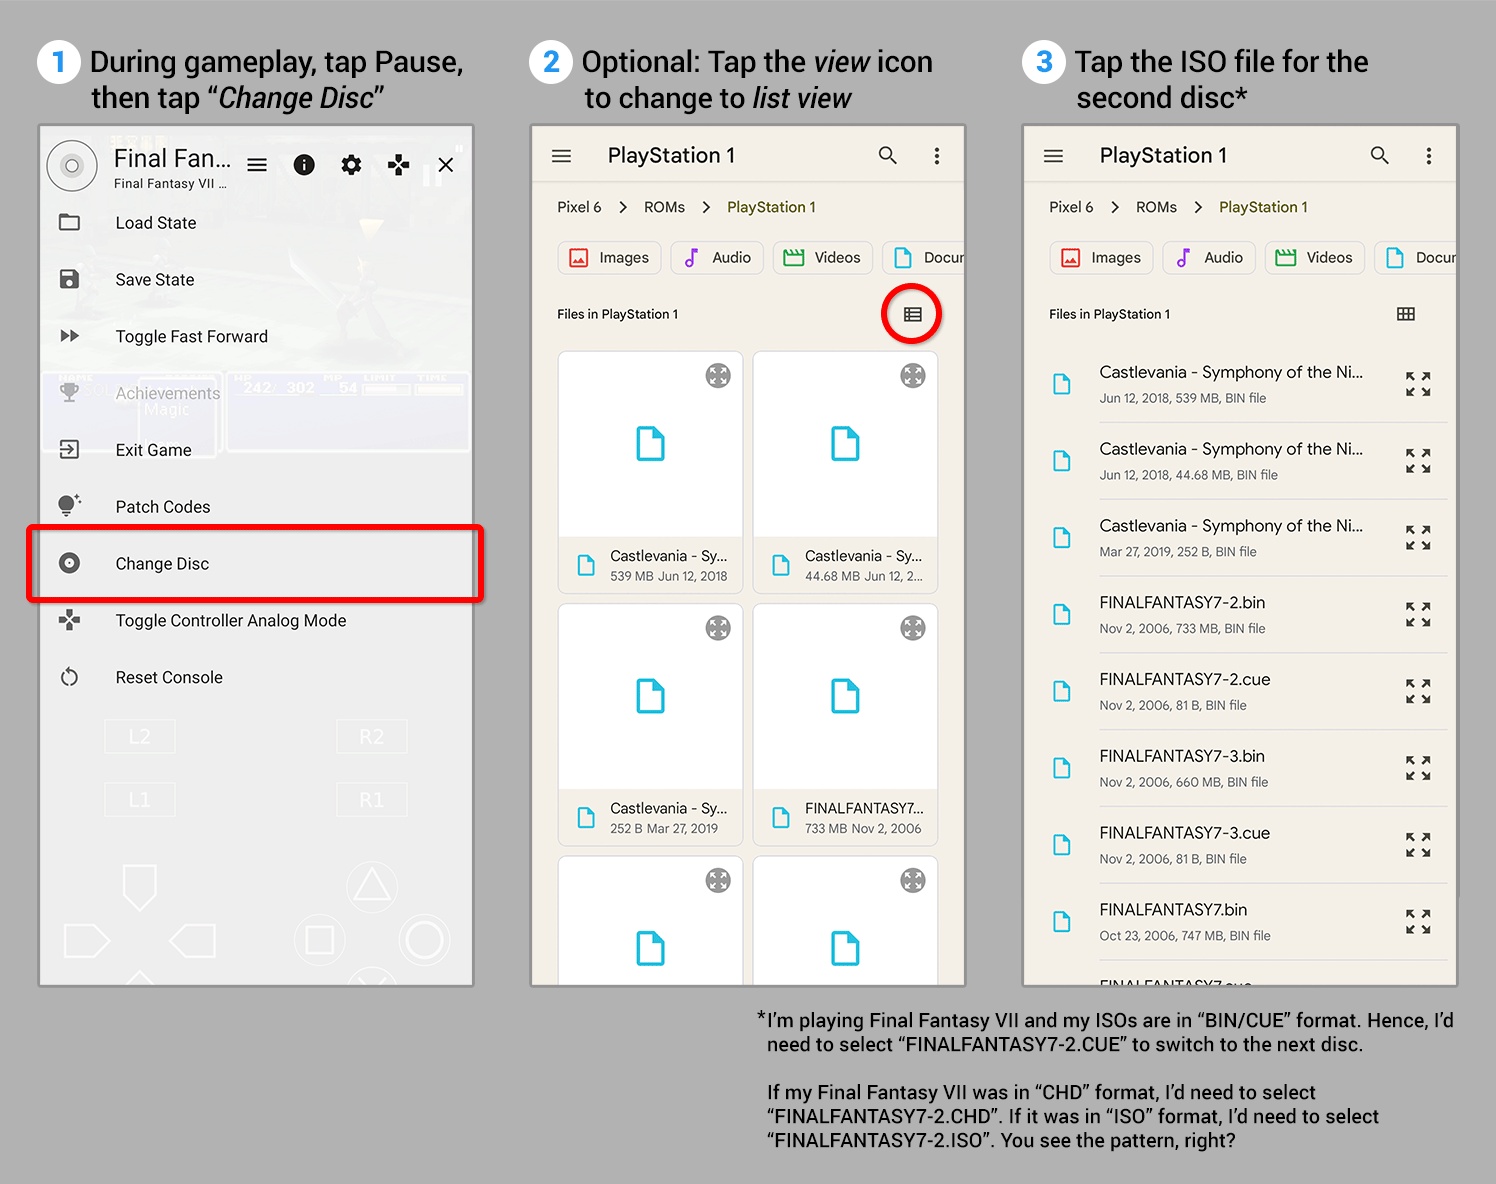 Steps to swap discs
- While a game is running, tap the Pause icon .
- Tap Change Disc.
- You'll enter Android's 'file selector' UI. Yours might look different from my screenshots. By default, this is in thumbnail view. You can tap the grid icon to switch to list view (makes things easier).
- Next, tap the ISO for the next disc. In my example, I'm playing disc 1 of Final Fantasy VII, and my ISO is in “BIN/CUE” format. That means I need to tap “FINALFANTASY7-2.CUE” for disc 2. If my ISO was in “CHD” format, I'd need to tap “FINALFANTASY7-2.CHD”. If my ISO was in “ISO” format, I'd need to tap “FINALFANTASY7-2.ISO”. Do you see the pattern?
- After selecting the ISO for the next disc, DuckStation returns to the game and you'll see messages on the upper-left about how it switched to the next disc. Then follow the prompts within the game to proceed.
Save states
Save states is a feature that saves the exact spot you are in any game. You can recall your save state at any time. It's quick to access. Here's how:
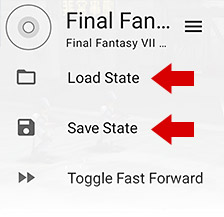
- While a game is running, tap the Pause icon .
- Tap Save State.
- DuckStation offers multiple slots, allowing you to have many save states. Tap on a slot, then DuckStation will immediately return to the game.
- When you want to recall your saved state, repeat the steps but select Load State. Then select the slot of the state you want to load.
New to emulation? If you're new to video game emulation, I don't want to confuse you into thinking that save states are what you're supposed to use as the only means to save your progress with DuckStation. Save states are an optional feature. You can still save your game at save points as you would on a real PlayStation 1. In-game saves are loaded at the game's title screen (like on a real PS1) - they're not loaded via the Pause menu.
Pro Tip: I recommend that you use both save states and in-game saving to save your games. That way you'll always have a backup if you lose a save.
Memory card: copying/moving/deleting saves
DuckStation gives you the option to manage your saves in an exclusive editor or using the PlayStation 1's native interface. The difference is that DuckStation's editor is far more robust.
Option #1 - Managing memory in DuckStation
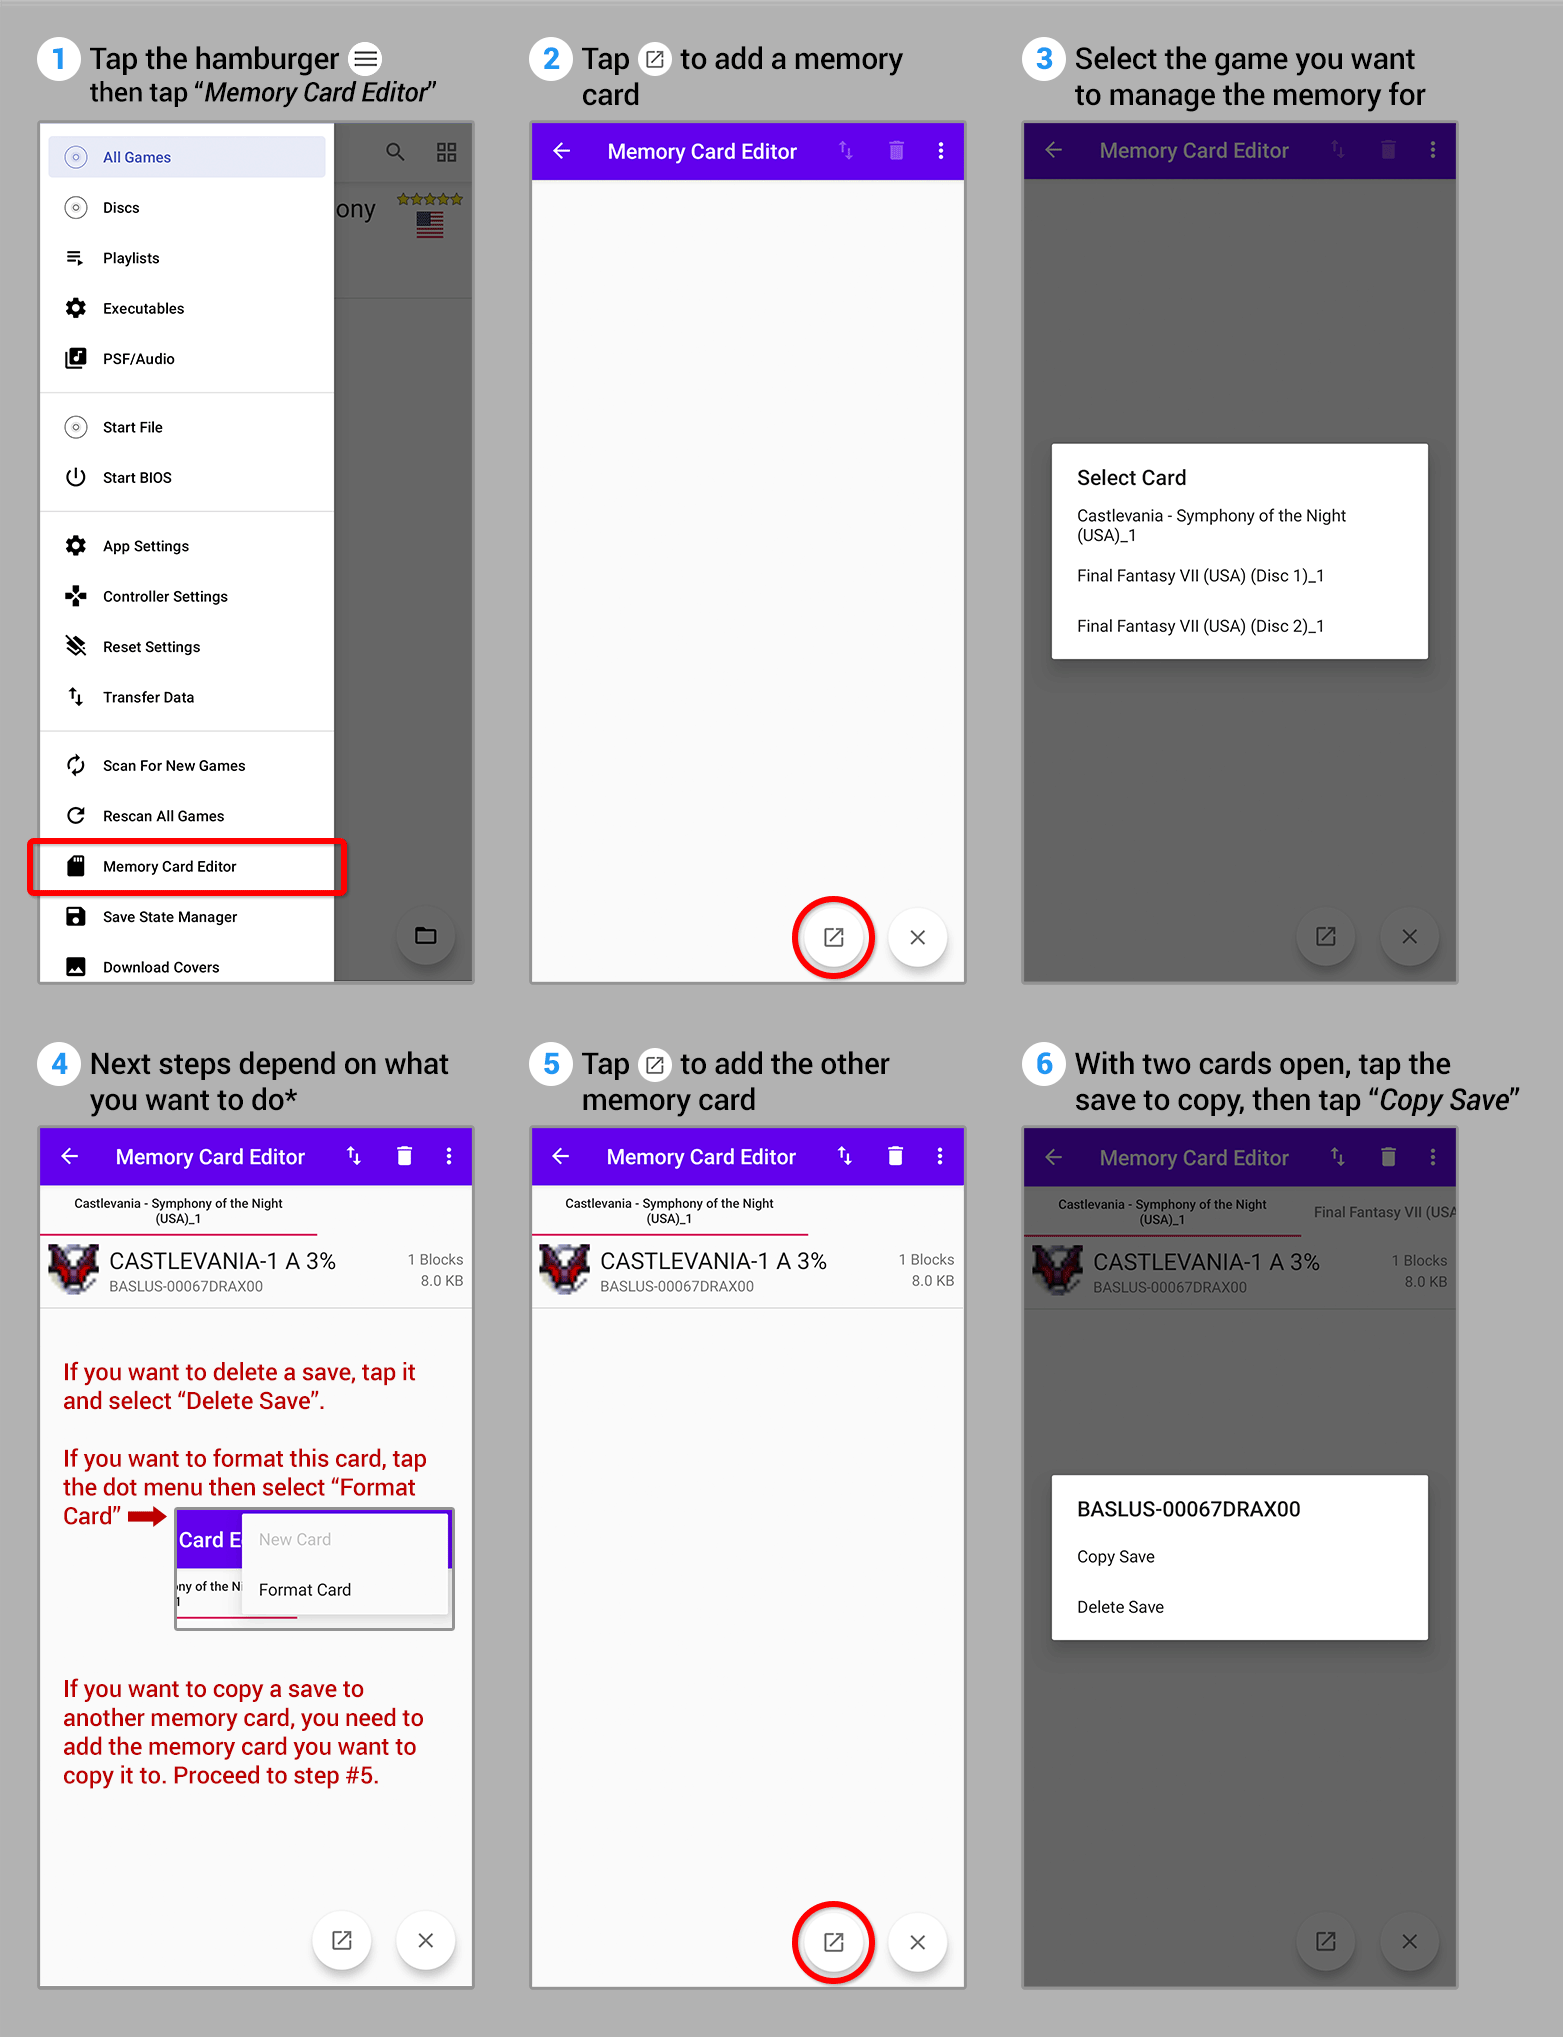 Steps to manage memory cards
- While a game isn't running, tap the hamburger menu, then Memory Card Editor.
- Tap
 to add a memory card. Then select the game you want to manage the memory for.
 - Once a memory card is open, you have several options:
- To delete a save, tap the save you want to delete, then Delete Save.
- To format this memory card, tap the dot menu, then Format Card.
- To copy a save to another memory card, that requires another memory card to be open. Proceed to step #4 for this...
- To open a second memory card, tap . Then select the game you want memory copied to/from.
- With the second card open, tap the save you want to copy over, then select Copy Save. DuckStation will ask you which memory card to copy it to. There's only one other memory card open, so simply select the only card listed.
Option #2 - Managing memory natively
This method can't be used by default because DuckStation saves memory cards on a per-game basis. Memory needs to be changed to shared memory to use this option.
- When a game isn't running, tap the hamburger menu, then Start BIOS
- You should arrive at the BIOS main screen . Choose Memory Card to proceed.
- Now you're at the memory card management screen:

This is the screen where you can manage your memory card saves. You would do so exactly as you would on the real PlayStation 1 system.
Important note: When transferring saves from another PlayStation 1 emulator, memory card files that are in the MCR or GME file format must be renamed to MCD format for support with DuckStation. For example, if your memory card file is called “finalfantasyvii_disc1.mcr”, rename it to “finalfantasyvii_disc1.mcd”. After renaming it, you can then load that file in DuckStation's memory card editor.
Fast forward
While a game is running, tap the Pause icon ![]() then select Toggle Fast Forward. DuckStation will return to the game and it will be running in fast forward. To turn off fast forward, simply repeat the same steps.
then select Toggle Fast Forward. DuckStation will return to the game and it will be running in fast forward. To turn off fast forward, simply repeat the same steps.
Capturing screenshots
During gameplay, tap the Pause icon ![]() then select Save Screenshot . DuckStation will prompt you where you want to save the screenshot. That's it! The screenshot will save as a PNG image.
then select Save Screenshot . DuckStation will prompt you where you want to save the screenshot. That's it! The screenshot will save as a PNG image.
This screenshot feature is a little wonky. It'll capture the screenshot and all the black space around it. For example, if you capture the screenshot while holding your phone upright, it'll capture the screenshot with a lot of black space below the game. If you capture the screenshot holding your phone sideways, it'll have black space to the left and right of the game.
Using cheats
DuckStation auto-downloads cheats! Enabling cheats takes mere seconds.
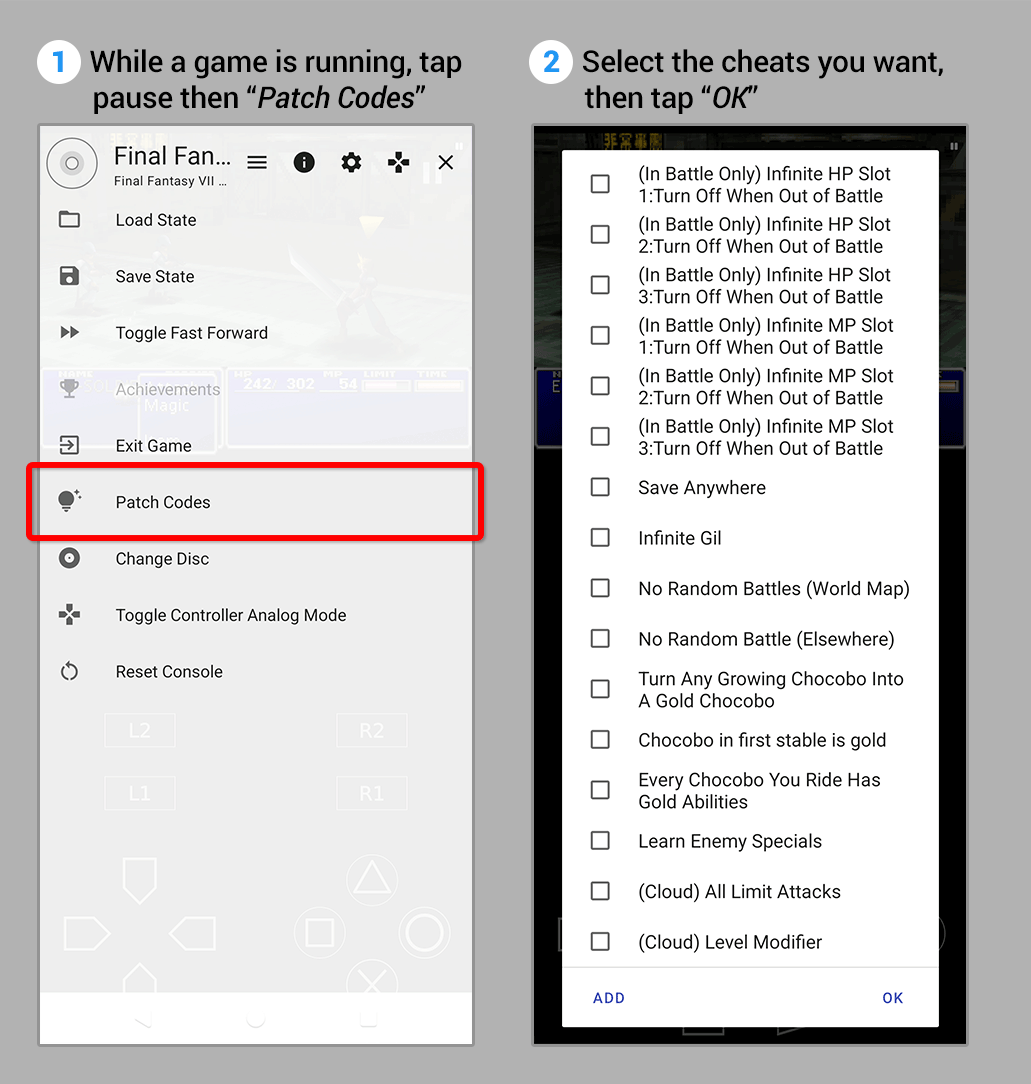 Steps to use cheats
- While a game is running, tap the Pause icon .
- Tap Patch Codes. (They can't call it “Cheat Codes” because the word 'cheat' raises a red flag with Google's protections.)
- In the Patch Codes section, tap Enable Codes to turn on cheats.
- Scroll down and you'll see a list of pre-downloaded cheats. Tap the toggle button for each cheat that you want to be turned on.
- When you're finished, tap the X to close this and return to your game to enjoy the cheats. You may need to restart the game for the cheats to take effect.
Q: Help! I get a black screen when I load games!
If you load a game and you get a black screen, that's a catch-all issue that could be the result of several potential causes. Try running through the following troubleshooting.
Did you read my directions?
First of all, make sure you read my directions on preparing ISOs and adding a game directory. Notes about downloading ISOs is also an important read. Don't be impatient and skim through my directions!
Are you using my BIOS?
Did you download the BIOS from another website? An improper or bad BIOS could cause a black screen. Try the BIOS I offer in this tutorial. To verify that the BIOS is working, you can test it by tapping the hamburger menu then Start BIOS - as shown here .
Game-specific or global?
Find out if this is a game-specific issue or a global issue. Try loading other games. If other games work, then it's clear there's something wrong with your PlayStation 1 ISO. Try downloading the game in question from other sites. If all games load to a black screen, keep reading.
Troubleshooting: Change the renderer
Changing the renderer might help to get games working past the black screen. Go to App Settings > Graphics, then change “GPU Renderer” to Hardware (Vulcan) or Software - as shown here .
Troubleshooting: Is this a BIN/CUE?
With DuckStation on Windows, a common black screen issue is when people have a BIN/CUE for a game and they load the BIN file when they're supposed to be loading the CUE file . DuckStation for Android, though, auto-detects your games so this shouldn't be an issue. But still, this could be an Android issue if the games you downloaded aren't set up properly for DuckStation. I recommend downloading games from other sites. If that doesn't help... I suppose it's possible DuckStation isn't compatible with your device.
Is this more akin to a crash?
Do all your games load fine, but you reached a black screen during gameplay? That would mean your game crashed. That's tricky to troubleshoot due to the many possible causes. DuckStation is still an in-progress emulator, so it's probably a bug. I hope you saved your game! Crashing can occur if you saved your game near or during a CGI cutscene. Crashing can certainly occur with a ROM hack or fan translation. If you've been tweaking around settings, perhaps something you did caused the crash. Try to undo it. I would also try disabling PGXP corrections. If all else fails, you may need to jump ship from DuckStation and try ePSXe or RetroArch (with the Beetle PSX core).
Dumping your PSX games to ISO
Dumping your own PSX games to ISO requires a PC with a CD-ROM or DVD-ROM drive. I have step-by-step directions for this process in my RetroArch (Windows) tutorial.
Finding PSX ISOs
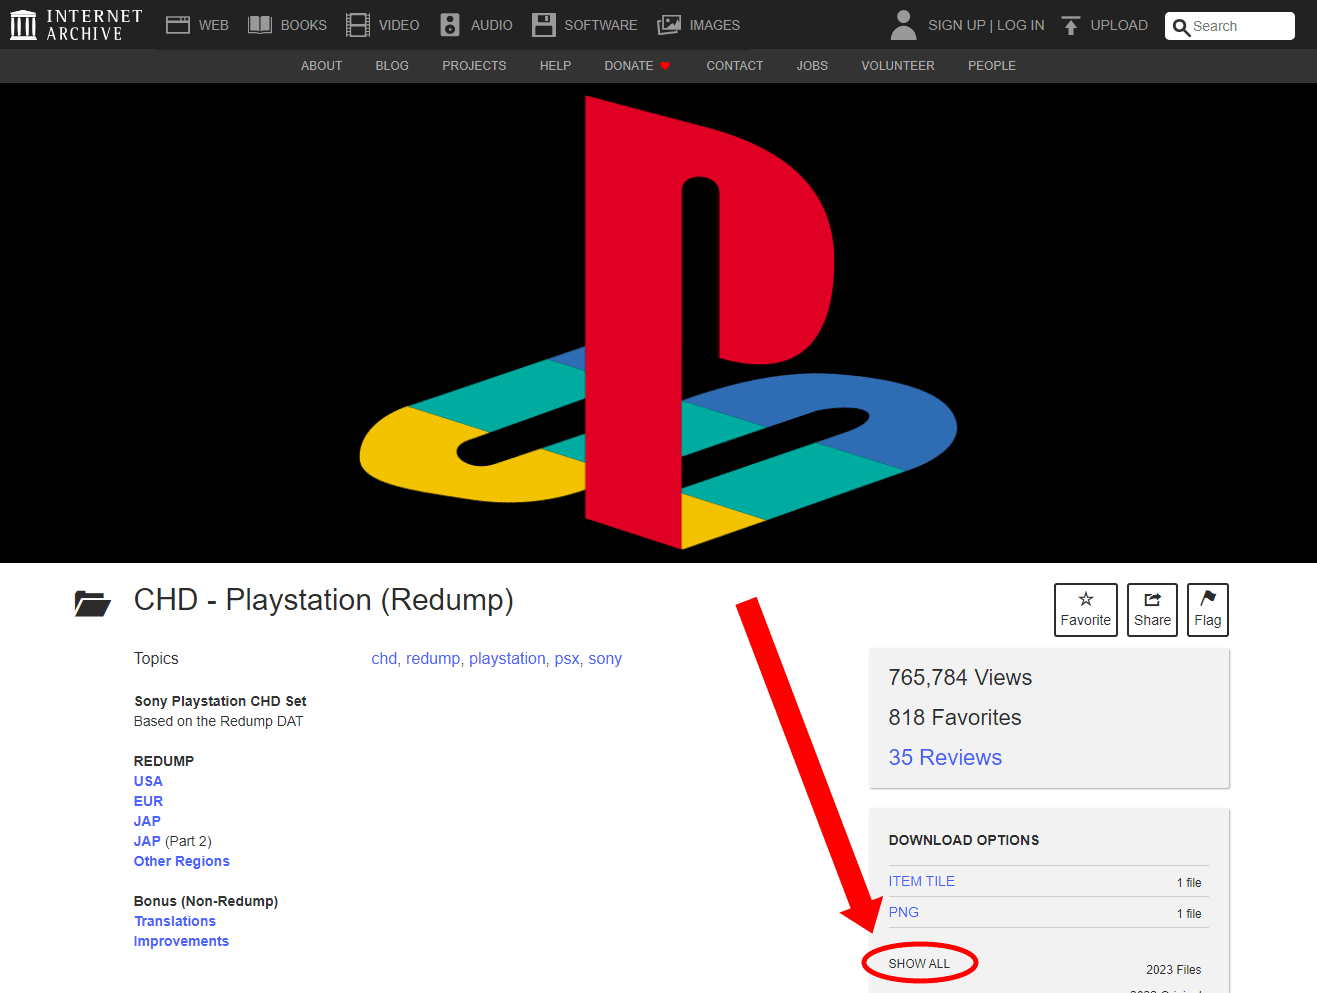
In the late 2010s, a new ISO was introduced called “CHD”. This format is now commonly used for systems such as PlayStation 1, Sega Saturn, Sega CD/Mega CD, and PC Engine CD/TurboGrafx16-CD. CHD guarantees that games will run effectively on modern video game emulators (from a file compatibility perspective).
To find PlayStation 1 ISOs in CHD, I recommend searching Google with “archive.org playstation 1 chd”. Clicking the first link typically brings you directly to the list of CHD ISO downloads. If the link takes you to a landing page , click SHOW ALL to reach the downloads page.
If you want more options for downloading ROMs, check out my links page.