Dolphin Tutorial
- About Dolphin
- Installation
- How Dolphin handles the controls
- Reconfiguring keyboard or gamepad for GameCube
- Reconfiguring keyboard or gamepad for Wii
- Setting the games directory
- Loading a game
- Q: Games are stuck on a black screen!
- Q: I get 'Failed to load D3DCompiler_42.dll'!
- Full screen
- Improving graphics
- Anti-aliasing
- Post-processing effect
- Save states
- Fast forward
- Using cheats
- Capturing screen shots
- Downloading games
View this guide on Google Docs to:
- Save as PDF or any common doc format
Share
About Dolphin
Dolphin is a GameCube and Wii emulator for Windows, Mac, Linux, and Android. Known for its high compatibility and enhanced performance, Dolphin enables games to be played in high definition, often surpassing the original console's capabilities. It offers features like save states, cheat codes, turbo speed, and multiplayer support, along with extensive customization options for graphics and controls.
Dolphin can be downloaded from its homepage: dolphin-emu.org
Installation
Dolphin is a standalone program, so it does not have an install wizard. Installation is simple: just extract Dolphin from its zip file. To make things clearer, check out the video below that shows how to 'install' a portable emulator (it shows Snes9x, but Dolphin is the same process). It's pretty straight-forward - all that you're doing is extracting a zip file while doing a little bit of folder management. If you want to 'uninstall' a portable emulator, simply delete it!
In the video, I'm recommending “Documents” to house your emulators. But, you could also place emulators in “Downloads”, a folder on your desktop, an external HDD, or a thumb drive. These are common locations with full read/write access. Keeping it on your computer is better than external storage because it runs better & faster.
To open Dolphin, double-click on ![]() .
.
How Dolphin handles the controls
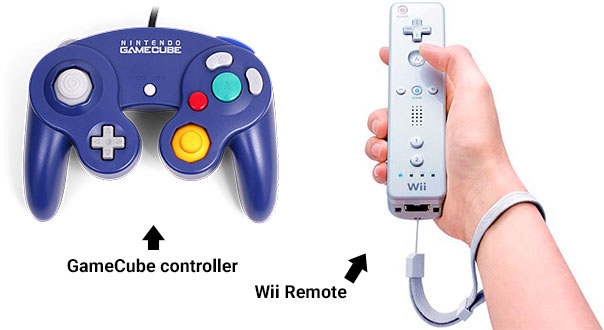
Keep in mind the differences between the GameCube controller and the Wii Remote. Particularly, remember that the Wii Remote uses motion sensing for directional interaction.
GameCube controller
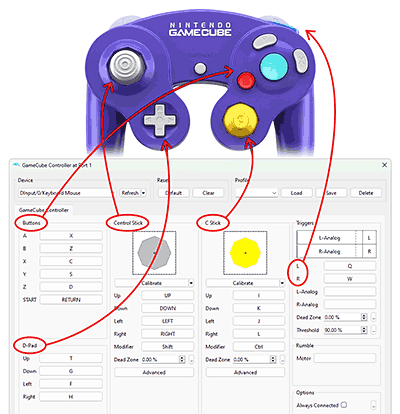
The GameCube controller settings can be found by going to Options > Controller Settings, then click Configure for the first GameCube controller - as shown here . Next, view this diagram to see how the configuration screen relates to the GameCube controller.
Wii Remote
 Dolphin using the mouse for Wii motion
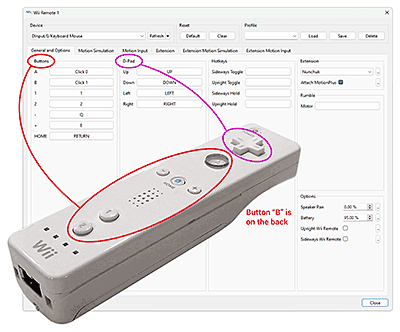
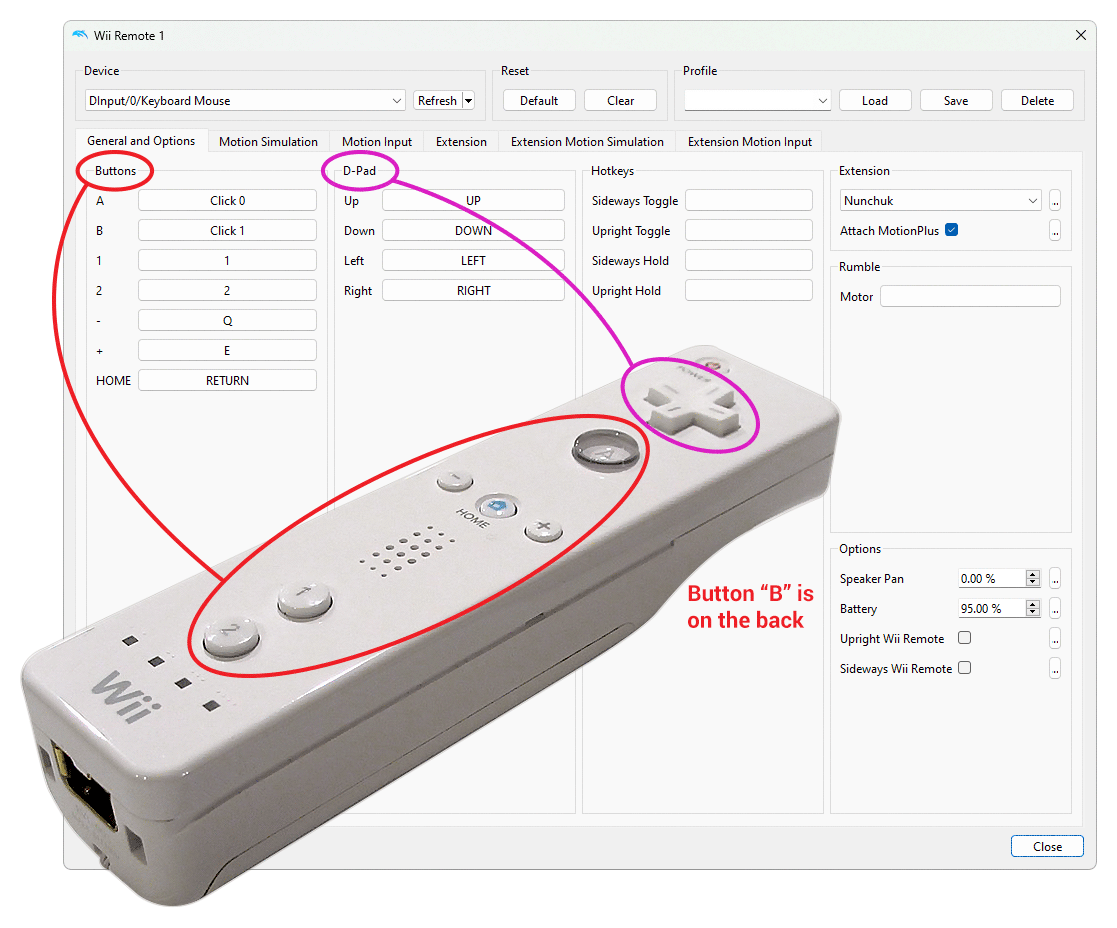
The Wii controller settings can be found by going to Options > Controller Settings, then click Configure for “Wii Remote 1” - as shown here . Next, view this diagram to see how the configuration screen relates to the Wii remote.
Click on the Motion Simulation tab to view the default configurations for motion controls . As you move your mouse around, you'll notice a red dot in a diagram moving along with you (shown to the right). This is how Dolphin handles emulating the Wii Remote's motion sensing - with your mouse.
Reconfiguring keyboard or gamepad for GameCube
- Click
 or go to Options > Controller Settings - as shown here .
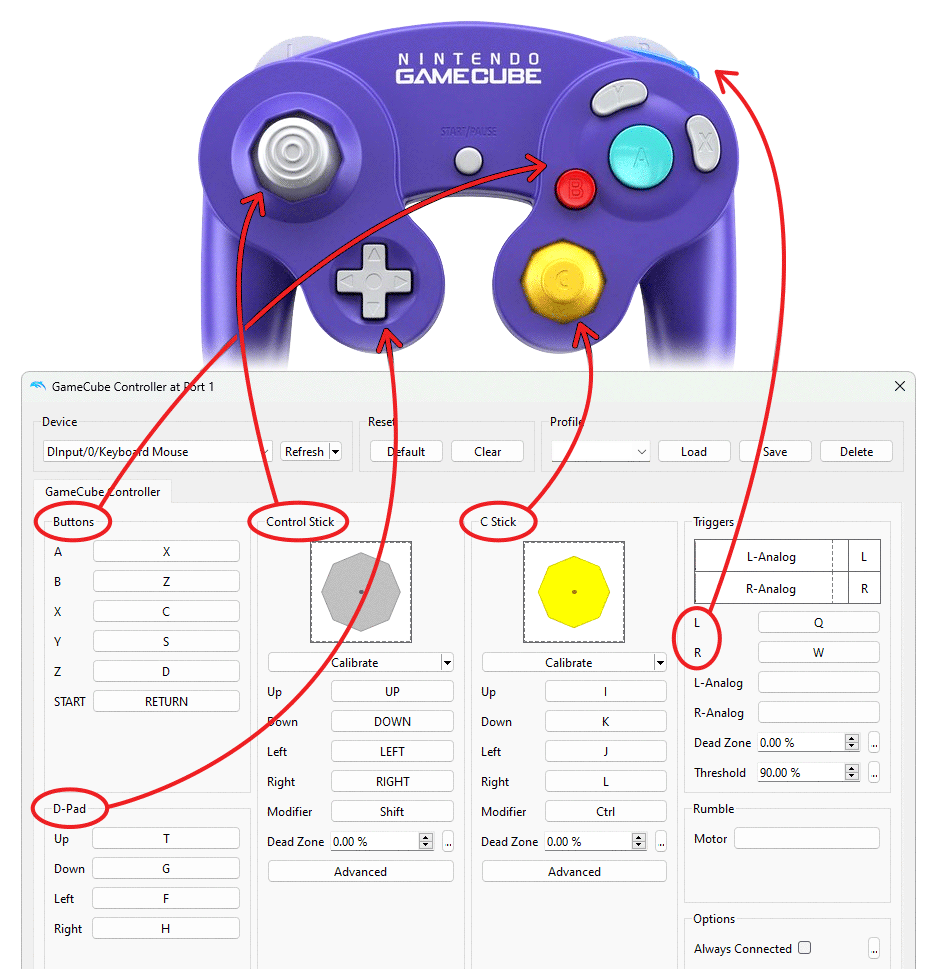
 - Under “GameCube Controllers”, click the Configure button for “Port 1” (which is player 1) - as shown here .
- You'll arrive at the controller configuration screen (shown below). To reconfigure a button, simply click on it then press the new keyboard key or press a button on your gamepad. Repeat for every button you want to be reconfigured. When you're done click Close.
Reconfiguring keyboard or gamepad for Wii
- Click or go to Options > Controller settings - as shown here .
- Under “Wii Remotes”, click the Configure button for “Wii Remote 1” (which is player 1) - as shown here .
- You'll arrive at the controller configuration screen (shown below). To reconfigure a button, simply click on it then press the new keyboard key or press a button on your gamepad. Repeat for every button you want to be reconfigured.
- Next, you may want to reconfigure the motion control for the Wii Remote (if you don't want to use your mouse). That's found by clicking on the Motion Simulation tab. Take notice of the “Point” area:
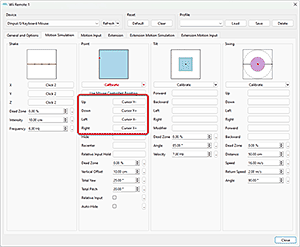
You could reconfigure these four buttons to a D-pad, but I recommend a joystick. For example, if you're using a PlayStation 3 controller, you could configure these buttons to one of the joysticks . After configuring the buttons, make use of the motion sensing tester to ensure it's working properly. - When you're done, click Close.
Setting the games directory
This step is optional. You have the option of loading your list of games directly into Dolphin so that you don't have to fuss with loading a game manually. It takes seconds to do. First, make sure your games are extracted from their 7Z, RAR, or ZIP files. 7-Zip can be used to extract any compression file format (it's free).
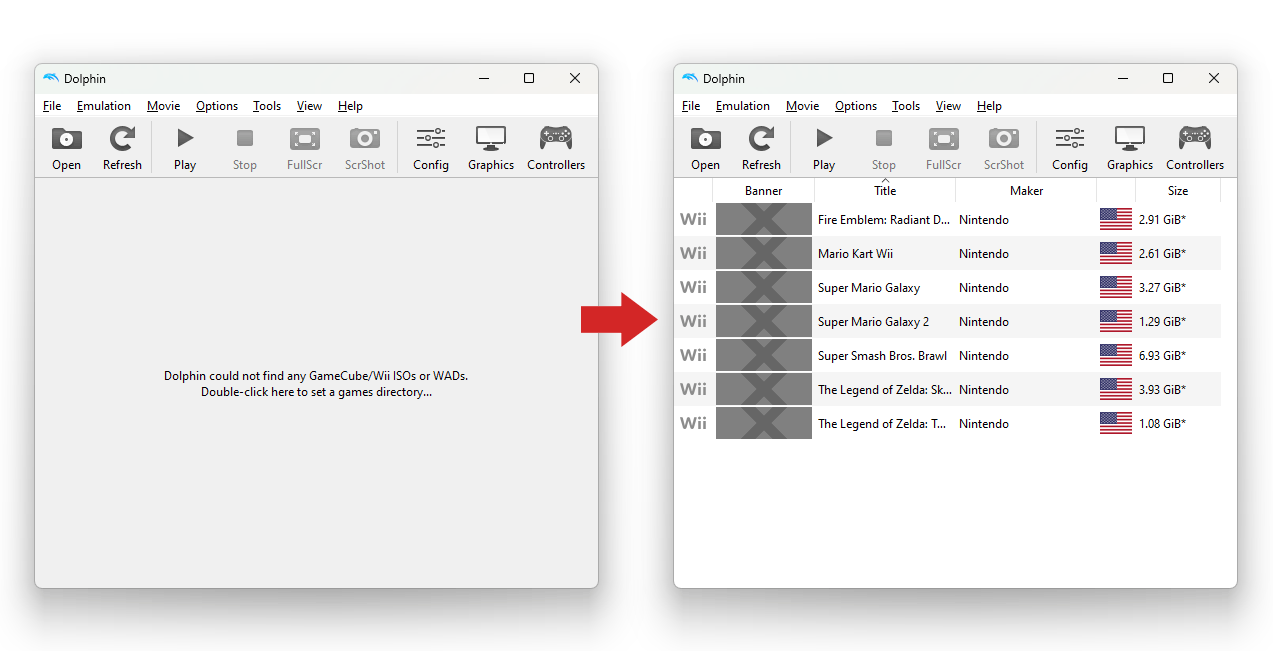
After opening Dolphin, you'll see this message on the main screen:
Dolphin could not find any GameCube/Wii ISOs or WADs.
Double-click here to set a games directory...
As it says, double-click on it. You'll be prompted to select the folder where your ISOs/WADs reside. Go ahead and do so. That's it! Dolphin will immediately be populated with your games. To play a game, simply double-click on it.
Loading a game
- So you've downloaded a few GameCube and Wii games, and you're ready to load them with Dolphin. The games you downloaded are probably compressed in a 7Z, RAR, or ZIP file. 7-Zip can be used to extract any compression format (it's free).
- Using 7-Zip is easy. Just right-click the 7Z or RAR file, and go to 7-Zip > Extract Here, as shown here .
- If you read the above about setting the games directory, all you do to load a game is double-click on it. Otherwise, to manually load a game click on
 or go to File > Open.
 - After clicking Open you'll be prompted to the “Select a file” window. Navigate to the folder where your GameCube or Wii games are. Click on the game you want to play, then click Open - as shown here .
- Your game will begin. It normally loads instantly. Enjoy!
To close a game, click the “X” on its window or press the Esc key.
Q: Games are stuck on a black screen!
Does Dolphin get stuck on a black screen after loading games? Below are some possible reasons for this.
- This might sound silly, but make sure the game you're trying to load is actually a GameCube or Wii game :)
- Rule out if this black screen issue is specific to a single game or all your games. If it's happening to only one game then it could be that it's corrupt. That should be an easy fix by simply downloading the game from another website. Otherwise, if the black screen issue is happening to all your games then keep reading.
- Try installing the full DirectX package to ensure DirectX is running the best it can (don't forget to restart your computer after installation).
- Is your computer kind of old? Make sure it's fully updated. Dolphin is programmed to work with the latest version of Windows. A decent video card is necessary as well. If your computer is old or it's a low-end machine (cheap), the black screens could be that Dolphin is not compatible.
Q: I get 'Failed to load D3DCompiler_42.dll'!
If Dolphin returns the following error upon loading a game: “Failed to load D3DCompiler_42.dll” - this is a DirectX issue. This should be resolved by installing the full DirectX package (don't forget to restart your computer after installation).
Full screen
By default, Dolphin loads games in a window. Press Alt+Enter to enter full screen. Press Alt+Enter again to go back to window mode. You can also click on ![]() to enter full screen.
to enter full screen.
Pressing the Esc key can exit full screen. Doing so will also have Dolphin prompt you asking if you want to close the game. It's kind of annoying; pressing Alt+Enter to exit full screen is better.
Improving graphics
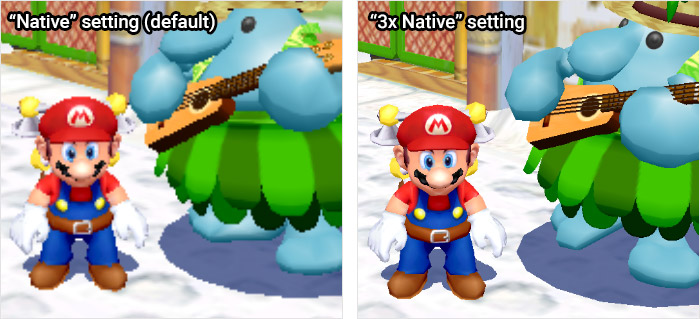
Upon entering full screen, the first thing you're going to notice is that the quality of the graphics looks somewhat low grade and pixel-ish. Dolphin can be a CPU heavy emulator, so by default its settings are low to be as compatible as possible for most computers. Fortunately, as shown in the above sample picture, Dolphin's graphics can be improved (if your computer can handle it).
- Click on
 or go to Options > Graphics Settings.
 - You'll arrive at the “Graphics Configuration” window. Click on the Enhancements tab:
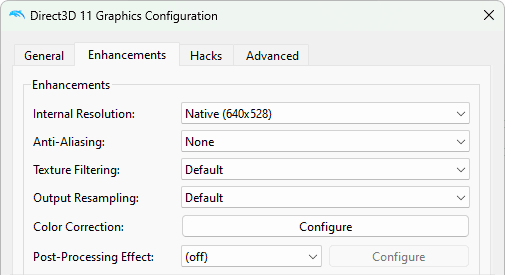
The options of importance here are “Internal Resolution”, “Anti-aliasing”, and “Post-processing Effect”. For now, let's focus on Internal Resolution. - Click on the drop-down field for “Internal Resolution.” You'll get these options:
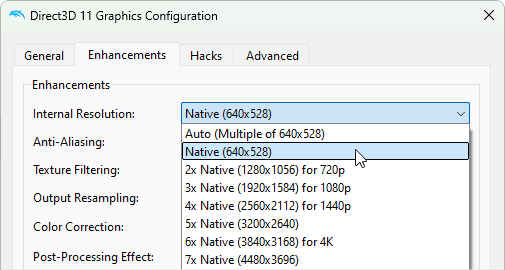
If you have a game running, you can click among these resolutions, and Dolphin will immediately apply the resolution for you to preview. Clearly, if you begin to hear the music playing scratchy, that's a sign that your device can't handle that resolution. In general, an average computer should be able to handle 2x Native (1280x1056) for 720p or 3x Native (1920x1584) for 1080p. If your device is older or lower end, you might be stuck with the default: Native (640x528). - When you've selected a resolution that works well for your computer, go ahead and close this window. If you jump between GameCube and Wii games regularly, you may have to return to this screen to change the resolution. For example, if you set it to 2x Native (1280x1056) for 720p and all your GameCube games run fine, but once you open a Wii game you find it running sluggish. In this case, you'd need to roll back the resolution to Native (640x528) for Wii games, then switch it back to 2x Native (1280x1056) for 720p when you decide to play GameCube games.
Anti-aliasing
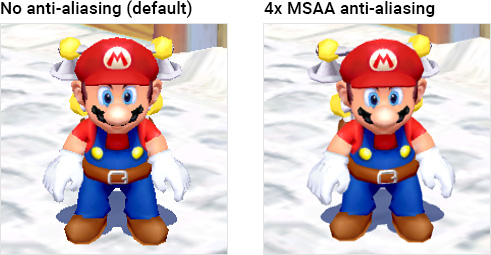
Enabling anti-aliasing works well for GameCube games. Although with Wii games only high-end computers can handle them with anti-aliasing. It's a pretty subtle feature. Unless you're particular about rendering quality, you probably wouldn't notice the difference with or without anti-aliasing. Anyway, here's how to enable anti-aliasing:
- Click on or go to Options > Graphics Settings.
- You'll arrive at the “Graphics Configuration” window. Click on the Enhancements tab.
- Click on the drop-down field for “Anti-Aliasing.” You'll get these options:
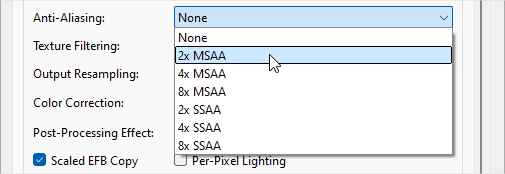
Select 2x MSAA, or select anything higher if you want to test your CPU. Like when changing the resolution, Dolphin will give you an immediate preview of the anti-aliasing you select.
Post-processing effect
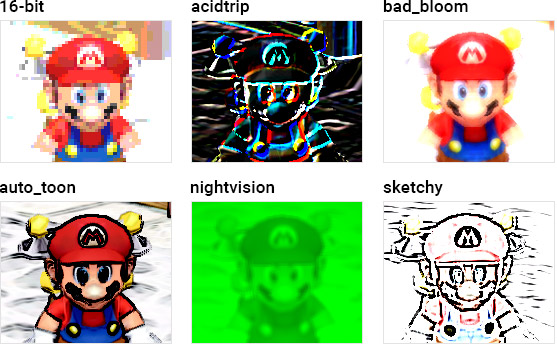
Post-processing effect doesn't do anything to enhance the graphics. It's just a fun feature that applies a wacky filter. Here's how to enable it:
- Click on or go to Options > Graphics Settings.
- You'll arrive at the “Graphics Configuration” window. Click on the Enhancements tab.
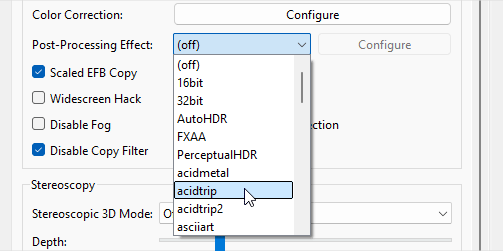
- Click on the drop-down field for “Post-Processing Effect” and select whatever you want. Like when changing the resolution, Dolphin will give you an immediate preview of the effect you select.
Save states
Save states is a feature that saves the exact spot you are in any game. You can use this feature manually by going into the File menu or by quick keyboard shortcuts.
Using save states
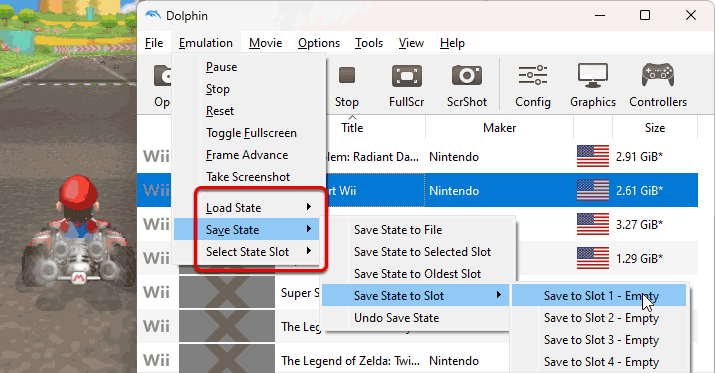
- Capturing a save state: To capture a save state go to Emulation > Save State > Save State to Slot > Save to Slot 1 - as shown here .
- The keyboard shortcut for saving a save state is Shift+F1.
- Loading a save state: To load a save state that you previously saved, go to Emulation > Load State > Load State to Slot > Load to Slot 1.
- The keyboard shortcut for loading a save state is F1.
- Ten save slots! Dolphin allows you to save up to 10 different save states. By default, it is set to slot “1”. You can change the slot by going to Emulation > Select save slot. Then select the desired slot.
- By default, Dolphin can save and load states from the first 8 slots via keyboard shortcuts. As I stated above, Shift+F1 saves to slot 1 and F1 loads the save. Furthermore, Shift+F2 saves to slot 2, Shift+F3 saves to slot 3, and so on with Shift+F8 saving to slot 8. You can customize these shortcuts by going to Options > Hotkey Settings, then click on the Save and Load State tab - as shown here .
Save to file
Dolphin also gives you the option to save to a file. This lets you collect an infinite amount of save states. This is also helpful to transfer a saved game to another computer or let you collect saves with specific names.
- Save to file by going to Emulation > Save State > Save State to File. You'll be prompted to enter a custom filename for your save.
- Load a save file by going to Emulation > Load State > Load State from File and navigate to your save file to load it.
New to emulation? If you're new to video game emulation, I don't want to confuse you into thinking that save states are what you're supposed to use as the only means to save your progress with Dolphin. Save states are an optional feature. You can still save your game at save points as you would on a real GameCube or Wii. In-game saves are loaded at the game's title screen (like on the real thing) - they're not loaded via the Emulation menu.
Pro Tip: If you're playing a game that has in-game saving, I recommend that you use both save states and in-game saving to save your games. That way you'll always have a backup.
Fast forward
Fast forward is the feature that speeds up the game. To activate it, hold down the Tab key.
Using cheats
I have good news and bad news. The good news is that Dolphin's cheats feature is awesome. Cheats are pre-loaded with every game; you simply select the cheats you want to use. The bad news is that cheats are only offered with GameCube games, not Wii games. Here's how to use cheats with GameCube games:
- First, you need to set the game directory to have your list of GameCube games appearing within Dolphin.
- Click
 or go to Options > Configuration.
 - In the Settings window, put a check in Enable Cheats - as shown here .
- Right-click a GameCube game in your games list, then left-click on Properties - as shown here .
- In the window that pops up, click the AR Codes tab. You'll see something like below:

Select the cheats you would like to enable, and that's it! When you're done, close this window and open the game to enjoy the cheats.
Capturing screen shots
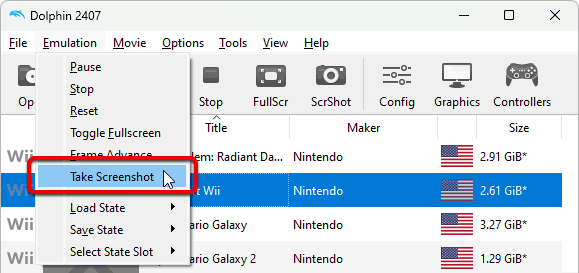
Press F9 to capture a screenshot. You can also do it from the menu by going to Emulation > Take Screenshot.
The tricky part is finding the folder where Dolphin sends the screenshots to. Here's how:
- Open File Explorer. There are many ways to do this. A quick way is to press the Windows key, type “file”, and you should see File Explorer appear in the search results.
- Go to Windows (C:) > Users, then open the folder for the Windows profile you're currently signed into. If that sounds Chinese to you, the name of your Windows profile is probably your first name or your nickname. You'll see a folder like this .
- Here's the fun part. We need the “AppData” folder, which is hidden here by default. We need to tell Windows we want to show it. Look at this picture . Go to dot menu > Options > View tab, then put the radio bullet in “Show hidden files, folders, and drivers”. Then click Apply, then OK.
- Next, go to AppData > Roaming > Dolphin Emulator > Screenshots. Open the folder you see here, and your screenshot(s) will be there.
This is kind of a hassle. If you want my recommendation, I think it's better to take screenshots with ShareX. It's a free & open source screenshot app. When Dolphin is in a window, you can just press Ctrl+Print Screen, then click the Dolphin window to capture the shot. It's easy to find and customize where screenshots go.
Downloading games
Internet Archive is the best place to download games. The website itself is not easy to navigate, but you can 'hack' that poor usability by using Google to search for stuff on there. For example, use such search phrases as:
I have more options for rom sites on my links page.