Walkthrough
 Contents
Chapter 3 The Barazuishou
Infinity Academy
 Infinity Acadamy
Arriving at the Infinity Academy's front gate, Chibi-usa feels that the Barazuishou is somewhere here. Momo-chan, Chibi-usa's school friend, appears. Chibi-usa asks Momo to leave. But Momo knows that Mamoru is in trouble and so, she is here to help Chibi-usa find the Barazuishou. The two girls go past the gates, but the gate behind them abruptly closes. Go up and enter the building.
The scene switches over to Anshar, who is in the principal's office. He is surprised to see Chibi-usa and Momo here. He asks Sin if he could go to where they are and escort them out. Sin refuses that, as she says that they are the enemies. They are in the youth, so it would be easier just to kill them. She tells Anshar to kill those girls quickly so that later on, they can return to the future. Anshar reluctantly complies and leaves. Sin calls forth two Youmas to defeat those two girls.
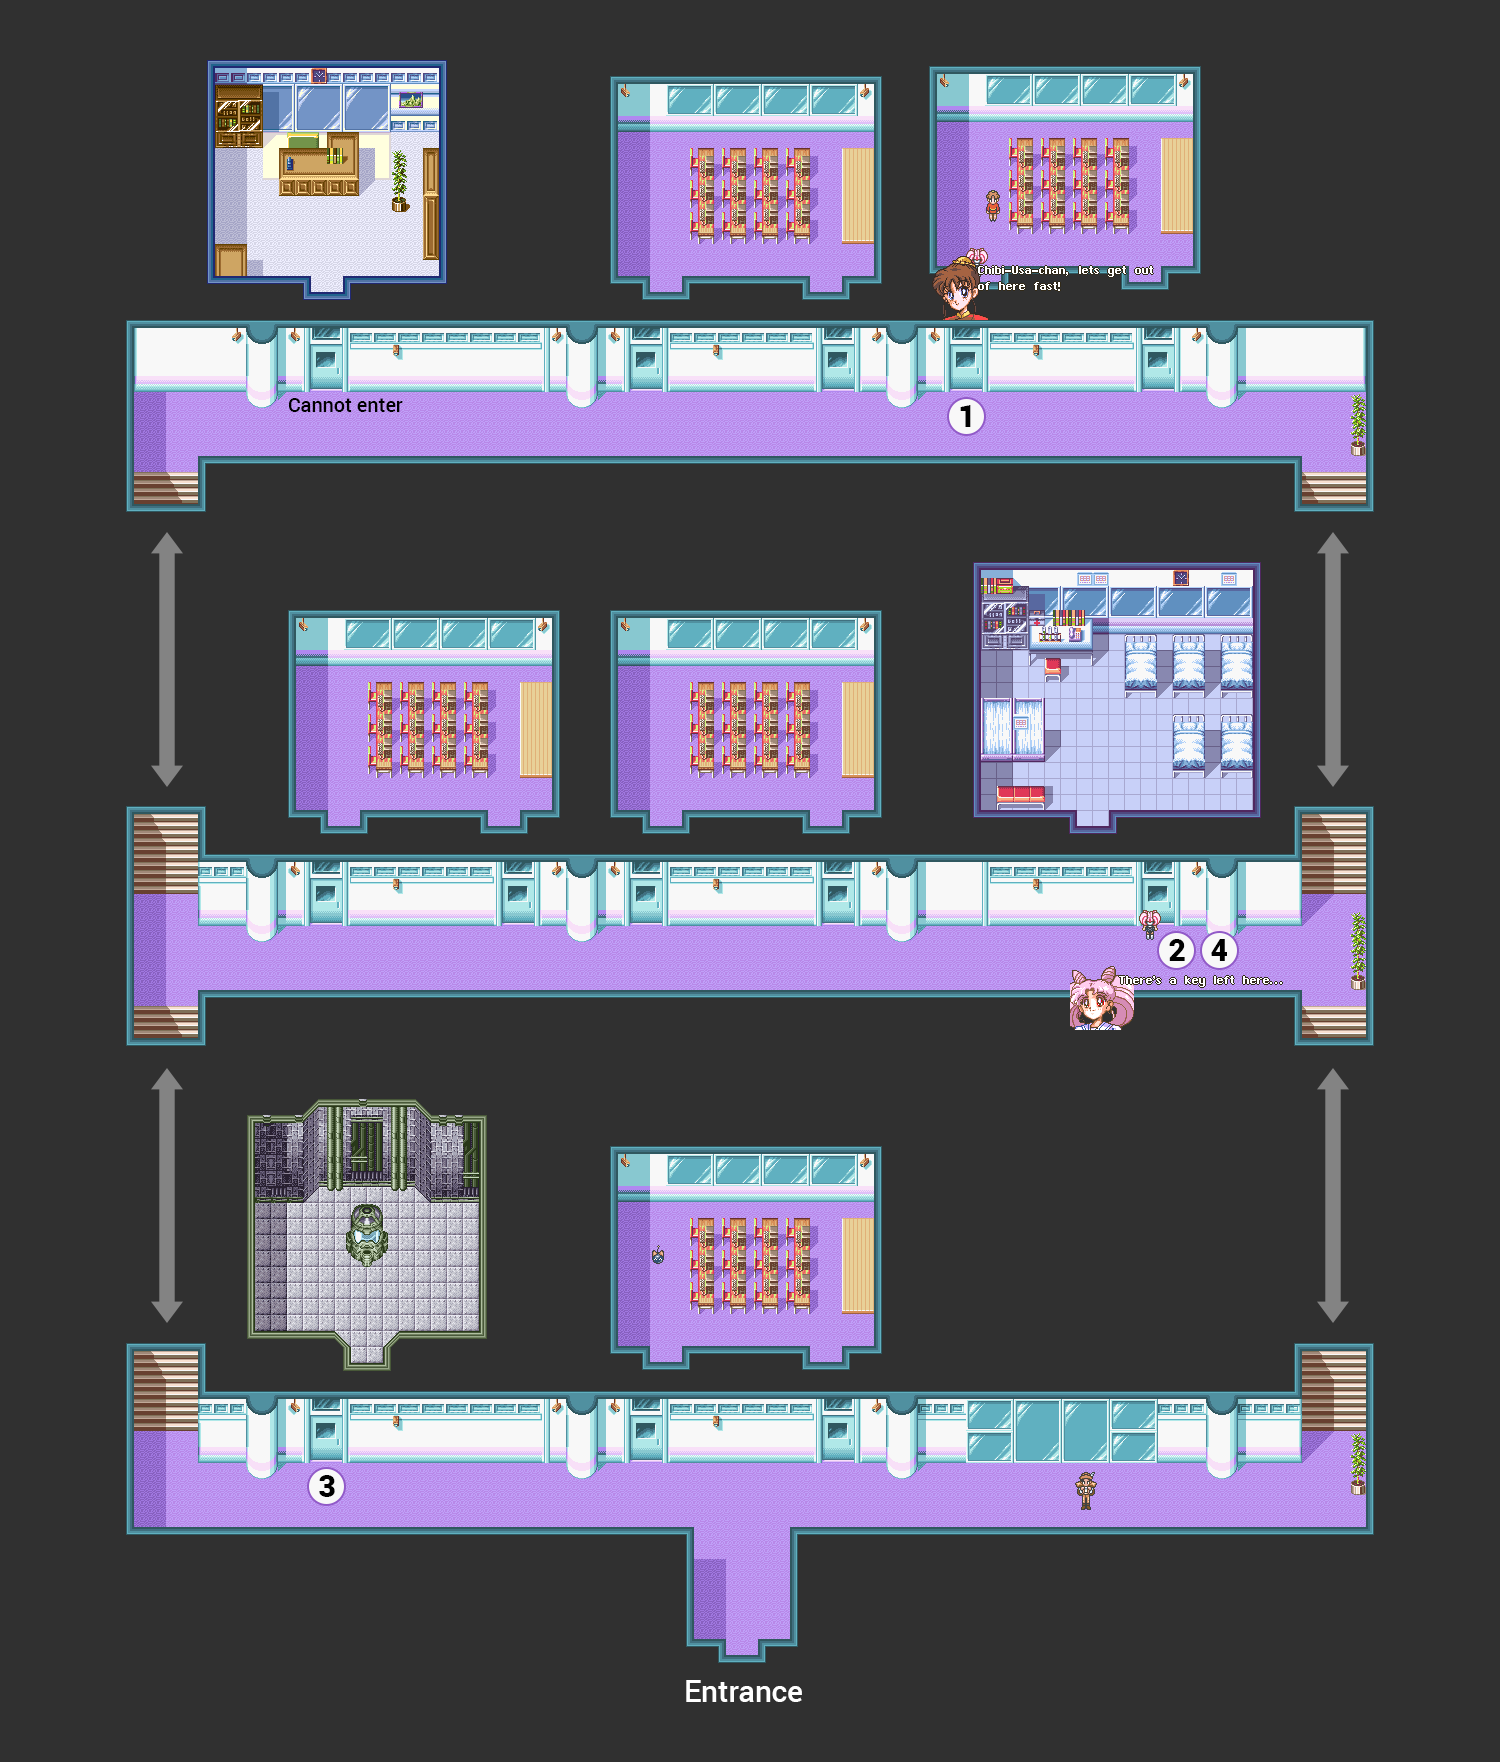
Go up and keep moving right until you see a traveling merchant. Speak to him and he will recover your health! Now keep going left, past the two doors, and try to enter the third door. There is a suspicious computer inside this room, so Chibi-usa decides not to go in there. Go left, and up the stairs.
Go up and keep moving right, past the four doors. Try to enter the fifth door and you will discover that it is the sick room, but it is locked because a key is needed to open it. Now go right, and up the stairs.
Go left and enter the first door you see. Momo will start freaking out and tells Chibi-usa that they should leave. Chibi-usa agrees. Suddenly, two Youmas approach Momo and puts her to sleep. Anshar enters the room and makes the two Youmas disappear. He asks if the girls are okay. He examines Momo-chan and says that she has been poisoned! She might die. Chibi-usa fears for Momo's life hanging in the balance, but Anshar tells her that there is a sick room nearby. If they go there, Anshar will give Momo some treatment to make her all better. Chibi-usa notices a weird creature that is with Anshar and asks what it is. Anshar replies that the creature's name is Kishal. Chibi-usa comments on how Kishal looks human-like.
He calls Chibi-usa “Princess”, telling her that they should get to the sick room. Chibi-usa gets confused. Anshar apologizes, saying that she looks like someone he knows. He suggests that they should get out of here, but Chibi-usa tells him the school gates have been closed. Anshar answers that they can open the gates if they get to the school's control room. Chibi-usa tells Anshar that they should help Momo-chan first.
Anshar figures that his sister, Sin, sent those two Youmas to attack the girls. He will never forgive her if the Youmas attacked Chibi-usa.
Go right and down the stairs. Go down, left and try to enter the door. You will find a key here that can be used to open the control room door. Go right and up the stairs. Keep going left, past the four doors, and try to enter the fifth door. It is the principal's office but you cannot enter it since we don't have the key to this room. Go left and down the stairs. Keep going down, down the stairs. Go down, right, and try to enter the door you see.
This is the control room. If they open this room, then they can open the sick room as well. Chibi-usa will enter the room alone and she'll get trapped. Anshar asks if Princess is okay, but Chibi-usa can't open the door! Security starts up and asks for a password. But Chibi-usa doesn't know any password. Since she doesn't, Chibi-usa will be ambushed by two Youmas!
Boss: BoxyX2
Even though Sailor ChibiMoon has a weak attack and is at level 1, she is more than enough to defeat these two easy monsters. You don't have enough EP to use Pink Sugar Heart Attack or her special move after using MoonCup 2. So just use physical attacks on the two Boxys until they are both defeated. They should die in one hit by ChibiMoon's physical attack.
Rewards after winning: 140 EXPs, 1960 Yen, MoonShard, Sailor ChibiMoon gains 7 levels
Anshar enters the control room and asks if Chibi-usa is okay. He shuts down the computer, causing the gates and Sick Room to unlock. He calls Chibi-usa Princess again, but Chibi-usa gets peeved. Anshar apologizes. Before they can leave the school, they have to go to the sick room and heal Momo-chan. Anshar agrees and so, they decide to head for the sick room.
The scene switches over to Sin, in the principal's office. She calls Anshar to come back to her, but Anshar doesn't respond.
Keep going right, then go up the stairs. Now go up, left, and up. Enter the door and you will be in the sick room.
After treating Momo-chan, Anshar tells Chibi-usa that her friend will be feeling better again after a little while. Chibi-usa thanks Anshar and suggests that they should get Momo-chan out of here. She soon tells him that she is looking for the Barazuishou. She asks if Anshar knows of it. Anshar answers that he has never heard of it and asks why Chibi-usa is looking for it. Suddenly, Momo-chan starts talking, much to Chibi-usa and Anshar's surprise! Anshar figures it out that it is Sin who is impersonating Momo.
Sin shows herself and asks Anshar how many times he has had missed the princess and not looked for them. If Anshar had helped the Oppositios now, the flow of time would change. Chibi-usa finds out that Sin is Anshar's sister. Momo-chan starts moving, being controlled by Sin. Anshar tells Chibi-usa to quickly leave, but she wants to try and help. Sin quickly pins Chibi-usa to the ground and Anshar gets furious. Upset by his evil sister's ways, Anshar teleports himself and Chibi-usa away.
Chibi-usa's Forest
 Chibi-usa's Forest
Having arrived at an unknown location, Chibi-usa regains consciousness. She notices Anshar, who is tired after using his powers to teleport himself and Chibi-usa here. Chibi-usa asks where they are right now, but Anshar doesn't know. He thinks they are inside Chibi-usa's guiding light. Chibi-usa notices that it must be the Ginzuishou's light. Maybe the Barazuishou is around here somewhere. Anshar loses consciousness. Now on her lonesome, Chibi-usa starts to get scared. She calls out for Sailor Moon's help...
This chapter is not over yet, but Luna will appear and prompt you to save the game. Save now.
Usagi's house
Usagi is bored, doing nothing but walking around back and forth in her room. Suddenly, she hears Chibi-usa's voice in distress. Luna appears and Usagi asks what's wrong. Luna tells her that Hotaru has disappeared. Usagi thinks she's just gone for a walk. Maybe, but Luna tells her that Hotaru is not like Usagi. She's not a wandering child and this makes Usagi angry. Anyway, right now there must be tons of enemies lurking around. If Hotaru is all alone, then it must be dangerous for her.
Suddenly, Momo enters Usagi's room, telling her that Chibi-usa is missing. Usagi exclaims that she will help Chibi-usa. She tells Momo that it's dangerous outside, so she should go home. Momo agrees and leaves. Luna implies there's probably something that can help them at the Infinity Academy and Usagi decides that they should check it out.
Exit Usagi's room and go down the stairs. Exit Usagi's house. Go down and keep moving right, until you enter the next screen.
The town of Juuban
.png) Juuban
Juuban
Before we move on, you should stock up on some restorative items. They would help you at this point in the game. Go right, up, right, move up a bit and you should see a shop called “elegance shop Otafukuya”. Head inside and buy some Cologne (which restores all EP). If you have the cash, I also suggest buying some Manicure and F. Creams, which increase attack and defense respectively. Buy anything else you're short on, then exit the store.
Go left, down, and just keep moving right, until you get to the next screen. Keep moving right until you see a Bus Stop sign. Stand next to it and a bus will arrive soon, asking if you want to get to Infinity Academy for 180 Yen. Say Yes and you'll get on the bus, which will take you there.
Infinity Academy
Move right and Usagi will go towards the front gate of the academy.
The scene switches over to Sin and Dr. Tomoe, at the principal's office. Sin wonders what Sailor Moon is doing here and she instructs Tomoe to invite the Senshi to Tomoe Labs and kill them. Dr. Tomoe complies and leaves.
Usagi and Luna feel an evil energy that is not coming from the Infinity Academy, but from Tomoe's Lab! Usagi transforms into Sailor Moon and Luna tells her that Tomoe's Lab is Southwest from the academy.
Walk out of the front gate of the Academy and go left, then up. Enter the secret door and you will be inside the Collector's Shop. He will pay you enormous profits if you sell him your Collective Items. Since we only found the Ancient Doll and Premium Ticket, do NOT sell them to him. We'll find the other Collective items first, then come back to this guy and sell the items for big money. Exit his shop.
Now keep moving down until you enter the next screen.
Outside Tomoe's Lab
 Tomoe's Lab
Note: Gain some levels for Sailor Moon here, as random battles will occur. Get up to at least level 10 or more, and you will be fine.
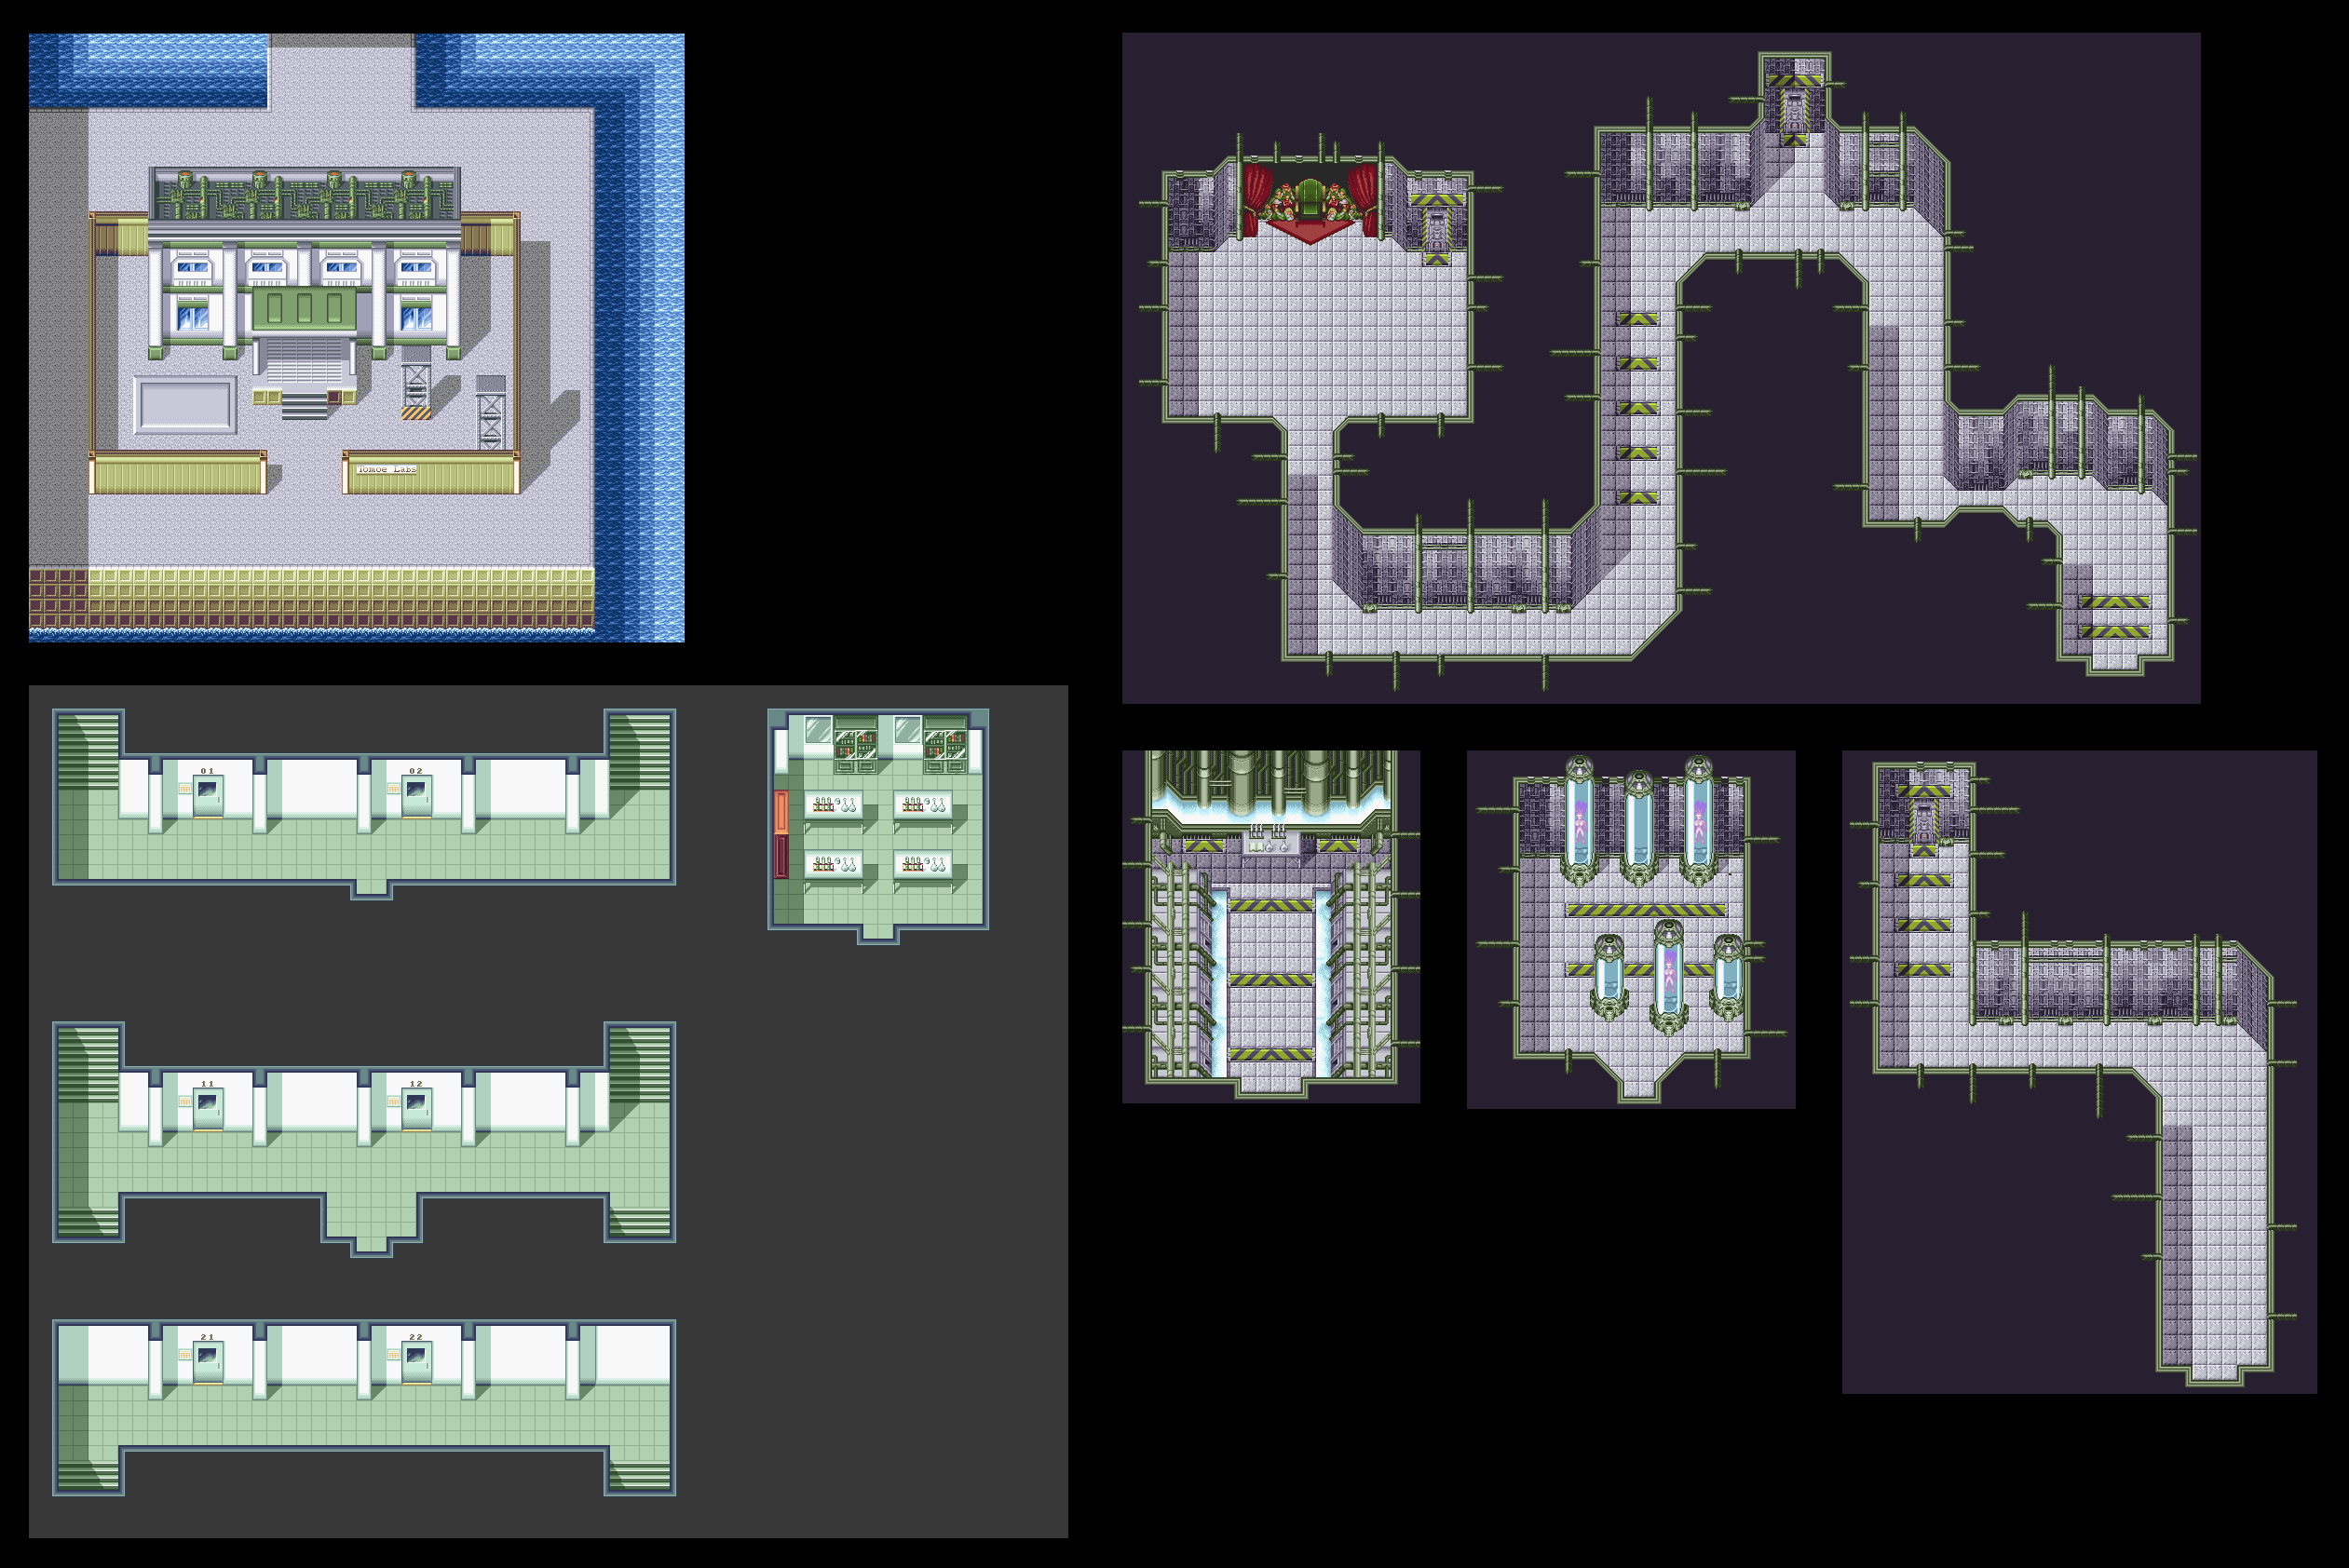
When you are done, follow the path until you see a banner that says “Tomoe Labs”. Enter the gateway and go left to find a Luna-P. Save if you want, then go up and you will find a treasure chest that contains a Nigiri Set. Go down, right, and go up to find a treasure chest that contains a Cologne. Now go down, left, and enter the building.
Inside Tomoe's Lab
Go up, left, and down the stairs.
You will find Dr. Tomoe here, as he greets Sailor Moon. He calls forth Mistress 9 to attack Sailor Moon! Sailor Moon is shocked that Hotaru has transformed back to Mistress 9. Tomoe says that if Hotaru were to stop being Mistress 9, she would cease to exist. Sailor Moon thinks Hotaru is the same as before, as she asks her if she has changed into Mistress 9. Mistress 9 tells her that this time, they shall receive their true destiny!
Boss: Mistress 9
Not a very difficult battle. Mistress 9 knows Sonic Wave, which causes sleep, and her physical attacks do some good damage. Make sure you use the MoonCup1 in case if Sailor Moon's HP becomes low. Try out Sailor Moon's Rainbow Moon Heart Ache too, which is very powerful. Otherwise, keep using Moon Spiral Heart Attack until you run out of EP. If you bought some Cologne, like I told you to, use it to restore EP and repeat with the special attacks. Otherwise, use physical attacks until Mistress 9 is vanquished.
An easier way to beat her is to use a Manicure (if you have some), then use Moon Sprial Heart Attack twice.
Rewards after winning: 65 EXPs, 12,000 Yen
After the battle is over, Hotaru falls unconscious. Dr. Tomoe doesn't waste time, as he decides to have Kaolinite attack you!
Boss: Kaolinite
Kaolinite is just like Mistress 9, has damaging physical hits and knows Sonic Wave. On the first turn, use a Manicure, which raises attack. Keep using Moon Spiral Heart Attack until you run out of EP. Use a Cologne after that and repeat. If not, then use physical attacks until Kaolinite is defeated. Use MoonCup1 if your HP gets low and, if you get the chance, use Rainbow Moon Heart Ache.
On my new playthrough, I defeated Kaolinite in just two turns like I did Mistress 9 using a Manicure and Moon Spiral Heart Attack. You should have leveled up Sailor Moon to 10 to make it this way though.
Rewards after winning: 65 EXPs, 10,000 Yen, P.Earring
Dr. Tomoe decides to withdraw for now and runs off. Sailor Moon examines Hotaru and finds that she's changing back to Mistress 9! But wait, she's also changing back to Hotaru. Seeing as how Hotaru has gone into limbo, Luna tells Sailor Moon to use the Ginzuishou to help her. Sailor Moon does so, and Hotaru returns back to her plain self! Hotaru asks if her papa is still alive and Sailor Moon answers yes, but it seems he's helping to revive defeated enemies.
Sailor Moon notices the door that Tomoe just went through and she asks Hotaru where it leads to. Luna suggests that they should go through that door and see if Doctor Tomoe is there. Hotaru transforms into Sailor Saturn and you get control of Sailor Moon. Now go through that door.
Doctor Tomoe sees two Sailor Senshi now and finds it convenient. Sailor Moon asks why he is dragging Hotaru into battle again. Tomoe answers that it is not a battle, it is a project. They are resurging with a thing called “strength”. And they shall get some proper results this time around.
Boss: Gelmadoid
This boss is versatile, as it knows Sonic Wave, Fascination, AND Toxic Mist. Make sure you have the items that you will need to get rid of those numerous status ailments. His physical attacks are pretty tough so make sure you heal often, especially Sailor Saturn since her HP is VERY low. She could die in one hit if she is attacked by the boss, so make sure you heal her using items like LifeWater.
You could use a manicure on Sailor Moon if you want to make the fight a lot easier, but I suggest that you save the ones that you have left for later on. If you have plenty, then by all means! Use Moon Spiral Heart Attack and Death Reborn Revolution until you run out of EP. Use a colgone afterward, or just use physical attacks until this boss is defeated.
Rewards after winning: 65 EXPs, 13,000 Yen
After the battle, Saturn asks her papa why he's helping the bad guys. Tomoe slowly starts to regain his plain self, but he loses control of his mind to a dark spirit that's inside of him. Tomoe tries listening to Hotaru's words, but the evil spirit takes full control of him. Tomoe soon disappears after stunning Sailor Moon and Sailor Saturn.
Sailor Moon figures that Hotaru's father is being controlled and it's getting dangerous. It's not right for her to help this time and Luna agrees. Saturn agrees with Sailor Moon and asks for her to help Tomoe this time.
Note: Random battles will occur here.
Go up and you will find a treasure chest that contains a Red Rose. Go left, up, left and you will come to an intersection - left or up. Go up and enter the room. In here, you will find a Luna-P as well as two treasure chests. One of the chests contains App.Medic while the other one contains a Destruction Tiara, which is a VERY useful item for Sailor Saturn. Unequip Saturn's Tiara and in place of that, equip the DestTiara. Save at the Luna-P, then exit this room.
I suggest that you gain some levels here. Get Saturn up to at least level 11 or higher, and get Sailor Moon up to level 13 or higher. When you are done, go left, down, left, up, and you will arrive at an open area. Go left and you will find 4 treasure chests. Open them all to get an Apple J., Toilette, Harisen, and an Amulet. Equip the Amulet on Sailor Saturn by unequipping the Bracelet. When you are done, go right and enter the door.
Go up, left, and up. Enter the door.
You will be in Dr. Tomoe's lab. A Yes or No option will appear on whether you want to try and convince Tomoe or not. If you choose No, then you don't have to fight a boss. But if you choose Yes, the evil spirit will be flushed out by the Ginzuishou and confront you.
Boss: Stone Danger
Very easy, especially now that Sailor Saturn is much stronger than before! :) Just keep using Moon Spiral Heart Attack and Death Reborn Revolution until this boss is defeated.
Rewards after winning: 65 EXPs, 12,000 Yen
Hotaru starts crying for her papa, but he tells her that he's returning to his original destiny. He is happy that Hotaru is at peace. With that said, Dr. Tomoe disappears. Sailor Moon consoles Saturn, who is very sad to have lost her papa once again.
Usagi's house
Hotaru is sleeping on Usagi's bed. Luna asks Usagi about the evil spirit that possessed Dr. Tomoe. Usagi says it was just their imaginations. It's all sealed up now, all that sadness. Luna tells Usagi that Dr. Tomoe did come back to life. Usagi tells Luna to stop talking about that, as she doesn't want to remember anything that happened then. Luna tells Usagi it's too heart breaking just to ignore. Maybe if they went back to the Tomoe Labs they could find some clues. The Tomoe Labs has been purified by the Ginzuishou so the enemies can't get in, which means they would be free to investigate. Usagi agrees.
Hotaru wakes up from her sleep and wants to go with Usagi too. Usagi refuses, especially under such circumstances. Hotaru makes her point that she couldn't save her father, but she wants to at least save Chibi-usa. She earnestly asks if she can go along with Usagi. Usagi agrees to take Hotaru with her.
Get out of Usagi's room, go down the stairs, and exit Usagi's house. Go down, right, and keep moving until you enter the next screen.
The town of Juuban
Juuban
Keep moving right until you enter the next screen. Go right and find the Bus Stop sign. Stand next to it, and the bus to Infinity Academy will arrive. Hop on the bus.
Infinity Academy
Go left, then down.
Outside Tomoe's Lab
Go down, right, down, left, and up. You will find Sailor Uranus and Neptune, who are ready to help save Chibi-usa. Usagi doesn't know where Chibi-usa is, but Uranus says that they have found the enemies' hideout. Chibi-usa must be hidden there. Usagi and Hotaru transform into Sailor Senshi and the four Senshi teleport to Chibi-usa's location.
Chibi-usa's Forest
Chibi-usa's Forest
Sailor Moon asks how Uranus and Neptune know that Chibi-usa is here. Uranus answers that the two of them found the enemies while checking out the hideout. They sensed both homesickness and evil energy. Because of that, they know that Chibi-usa must be somewhere in this area. They don't know exactly where she is, but they're going to look for her, and they thought it would be faster if they brought Sailor Moon along.
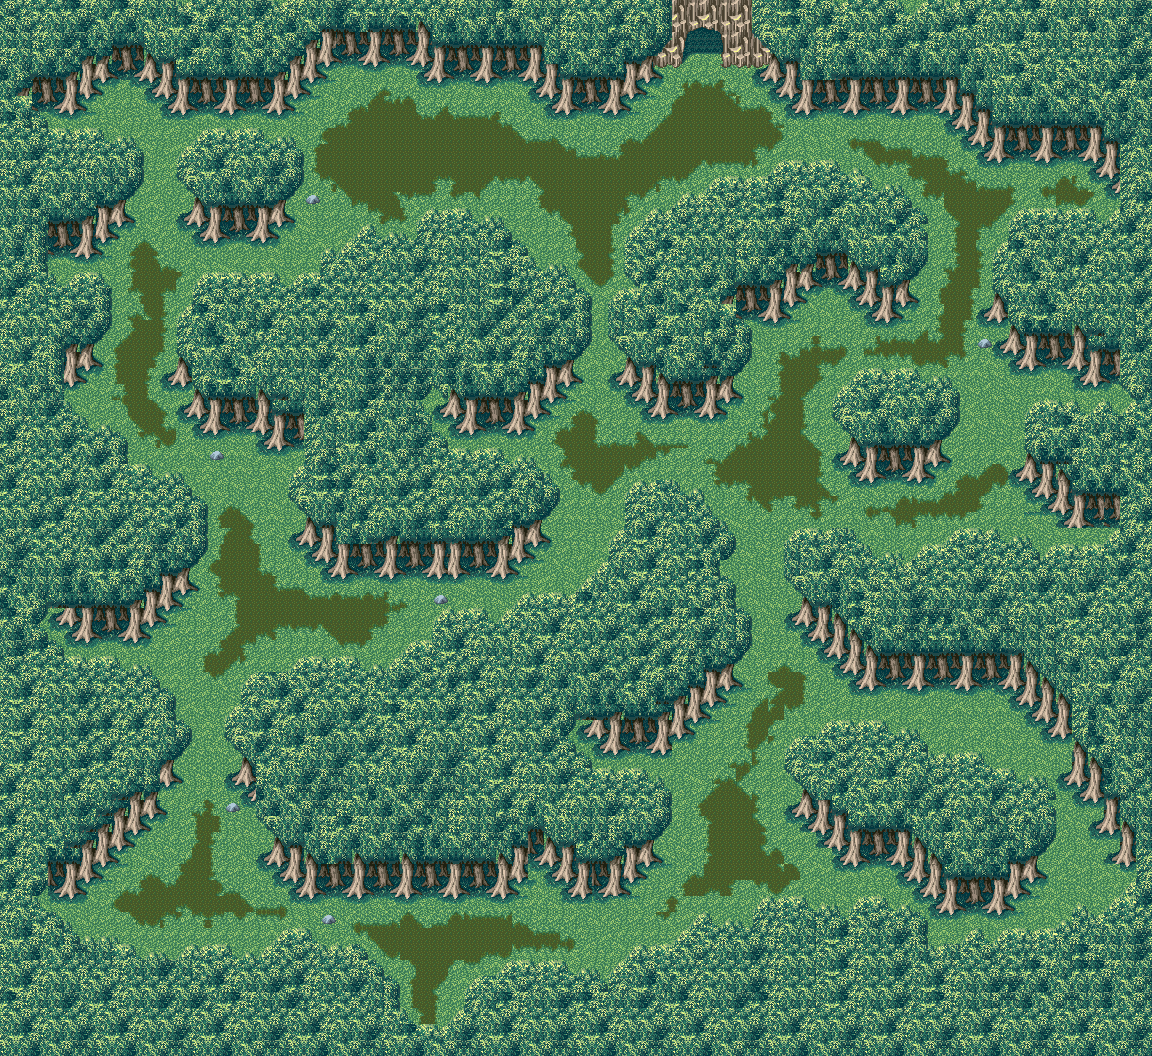
You'll see a Luna-P at the right, so save now. Keep moving right and you will see a traveling merchant. This time, however, he will not heal your party. Instead, he will be selling very useful items. I suggest you buy 15 Bentou Sets, 10 Colognes, 15 BathMedics, 20 Manicures, and 20 F.Creams. These items will be very helpful. Now open the menu screen and go to Formations. Make sure Saturn and Uranus are at the front, while Neptune is at the back.
When you are done, go left and keep moving until you see a treasure chest. Open it to get a Cologne. Go up, go left until you can't move, and go up (in the trees). Press X (A) and you will find another Collective Item called an Excellent Doll! Go right, up, and follow the path until you come to an intersection - left, up, or right. Go left and you will see a treasure chest that contains a Special Juice. Now go up the intersection and you'll see a treasure chest at the left that contains a Nigiri Set. Go right and you'll see another treasure chest that contains a Violet Rose. Now keep going right, until you see Chibi-usa.
Talk to her and Sailor Moon is glad to see that she's alright. She asks who the unconscious kid is and Chibi-usa answers that his name is Anshar. He protected her but was beaten up. He helped Momo-chan to her house. They came here by flying up into the sky. Uranus teases that Anshar must be Chibi-chan's Knight in Shining Armor, which makes Chibi-usa blush a scarlet. Neptune says Anshar has the power to defeat enemies, and the power to fly. But she wonders what he is.
Anshar's mind starts speaking. He says if the Princess is set free from Sin's influence, then it's over.
Chibi-usa tells Neptune that Anshar helped her and she wonders if her friends suspect him. Neptune is suspecting him, but thanks Anshar for protecting Chibi-usa. Sailor Moon tells Chibi-usa that it's up to them to carry things on from here. But Chibi-usa refuses, as she wants to go along with Sailor Moon and others. Sailor Moon tells her that it's too dangerous at this point, but Chibi-usa really wants to go along with her. Sailor Moon asks if Anshar should come along as well. Uranus tells her that he should since the Barazuishou seems to have responded to Chibi-usa's Ginzuishou. Saturn agrees and tells Sailor Moon that it would be too dangerous if Chibi-usa stays behind. Sailor Moon finally agrees and decides to take Chibi-usa along with them. Chibi-usa transforms into Sailor ChibiMoon and you get control of Sailor Moon again.
Keep going right, and you will find a treasure chest that contains some Amber Earrings. Open up the menu screen and go to Formations. Make sure Sailor ChibiMoon and Sailor Neptune are at the back, in Cluster, while Sailor Uranus and Sailor Saturn are at the front. Sailor Moon should be in the middle. Next, equip the Amber Earrings on Uranus by unequipping the Anklet.
Now keep going down until you can't go any further, then go right and search in the tree corner, pressing X (A), and you will find some Aqua Earrings. Equip the Aqua Earrings on Neptune by unequipping either the Bracelet or Tiara.
Go left, down, then go all the way left until you reach a dead-end. Go up a bit, into the trees, and press X (A). You should find a Life Crepe.
From where you just got the Life Crepe, head to the east, past the group of trees, until you see a chest that contains a Bread Roll.
Go left, and keep going up and you'll see a Luna-P. Save if you want, then go right, up, left and you'll see the entrance to the cave (where we found Chibi-usa). Don't go in yet. Build up on your levels first. Get up to at least level 16 or higher and you'll be in great shape. When you are done training, go inside the cave.
D-Point, North Pole
 Cave
Cave
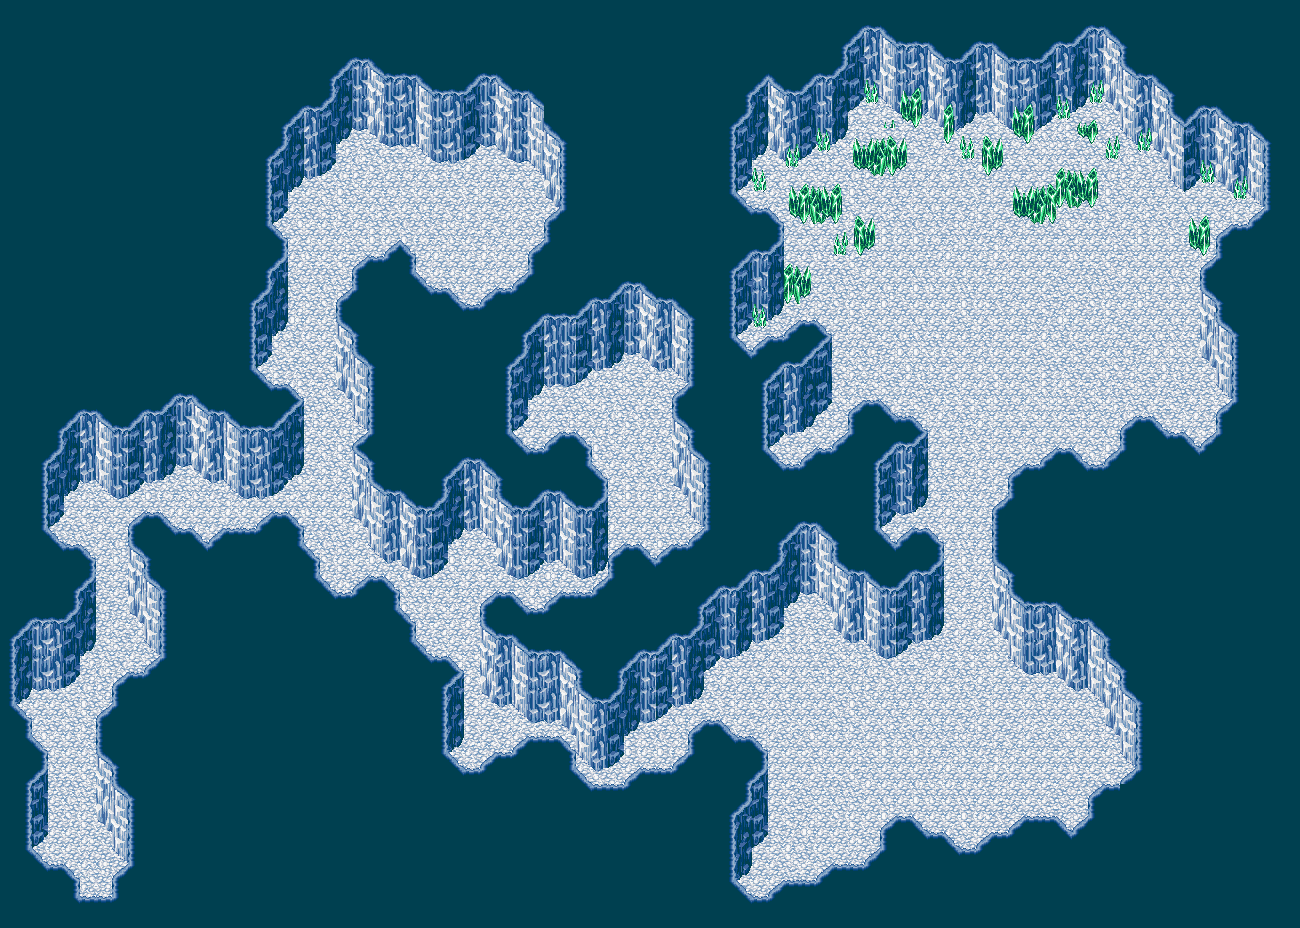
Upon entering, Sailor Moon finds this cave similar to the D-Point, North Pole. She starts to think that Queen Beryl has been revived.
Go up, and another scene will start.
Sailor Uranus seems to have noticed all the enemies in here are the enemies they have seen before. Sailor Moon answers that they are Queen Beryl's Youma, which surprises Uranus. Uranus asks if that is the same Queen Beryl that destroyed the Moon Kingdom and the Silver Millennium. Sailor Moon wonders why there are youma like that here. Maybe Beryl HAS been resurrected. Sailor Moon has to show everyone here that she can protect them.
Anshar's mind starts speaking again. He wonders what the Sailor Senshi' power is called. And if they have the Ginzuishou, why have they come here? Anshar figures that the Princess' Ginzuishou has reacted to the Barazuishou. Did this happen while Anshar was unconscious?
When you get control of Sailor Moon, just keep moving right, and a fight will begin.
Boss: DD Girls 1
Her attacks are not too damaging. Use Saturn's Death Reborn Revolution, Neptune's Deep Submerge, Sailor Moon's Moon Spiral Heart Attack, Uranus' World Shaking, and use a physical attack with ChibiMoon. I defeated this boss in just 2 turns, so good luck!
Rewards after winning: 89 EXPs, 5000 Yen, LifeWater
After the battle is over, you'll be at an intersection - either up or down. Go up and you'll find a treasure chest that contains a Diamond Tiara, which is a very useful accessory for Sailor Moon. Equip her that by unequipping the Tiara. When you are done, go down the intersection this time, and another boss battle will begin.
Boss: DD Girls 2
Very easy, especially since Sailor Moon has gotten quite a power boost from the Di. Tiara. Beat this boss the same way you did DD Girl 1. You shouldn't have to heal in this battle at all. The only thing you should watch out for is her Toxic Mist, which can cause poison. Other than that, you've got this one made.
Rewards after winning: 104 EXPs, 6500 Yen
After the battle is over, you will come across an intersection - right or down. Go right, follow the path, and you will see a treasure chest that contains a LifeWater.
Now go down the intersection, and another boss battle will start.
Boss: DD Girl 3
Slightly tougher than the other two DD Girls, but still easy. Use Saturn's Revolution, Neptune's Submerge, Sailor Moon's Spiral Heart Attack, Uranus' World Shaking, and a physical attack with ChibiMoon. Watch out for her Tempest attack, as it might do good damage to one of your weaker characters (ChibiMoon).
Rewards after winning: 99 EXPs, 7200 Yen, S.Cake
After the battle is over, you'll see a treasure chest right in front of you. Open it and you'll get a Manicure. Now move right, and another boss battle will begin.
Boss: DD Girl 4
This one is not as tough as the previous one you just fought. But still, don't underestimate your enemy! Use the same attacks you did before on the other DD Girls and you will win. I knocked this one out in two turns also.
Rewards after winning: 104 EXPs, 7000 Yen, Confetti
Now just keep moving right, and you will confront the final DD Girl.
Boss: DD Girl 5
Defend Sailor ChibiMoon because this boss' WhirlWind Cut or physical attacks are almost guaranteed to kill her. But other than that, this last DD Girl is easy although the toughest one of all. Use the same strategy you used against the other 4 DD Girls and you will triumph over this one.
Rewards after winning: 110 EXPs, 10,000 Yen, Yaga Soup
Sailor Moon wonders how the DD Girls have returned. Uranus begins to realize that Queen Beryl HAS been revived. Neptune points out that in the middle of the cave, we shall find the answer to that secret.
You'll see the Luna-P, so save now. Go down and at the bottom left, you will find a treasure chest that contains a Pork Chop.
Now go back to where the Luna-P is and stand in front of it. Go right and you will find the middle of the cave.
ChibiMoon senses that the Barazuishou's reaction is coming from inside of the middle wall. Sailor Moon is confused, as she points out that this is a dead end. Uranus doubts it, as there might be a hidden entrance. Neptune thinks maybe someone put this illusion here as a trick, but Saturn says that they should believe in Chibi-usa's Ginzuishou. Sailor Moon goofs around, still not believing that there is a hidden entrance.
The wall abruptly opens itself, revealing the secret entrance! Sailor Moon starts sensing something very evil. And who better could it be other than Queen Beryl, hmm? That's right, she has returned! Queen Beryl has been waiting for the Sailor Senshi and the Princess. Sailor Moon states that Beryl was sealed away. Beryl replies yes, but once again, she stands before us. Because destiny has changed, the destiny which said that Beryl was defeated by Sailor Moon has changed. With that said, Queen Beryl wants to kill Sailor Moon!
Boss: Queen Beryl
Very easy. Queen Beryl's attacks are weak and she will be defeated in two turns if you use the same moves that you've used against the 5 DD Girls. Once again: Death Reborn Revolution, Deep Submerge, Moon Spiral Heart Attack, World Shaking, and physical attack with ChibiMoon.
Rewards after winning: 120 EXPs, 5000 Yen, Fragrance
Queen Beryl can't defeat Sailor Moon in her present form. She asks Sailor Moon why she has been waiting for her here. Sailor Moon wonders why and Luna figures it out. There has been some weird things happening recently. Magnetic radiation has been confusing people all over the place. And it seems to be coming from Mt. Fuji. Beryl says it's true. Here in the cave, all kinds of Metallia-sama like powers are coming together. And if the evil powers come together, Beryl will change!
Boss: Super Beryl (Invincible)
I'm not sure what to go by here. I've been hearing rumors lately implying that this first battle against Super Beryl is beatable, despite the fact she's invincible. Maybe it is if you use cheat codes. But I never cheat in this game. Anyway, Super Beryl is unbeatable and there's no way you can win. It doesn't matter what attacks you use - her Evil Surge will knock all your characters out. Just lose the match.
Rewards after winning: n/a
Thankfully, that loss didn't result as a game over! Sailor Moon exclaims that it's hopeless since Beryl is too powerful. Luna abruptly comes up with an idea and quickly tells Sailor Moon and MiniMoon to use their Ginzuishous together on Beryl. The Ginzuishous of both the present and the Future! Sailor Moon and ChibiMoon use their Ginzuishous on Beryl, but it didn't affect her! Sailor Moon wonders why the Ginzuishous didn't work. Queen Beryl answers that the Ginzuishou cannot be used against her, since she escaped from her destiny of being beaten BY the Ginzuishou. Luna exclaims that Beryl is bluffing and so, we should hang in there!
Boss: Super Beryl
NOW she can be beaten. She has weaker attacks now, like WhirlWind Cut and Illusion. Defend ChibiMoon, and have everyone else use their techniques on Super Beryl. You could use the MoonCup1 on Sailor Moon, then try out Rainbow Moon Heart Ache as it does excellent damage. Heal if your HP is below 120, and if you run out of EP, use Cologne. I didn't have to heal, as I defeated this boss in 4 turns.
Rewards after winning: 1000 EXPs, 30,000 Yen, Manicure
After the battle is over, Queen Beryl dies once again! Sailor Moon asks if her friends are alright. Uranus almost used up all of her strength and so did Neptune. Sailor Moon is glad that everyone is still alive. Luna prompts the Senshi that it's not over yet, as they still haven't found the Barazuishou.
The Senshi move front and what they see right before them are multiple forgeries of the Barazuishou! Sailor Moon wonders which one of these is the real Barazuishou. ChibiMoon examines the fake Barazuishous and soon unveils the real one!
Suddenly, Anshar appears and tells Lady Serenity (ChibiMoon) that she cannot have the Barazuishou. ChibiMoon wonders what he's talking about and demands the Barazuishou. Anshar knows that if he gave the Barazuishou to her, then Tuxedo Kamen would come back to his senses. And he and ChibiMoon would have to fight one another. Anshar doesn't want that to happen. Sin appears, much to Sailor Moon's surprise. She remarks that Anshar has finally opened his eyes. Anshar tells ChibiMoon that nothing would make him happier than to have them fight together. But she was too proud. With that said, Sin and Anshar teleport off, taking the Barazuishou away with them.
ChibiMoon is utterly dismayed, wondering why Anshar has betrayed her. Sailor Moon figures that Anshar is with the enemies. She tells ChibiMoon to cheer up. It was a mistake anyone could have made. Neptune says it can't be helped. It looked like Anshar wanted to help the Senshi. He took advantage of ChibiMoon liking him. Luna agrees and suggests that they should go home now since the Inner Senshi should have returned by now. Saturn consoles ChibiMoon.
Luna will prompt you to save the game. Save now and this is the end of Chapter 3! But stay tuned, since this game is starting to heat up.